Page 1
™
Wind Lift
Copyright 2012, TeacherGeek Inc. System Patent Pending.
Perpendicular Blocks
Quantity: 4
300mm (~12in) Dowels
Quantity: 4
Hole Plate
Quantity: 1
100mm (3in) Slide Stop
Cut to 6mm
(1/4in) Sections
Quantity: 1
5/8 Screw, #10
Quantity: 2
Nut, #10
Quantity: 2
5/8 Screw, #6
Quantity: 1
Mini Hub Cover
Quantity: 1
Mini Hub Base
Quantity: 1
150mm (10in) Skewers
Quanity: 10
Wire Roll or 4.5in Wire
Quantity: 1
Portion Cup
Quantity: 1
Cutting
Built it, test it, change it. TeacherGeek™ components
allow you to design and engineer your most imaginative
mechanisms. Combine them with other materials.
Dowels and Connector Strips
can be cut with a multi-cutter
(best method), saw, side cutters
or pruning shears. Wear safety
glasses when cutting.
Dowels
Dowels vary in diameter.
Some may be too large
or small to use.
Multi-Cutters
Cutters
Reamer
Screwdriver
Pliers
Cut
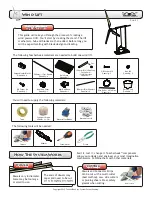
The following TeacherGeek materials are needed to build one wind lift:
The following tools will be needed:
The Activity
This guide will take you through the process of creating a
wind powered lift. You’ll start by creating the stand. The lift
mechanism, hub and blades are then added. Before long you
will be experimenting with blade design and loading.
Tape
String or thread
450mm (~1.5ft)
Material for Blades
Material to Lift
You will need to supply the following materials:
How The System Works
The ends of dowels may
taper and need to be cut

