background image


EE 

C o p y r i g h t  ©

 4I P N E T ,  I N C .  A l l  r ig h ts  r es er v ed .                                          


4ipnet WHG30 1  

  Q u ic k  I ns ta l l a tio n Gu id e 

ENGLISH 

4ipnet


W H G 30 1  S e c u r e  W L A N  C o n t r o l l e r


C o mmo n  Settin g s 

< Configuration Wizard > 


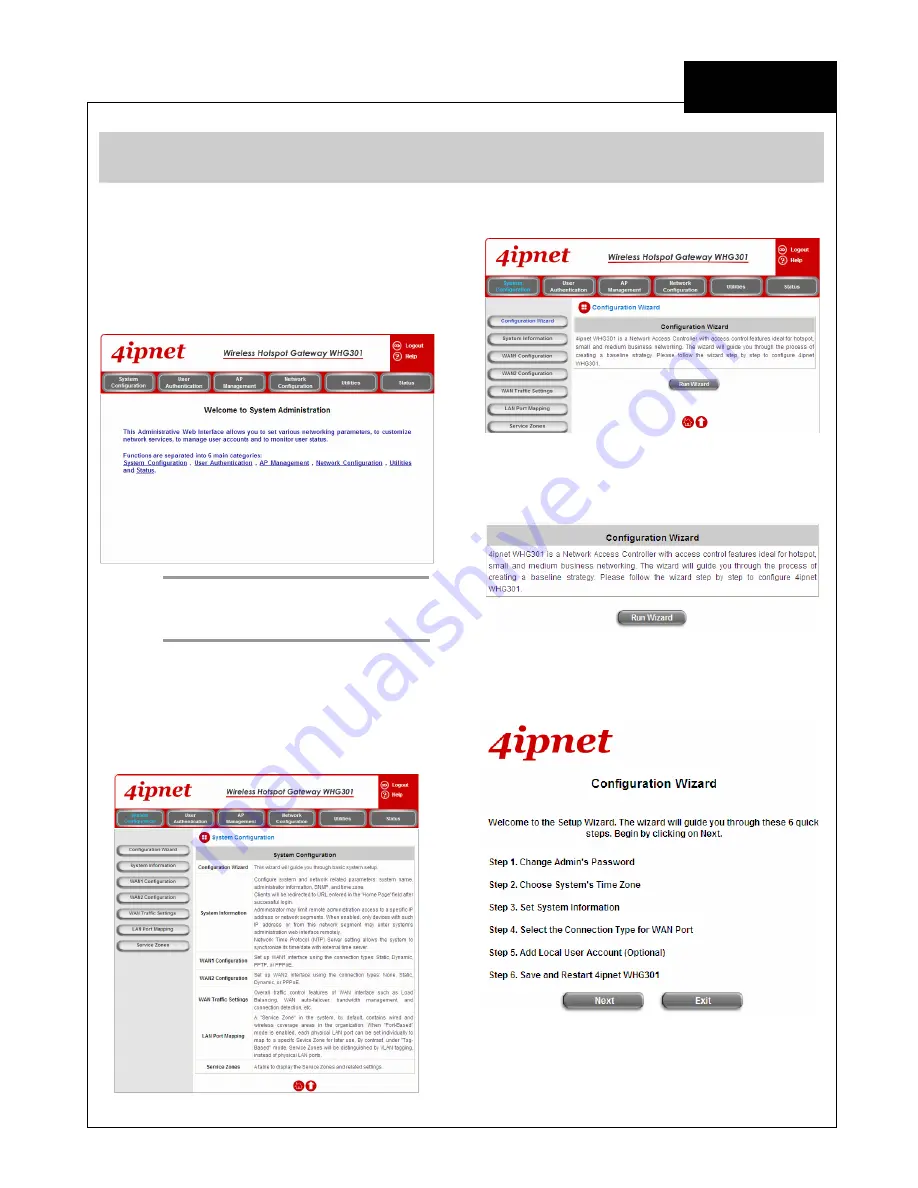
1.  After a successful login to WHG301, a web 

management interface with a welcome 
message will appear. 


Note:


To logout, simply click the 

Logout

 icon 

on the upper right corner of the interface 
to return to the login screen. 

 
2.  To quickly configure WHG301 by using the 

Configuration Wizard

, click


System 

Configuration


from the top menu to go to the 

System Configuration

 page.   


3.  Then, click 

Configuration Wizard

 on the left.


4.  Click the 

Run Wizard

 button to begin the 

Configuration Wizard


5.  The 

Configuration Wizard

 will appear in a 

pop-up browser window.   

6.  Click 

Next

 to begin. 


Содержание WHG301

Страница 1: ...V1 0 0 4ipnet WHG301 Quick Installation Guide ...

Страница 2: ...rsuant to part 1 5 of the F C C R ules These limits are designed to prov ide reasonable protection against harmful interference in a residential installation This eq uipment generates uses and can radiate radio freq uency energy and if not installed and used in accordance with the instructions may cause harmful interference to radio communications H owev er there is no guarantee that interference ...

Страница 3: ...recommended to use all the supplies in the package instead of substituting any components by other suppliers to guarantee best performance System Overview Front Panel 1 LED Indicators There are four kinds of LED Power Status WAN and LAN to indicate different status of the system 2 WAN1 WAN2 Two WAN ports 10 Base T 100Base TX RJ 45 are connected to a network 3 LAN1 LAN8 Client machines connect to W...

Страница 4: ... other end of the Ethernet cable to an xDSL cable modem or a switch hub on the LAN of a company organization The LED of this port should be on to indicate a proper connection 3 Connect an Ethernet cable to one of the LAN1 LAN8 Ports on the front panel Per your needs connect the other end of the Ethernet cable to an administrator PC for configuring the WHG301 system an AP for extending wireless cov...

Страница 5: ...G301 introduces the concept of Service Zones multiple virtual networks each with its own definable access control profiles This is very useful for hotspot owners seeking to provide different customers or staff with different levels of network services The following diagram is an example of WHG301 set to manage the Internet and network access services at a hotspot venue Web Management Interface 4ip...

Страница 6: ...there will be a Certificate Error because the browser treats WHG301 as an illegal website Please press Continue to this website to continue The default user login page will then appear in the browser For more information please see 4 2 5 Additional Configuration WHG301 User s Manual If you can t get the login screen the reasons may be 1 The PC is set incorrectly so that the PC can t obtain the IP ...

Страница 7: ...h a welcome message will appear Note To logout simply click the Logout icon on the upper right corner of the interface to return to the login screen 2 To quickly configure WHG301 by using the Configuration Wizard click System Configuration from the top menu to go to the System Configuration page 3 Then click Configuration Wizard on the left 4 Click the Run Wizard button to begin the Configuration ...

Страница 8: ...o modify the settings please click the Back button to go back to the previous step Step 2 Choose System s Time Zone Select a proper time zone from the drop down list box Click Next to continue Step 3 Set System Information Home Page Enter the URL that users should be initially directed to when successfully authenticated to the network NTP Server Enter the URL of the external time server for 4ipnet...

Страница 9: ...ection Click Next to continue Step 4 Cont Set WAN1 Port s Static IP Address Enter the IP Address Subnet Mask and Default Gateway provided by your ISP Click Next to continue For Dynamic IP Address or PPPoE Client follow the instructions showing on the screen Step 5 Add Local User Account Optional A new user can be added to the Local User database To add a user here enter the Username e g test Passw...

Страница 10: ...an be used to login to the system to verify whether the configuration is done properly First connect a client device e g laptop PC to one of the LAN1 LAN8 Ports If the client device already has a static IP setting the administrator can enable the IP PnP function to support static IP without changing the IP setting on client device Otherwise the client device must be set to use DHCP in TCP IP confi...

Страница 11: ...uccessful page appearing means WHG301 has been installed and configured successfully Now you are connected to the network and Internet Service Zone AP Management 4ipnet WHG301 has introduced an important new concept called Service Zone For how to set up Service Zones please refer to the User s Manual Appendix C Service Zone Deployment Example Port based Service Zone and Tag based Service Zone WHG3...

Отзывы: