background image


Quick Installation Guide


H S G1 0 0  

Wireless Hotspot Gateway

 E N GL I S H


Copyright © 4IPNET, INC. All rights re se rv e d . 


C o p y r i g h t  N o t i c e  


This  document  is  protected  by  USA  copyright  laws  and  other  laws  and  is  the 
property of  4 I P N E T,  I N C . Y ou may not copy,  reproduce,  distribute,  publish,  display,  
perf orm,  or modif y any part of  this publication in any f orm or by any means without 
prior  written  permission  f rom  4 I P N E T,   I N C .  Y ou  may  not  alter  or  remov e  any 
copyright or other notice f rom copies of  the content. All other brand and product 
names  are  claimed  or  registered  mark s  of   their  respectiv e  companies  or 
organiz ations. 
 
All rights reserv ed. 


To  download  up-to-date  v ersion  of   this  document,   please  v isit 
www.4 ipnet.com. 


Содержание HSG100

Страница 1: ...HSG1 00 V2 0 0 ...

Страница 2: ...reproduce distribute publish display perf orm or modif y any part of this publication in any f orm or by any means without prior written permission f rom 4 I P N E T I N C Y ou may not alter or remov e any copyright or other notice f rom copies of the content All other brand and product names are claimed or registered mark s of their respectiv e companies or organiz ations All rights reserv ed To ...

Страница 3: ...ith minimum distance 20cm between the radiator your body FCC Class B Statement This equipment has been tested and found to comply with the limits for a Class B digital device pursuant to Part 15 of the FCC Rules These limits are designed to provide reasonable protection against harmful interference in a residential installation This equipment generates and uses radio frequency energy and if not in...

Страница 4: ...1 2001 A2 2003 including the followings EN 61000 3 2 EN 61000 3 3 EN 61000 4 2 EN 61000 4 3 EN 61000 4 4 EN 61000 4 5 EN 61000 4 6 EN 61000 4 11 Safety EN 60950 1 2001 A11 2004 Caution This declaration is only valid for configurations combinations of software firmware and hardware provided and supported by 4ipnet Inc The use of software or firmware not provided and supported by 4ipnet Inc may resu...

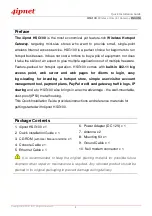
Страница 5: ... to login easy logo loading for branding a hotspot store simple user visitor account management tool payment plans PayPal credit card gateway traffic logs IP sharing and etc HSG100 also brings in an extra advantage the wall mountable dust proof IP50 metal housing This Quick Installation Guide provides instructions and reference materials for getting started with 4ipnet HSG100 Package Contents 1 4i...

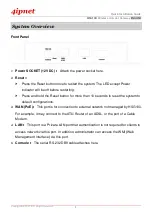
Страница 6: ...Press and hold the Reset button for more than 10 seconds to reset the system to default configurations 3 WAN PoE This port is for connection to external network not managed by HSG100 For example it may connect to the ATU Router of an ADSL or the port of a Cable Modem 4 LAN This port is a Private LAN port that authentication is not required for clients to access network via this port In addition ad...

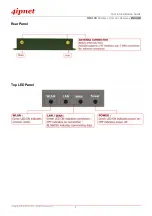
Страница 7: ...Quick Installation Guide H S G1 0 0 Wireless Hotspot Gateway E N GL I S H Copyright 4IPNET INC All rights re se rv e d 3 Rear Panel Top LED Panel ...

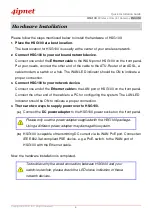
Страница 8: ...HSG100 to your network device Connect one end of the Ethernet cable to the LAN port of HSG100 on the front panel Connect the other end of the cable to a PC for configuring the system The LAN LED indicator should be ON to indicate a proper connection 4 There are two ways to supply power over to HSG100 a Connect the DC power adapter to the HSG100 power socket on the front panel Please only use the p...

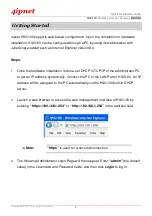
Страница 9: ...ware installation is done set DHCP in TCP IP of the administrator PC to get an IP address dynamically Connect the PC to the LAN Port of HSG100 An IP address will be assigned to the PC automatically via the HSG100 built in DHCP server 2 Launch a web browser to access the web management interface of HSG100 by entering https 192 168 1 254 or http 192 168 1 254 in the address field Note https is used ...

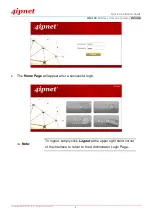
Страница 10: ...spot Gateway E N GL I S H Copyright 4IPNET INC All rights re se rv e d 6 4 The Home Page will appear after a successful login Note To logout simply click Logout at the upper right hand corner of the interface to return to the Administrator Login Page ...

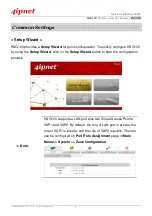
Страница 11: ...uration To quickly configure HSG100 by using the Setup Wizard click on the Setup Wizard button to start the configuration process Note HSG100 supports a LAN port plus two Virtual Access Points VAP1 and VAP2 By default the role of LAN port is private the role of VAP1 is private and the role of VAP2 is public The role can be configured on Port Role Assignment page of Main Menu System Zone Configurat...

Страница 12: ...ime zone from the Time Zone drop down list box to set up the system time Client s browser will be redirected after logging in the system successfully The redirected page can be assigned instead of the default setting of client s browser by enabling Homepage Redirect URL and configuring a desired one Click Next to continue For security concern it is strongly recommended to change the administrator ...

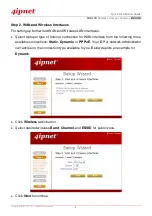
Страница 13: ...Wireless LAN interfaces Select a proper type of Internet connection for WAN interface from the following three available connections Static Dynamic or PPPoE Your ISP or network administrator can advise on the connection type available to you Below depicts an example for Dynamic Click Wireless radio button Select desired wireless Band Channel and ESSID for public zone Click Next to continue ...

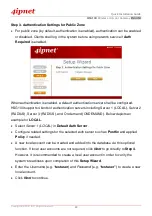
Страница 14: ...ervers including Server 1 LOCAL Server 2 RADIUS Server 3 RADIUS and On demand ONDEMAND Below depicts an example for LOCAL Select Server 1 LOCAL in Default Auth Server Configure related settings for the selected auth server such as Postfix and applied Policy if needed A new local account can be created and added into the database via this optional function If local user accounts are not required cl...

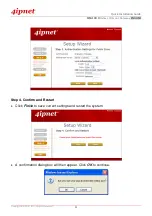
Страница 15: ...Wireless Hotspot Gateway E N GL I S H Copyright 4IPNET INC All rights re se rv e d 11 Step 4 Confirm and Restart Click Finish to save current settings and restart the system A confirmation dialog box will then appear Click OK to continue ...

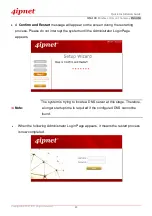
Страница 16: ... on the screen during the restarting process Please do not interrupt the system until the Administrator Login Page appears Note The system is trying to locate a DNS server at this stage Therefore a longer startup time is required if the configured DNS cannot be found When the following Administrator Login Page appears it means the restart process is now completed ...

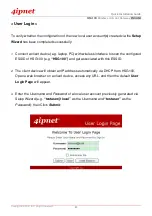
Страница 17: ...ce e g laptop PC with wireless interface to scan the configured ESSID of HSG100 e g HSG100 and get associated with this ESSID 2 The client device will obtain an IP address automatically via DHCP from HSG100 Open a web browser on a client device access any URL and then the default User Login Page will appear 3 Enter the Username and Password of a local user account previously generated via Setup Wi...

Страница 18: ...d username is userid postfix where userid is the user ID and postfix is the name of the selected authentication option 3 Exception The postfix can be omitted only when the default authentication option is used For example LOCAL is the default authentication option at this system therefore you may enter either testuser or testuser local in the Username field Congratulation The Login Success Page wi...

Страница 19: ...quired to access the network via wired and wireless Administrator can access the Web Management Interface WMI of HSG100 through the wired LAN port Waiters or waitresses can send orders back to the electrical menu system via wireless hand set devices In Public Zone by default Authentication Required is enabled so clients are required to get authenticated successfully before surfing the Internet In ...

Страница 20: ...Guide H S G1 0 0 Wireless Hotspot Gateway E N GL I S H Copyright 4IPNET INC All rights re se rv e d 16 Step 2 Configure Public Zone Settings Click the System menu Click the Zone Configuration tab Click Configure of Public ...

Страница 21: ... Public Zone Enter a desired ESSID for Public Zone in Wireless Settings HSG100 2 Click Apply at the bottom of this page Step 4 Configure ESSID for Private Zone Enter a desired ESSID for Private Zone in Wireless Settings HSG100 1 Select a desired Security Type for Private Zone for security enhancement if needed Click Apply at the bottom of this page ...

Страница 22: ...k Installation Guide H S G1 0 0 Wireless Hotspot Gateway E N GL I S H Copyright 4IPNET INC All rights re se rv e d 18 Step 5 Confirm Configuration and Restart Click Restart once all configurations are done ...

Страница 23: ...m A confirmation message of Do you want to restart the system will appear Click Yes to start the restarting process A confirmation dialog box will then pop out Click OK to continue Please do not interrupt the system during the restarting process For further configuration and information please refer to the User s Manual P N 2 0 0 2 0 0 9 0 7 1 8 ...

Отзывы: