background image


10


!  If  any  wire  remainder  still  sticks  out  of  the  sealing  you  can  cover  them  up 
with an additional coat of PediGel. 


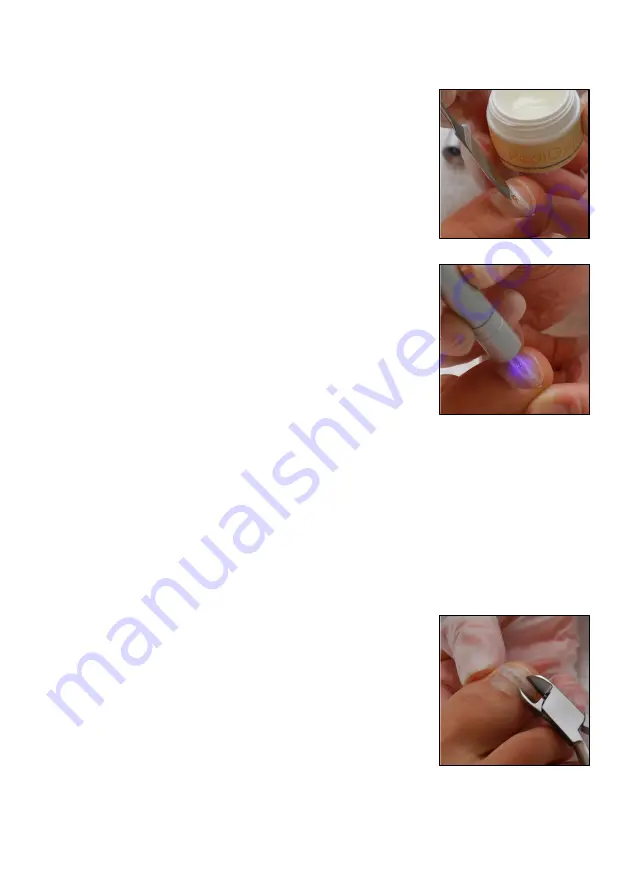
  To  remove  it,  the  brace  is  loosened  from  the  edges 

with the cutting pliers. 


 With a file or a cutter glue residues can be removed. 


4. Cover up the wire connection 
 

  To  seal  the  podofix  brace  use  the  spatula  to  apply  a 

drop  of  PediGel  sealant  and  mould  it  into  the 
indentation of the podofix brace. 
 

 Turn the UV microlamp on by turning the front of the 

torch clockwise and harden the PediGel by beaming the 
UV  lamp  on  it  for  20  seconds.  Hold  the  microlamp  at 
the  smallest  possible  distance  (maximum  5  mm)  away 
from the sealing point. 
 

 Wipe the brace off after the PediGel hardens with the 

alcohol swab. 
 

REMOVING THE PODOFIX BRACE 

Содержание podofix

Страница 1: ...Instructions for the podofix nail correction brace...

Страница 2: ...2...

Страница 3: ...glue on brace 5 How to avoid problems when using 6 Attaching the podofix brace 7 Preparations 7 Gluing the brace on 8 Activating the brace 9 Covering the wire connection 10 Removing the podofix brace...

Страница 4: ...for insertion of the wire hooks Duration of treatment Depending on the conditions the podofix active glue on brace remains on the nail for a period of from two weeks to about two months and can then...

Страница 5: ...to the nail and of an activation wire that tightens the brace after it is glued on After attaching it the wire lies in the indentation of the plastic pad and can be sealed smooth The podofix active gl...

Страница 6: ...ed the brace will not stick to the nail Please heed the dosage instructions on page 8 in these Instructions Glue flask Hold the rim and the threads of the bottle free from glue otherwise the cap can p...

Страница 7: ...more than the body of the nail is curved and it will then better fit onto the nail This is particularly important on the ends of the brace Clean the nail Before gluing on the brace the nail must be th...

Страница 8: ...es to the nail Then press especially on the edge areas of the brace Apply the brace Position the brace on the side of the nail that is more heavily ingrown Hold the brace by the wire handle and place...

Страница 9: ...t will rip off and the brace will be unusable 3 Activate the brace Turn the loop Insert the tension tool into the wire loop Turn the tension tool at least one and at most two complete rotations until...

Страница 10: ...nection To seal the podofix brace use the spatula to apply a drop of PediGel sealant and mould it into the indentation of the podofix brace Turn the UV microlamp on by turning the front of the torch c...

Страница 11: ...m with four LR41 round cells The batters can be accessed by opening the rotating cap on the back SAFETY POINTERS Safety pointers about the glue CAUTION The glue can within seconds glue skin and eyelid...

Страница 12: ...12 3TO GmbH Birkenstra e 8 D 82041 Deisenhofen 0049 89 20353444 Fax 0049 89 20353445 info 3to gmbh de www podofix de 3TO GmbH 2010...

Отзывы: