

3
MP8670/MP8745 Multimedia Projector Quick Setup Instructions
Projector Packout
Projector Controls
Remote Control Transmitter
Packout Items Not Shown:
• PS/2 mouse cable ............. (1)
• ADB mouse cable ............ (1)
• Serial mouse cable ........... (1)
Optional Accessories:
• RS-232 control cable ........ (1)
• USB mouse cable ............. (1)
Power Cord
US, UK, Europe
3-Conductor
Video/Audio Cable
Multimedia Projector
Remote Control
Transmitter
VGA Cable
(15-15 pin M/M)
3
MP8670
+
ZOOM
MUTE
INPUT
STANDBY ON
RESET
POWER
LAMP
TEMP
MENU
+
FOCUS
3
MP8670
PORTABLE PROJECTOR
VIDEO
RGB
LASER
FOCUS
BLANK
AUTO
OFF
TIMER
Pin P
MUTE
+
–
FREEZE
MAGNIFY
+
–
VOLUME
STANDBY/ON
POSITION
ZOOM
+
–
MENU
RESET
MAC
Adaptor
ON
OFF 2
6
5
4
3
S-Video Cable
(S-Video mini DIN4-pin)
Stereo
Mini-Jack Cable
MP8670
+
ZOOM
MUTE
INPUT
STANDBY ON
RESET
POWER
LAMP
TEMP
MENU
+
FOCUS
MP8670
PORTABLE PROJECTOR
+
ZOOM
MUTE
INPUT
STANDBY ON
RESET
POWER LAMP
TEMP
MENU
+
–
–
FOCUS
EPS-134A
(A)
(B)
(C)
(E)
(D)
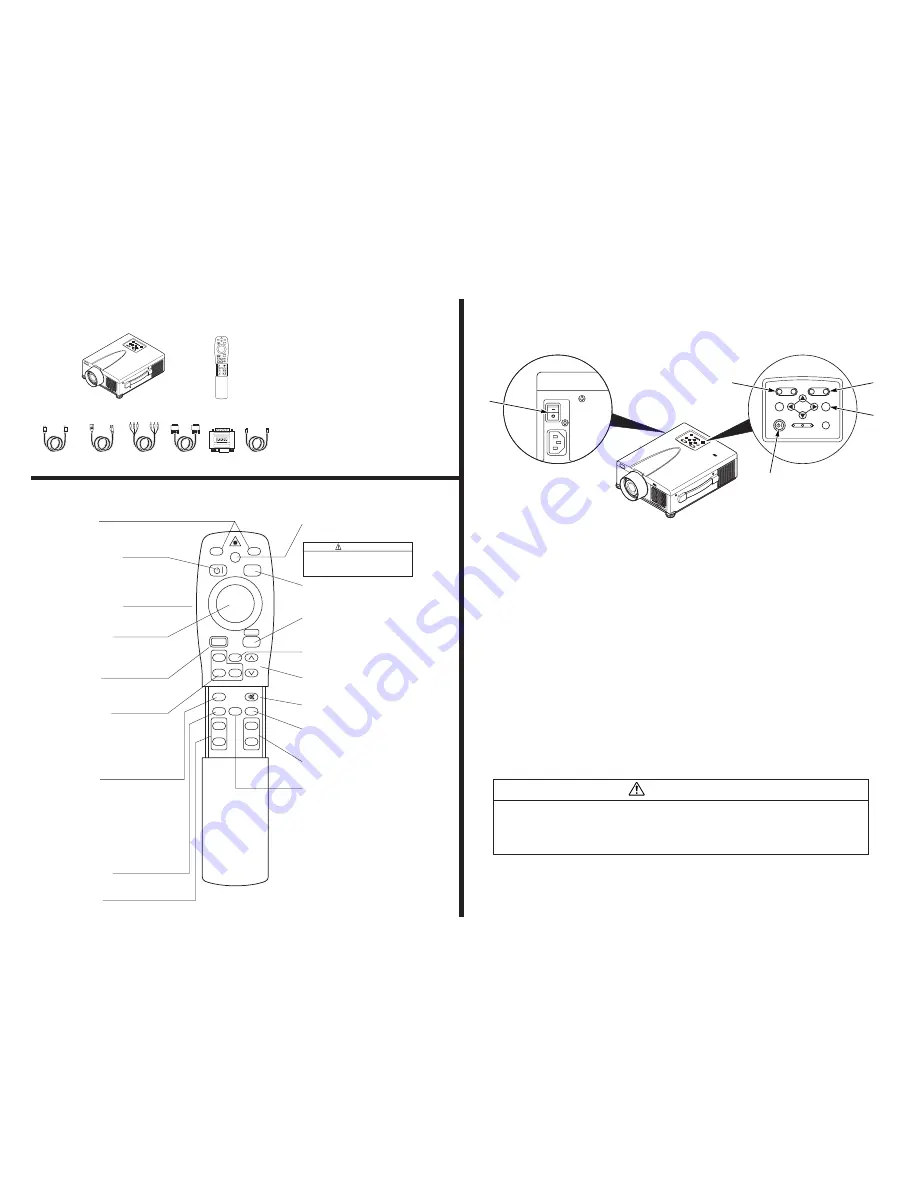
Start Up Procedure
1. Make all cable connections and line hookups with the power off.
2. Turn the POWER SWITCH
(A)
of the projector on.
3. Press the STANDBY/ON button.
(B)
4. Adjust the screen size by pressing the ZOOM button.
(C)
5. Adjust the focus by pressing the focus button.
(D)
6. Turn on all connected equipment.
7. Press the INPUT button
(E)
on the projector or the INPUT SELECT
(VIDEO or RGB) button on the remote to select the source of the
signal to be projected on the screen.
Shutdown Procedure
1.
Press and hold the STANDBY/ON button for 1 second.
2.
Turn the MAIN POWER SWITCH of the projector off.
3.
Attach lens cap to protect projection lens.
4.
Disconnect cables if moving projector to new location.
Do not turn off the POWER SWITCH before pressing the STANDBY/ON
button. After the STANDBY/ON button is pressed, the fan rotates for about
1 minute to cool the projector.
Caution
VIDEO
RGB
LASER
FOCUS
BLANK
AUTO
OFF
TIMER
PinP
MUTE
+
–
FREEZE
MAGNIFY
+
–
VOLUME
STANDBY/ON
POSITION
ZOOM
+
–
MENU
RESET
INPUT
Press the VIDEO or RGB button to select
the input source. Press again to select the
next source.
STANDBY/ON
Set main power switch to ON. Press
STANDBY/ON button to begin projection
mode (lamp on) or press and hold button
for 1 second to switch to standby mode
(lamp off).
LEFT MOUSE
Press for left mouse button function
(located on back of remote).
DISC PAD
∗
For menu screens, press DISC PAD to
select menu items. For non-menu screens,
press DISC PAD for mouse shift or left
mouse button function.
MENU
∗
Press to display the menu screen and light
the remote control buttons. The button light
automatically turns off.
MAGNIFY
∗
Press the MAGNIFY (+) to enlarge the
center of the display image. Press again
to enlarge image to maximum of 4X
magnification. Press MAGNIFY (-) to
reduce the display image size. Press OFF
to return to normal image size. (Can be
used with the POSITION button to select
the image area being magnified.)
PinP
∗
Press the PinP button to display a video
signal as a small picture-in-picture screen
in the corner of an RGB display. Press it
again to enlarge the picture-in-picture
screen size. Press it a third time to exit
the PinP screen and turn the function OFF.
The position of the picture-in-picture
screen can be controlled by pressing the
POSITION button or from the Image menu.
(Both RGB and Video signals must be
present for the picture-in-picture screen to
operate.)
BLANK ON
Press button to turn ON/OFF the screen
blanking function.
FOCUS
Press (+) or (-) to adjust the image
sharpness.
LASER
Press and hold down button to project laser
pointer.
CAUTION
To prevent injury to eyesight, do not point
laser beam at other persons or look directly
into laser beam.
POSITION
∗
Press button then use DISC PAD to move
image (RGB signal only) up/down or left/
right.
RESET
∗/
LEFT MOUSE BUTTON
For menu screens, press button to return to
initial settings. For non-menu screens, press
button for right mouse button function.
FREEZE
∗
Press button to turn ON/OFF the freeze
image function.
VOLUME
∗
Press up to increase or down to decrease
speaker volume.
MUTE
∗
Press button to turn the mute function
(speaker sound) ON/OFF.
TIMER
∗
Press button to turn the menu screen timer
ON/OFF.
The timer does not display when
the blank function is active.
ZOOM
Press (+) to increase or (-) to decrease the
size of the displayed image.
AUTO
∗
Press the AUTO button to activate the auto
sync function. The message “AUTO IN
PROGRESS” will display for several
seconds as the projector adjusts the V.
POSIT, H.POSIT. H.PHASE, & H. SIZE
settings. The Auto Sync function will not
operate under the following conditions:
•
Initial screen message NO INPUT IS
DETECTED or SYNC IS OUT OF
RANGE is displayed.
•
Freeze and Magnify functions have not
been turned off prior to pressing AUTO
button.
•
Software application running on your
computer is not set to maximum
screen size prior to pressing AUTO
button.
∗
This button will not function if the
message "NO INPUT IS DETECTED" or
"SYNC IS OUT OF RANGE" is displayed.


