background image

31

3M

 Pocket Projector MP220

© 2012 3M. All Rights Reserved.

Notifications Area

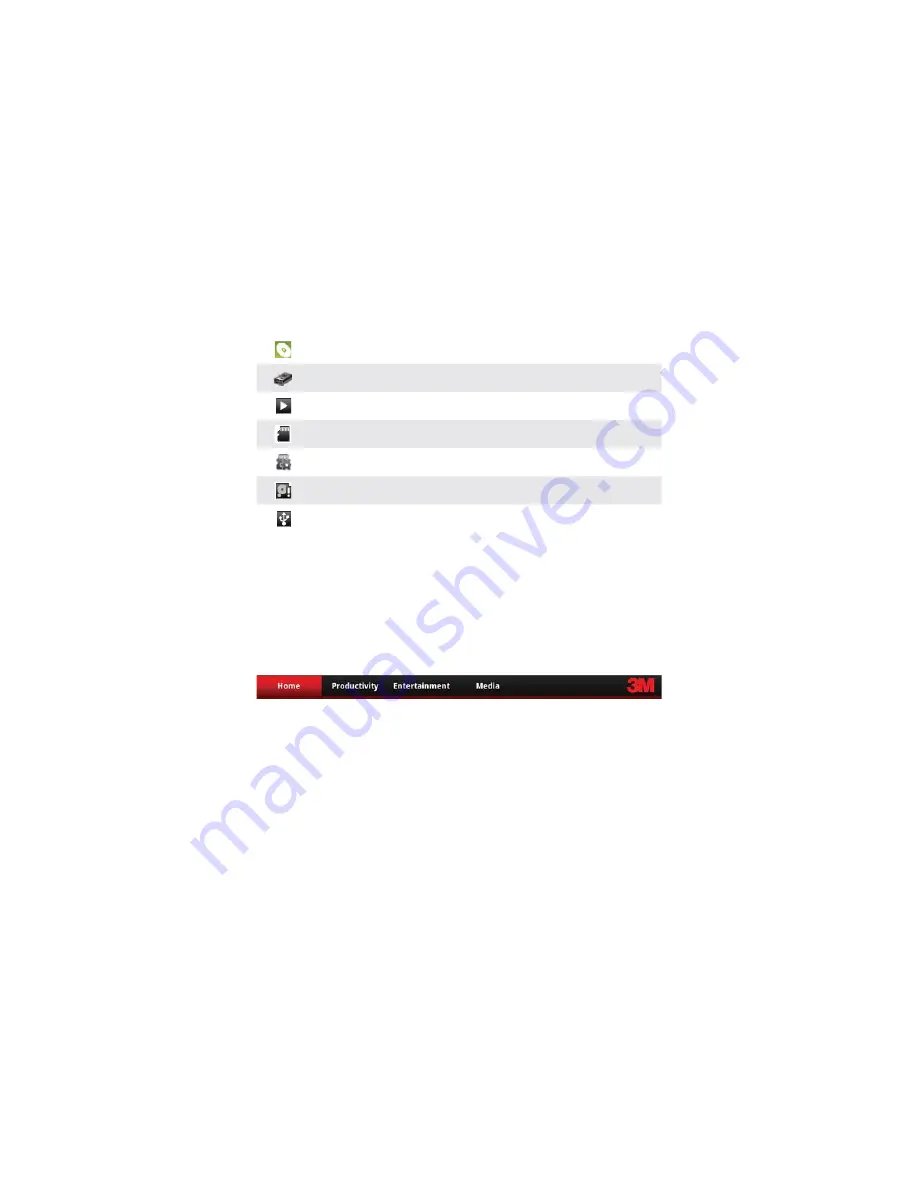
The Notification icons make you aware of events occurring in the background. Here 
is a list of icons you may see.  For more information, see Notifications. 

Media is being scanned

Video/VGA Pass Through is ready for use

Song is playing

The projector has unmounted the SD card or the SD card is safe to remove 

Mounting SD Card

SD card is full

USB is connected

Home Screen Tabs

The Home Screen Tabs provides a way for you to organize the available shortcuts 
and widgets. Each tab contains its own set of shortcuts and widgets and they can 
be arranged in any order. 

Additionally, you can modify the tab labels and decide whether or not the label 
appears on the Home Screen. See “Customizing the Home Screen” on page 32.

Selecting a Home Screen Tab 

t

Mouse Mode:

 Position the mouse pointer over the tab and press the Touch 

Sensor.

t

Using Trackball Mode:

 Move your finger across the Touch Sensor and you 

will see a gray highlight moving from one tab to another. Highlight the tab and 
press the Touch Sensor to select it. The tab will turn red and the shortcuts 
and widgets in the tab will appear.

Содержание MP220

Страница 1: ...operator s guide ...

Страница 2: ...nts 10 Parts of Projector 11 Getting Started 13 Home Screen 29 Remote Control Optional Accessory 41 Search 43 Opening and Switching Applications 44 Transferring Files to the Projector 45 Video VGA Pass Through 49 Gallery 55 Music 63 Video Player 71 Clock 74 Documents To Go 78 Word To Go 86 Sheet To Go 97 Slideshow To Go 120 PDF to Go 130 Fun Pack 133 Cannon Ball Pro 137 Settings 138 Limited Warran...

Страница 3: ... or any contrary statements contained on your purchase order shall have no force or effect unless expressly set forth in a written agreement signed by an authorized officer of 3M Technical Support For technical support call 1 866 631 1656 or email meetings mmm com Intended Use Statement The 3M Mobile Projector MP220 is designed to operate with the 3M specified battery and 3M power adapter in normal ...

Страница 4: ...ector Retain these instructions for future reference Explanation of Signal Word Consequences m Warning Indicates a potentially hazardous situation which if not avoided could result in death or serious injury and or property damage m Caution Indicates a potentially hazardous situation which if not avoided may result in minor or moderate injury and or property damage c Warning Hazardous voltage ...

Страница 5: ...d part prior to use To reduce the risk associated with fire and explosion t Do not immerse the projector or battery in any liquid or allow either to get wet t Use only 3M approved power supply and lithium ion battery provided t Do not disassemble or short circuit the battery t Do not dispose of the battery by incineration or fire t Do not operate this projector in any environment above 30 C 86 F t D...

Страница 6: ...sitive and negative terminals t Do not connect the battery directly to a wall outlet Use only the 3M specified wall charger or automobile charger t Do not strike throw or subject the battery to physical shock t Do not pierce the battery or break it open t Keep batteries out of the reach of children t Do not recharge the battery near a heat source or in extremely hot conditions t Do not use the batt...

Страница 7: ...afe volume level To reduce the risk associated with environmental contamination t Dispose of all system components in accordance with applicable government regulations To reduce the risks associated with LED bright light t Do not stare directly into the projector lens To reduce the risks associated with tripping and falling t Position the charging cord and data cables so that they are not a trippi...

Страница 8: ...3 9 m Warning t Use a specified charger t Do not throw the battery into fire or heat t Do not short circuit the battery terminals t Do not disassemble the battery Charging Specification Standard Charge 11 1V 1 3A Cut Off Voltage 8 5V Max Charge 12 3V 1 3A LED Light Output CLASS 1 LED PRODUCT IEC60825 1 1993 A1 1997 A2 2001 Maximum Radiant Power 1 693 mW ...

Страница 9: ...g instructions carefully Overview Product Features The 3M Mobile Projector MP220 makes it easy to project information almost anywhere you go instantly all with 65 lumens of brightness It is perfect for presenting to small groups The 3M MP220 projector includes these features Battery or plug in for super mobility 2 hour battery life ensures that it s ready when you are WSVGA resolution for crisp im...

Страница 10: ...M Pocket Projector MP220 2012 3M All Rights Reserved Package Contents 1 3M MP220 Projector 2 Power Adapter 3 Outlet Adapters 4 4 USB Cable 5 Product Warranty and Safety Guide 6 Quick Start Guide 1 2 3 4 6 5 ...

Страница 11: ...or audio out output 5 Volume up Turns up speaker or audio out output 6 Infrared sensor Accepts commands from 3M remote control Remote control sold separately 7 Air vents Do not block fans or vents while projector is operating or cooling down This will cause projector to overheat and automatically turn off 8 Status indicator LED 9 Focus wheel Adjusts to sharpen image 10 Cooling fans Do not block fa...

Страница 12: ...ges the battery using the 3M power supply 16 microUSB Transfer files back and forth from your computer to the projector Attach a USB computer mouse or keyboard Access files on USB memory stick 17 VGA AV Connect the 3M VGA or Video cable to your computer DVD Player or other video device and project its image Cables sold separately 18 Tripod Mount 19 Earphone jack Attach earphones or computer speakers...

Страница 13: ...es When the power adapter is first shipped it is fitted with a blank outlet adapter This must be removed before installing an outlet adapter Installing an Outlet Adapter onto the Power Adapter 1 Press the PUSH button on the underside of the power adapter 2 Remove the blank outlet adapter by sliding up 3 Select the outlet adapter that will plug into your wall outlet and align to the power adapter 4 S...

Страница 14: ... and discharge the battery by turning on the projector at least once a month t When storing the battery for more than a month store it at 50 charge The battery is at 50 charge when half of the battery icon is green t Do not store the battery when it is fully discharged It will lose the ability to charge Removing the Protective Film Remove the protective film by pulling in the direction shown below ...

Страница 15: ... battery out Install the battery 1 Orient the battery so that its contacts line up with the battery contacts inside the projector 2 Place the battery into the battery compartment 3 Slide the battery cover on 4 Replace the battery cover securing the screw using a Phillips head crosshead screwdriver ...

Страница 16: ...other end of the power adapter to the electrical outlet 4 The status indicator will change to amber while the battery is charging 5 Allow three hours to fully charge the battery When charging is complete the status indicator will turn off 110 240 VAC 50 60 Hz Battery Charging Notes t If the projector power is off allow three hours for the battery to fully recharge If the projector power is on the ...

Страница 17: ...on until the device options menu appears on the screen 2 Select Power off from the menu 3 Confirm that you wish to turn the projector off by selecting OK Turning the Lamp On and Off You can turn the projector s lamp off without turning the projector off Press and quickly release the power button and the projector s lamp with turn off The projector lamp will turn off immediately while the cooling fa...

Страница 18: ...t a diagonal image of 10 to 70 inches 254 1778 mm Refer to the chart for associated dimensions Image Size Diagonal Width Height Distance 10 in 25 4 cm 8 5 8 in 21 9 cm 5 1 16 in 12 8 cm 18 1 2 in 46 7 cm 20 in 50 8 cm 17 1 4 in 43 8 cm 10 1 8 in 25 7 cm 36 3 4 in 93 5 cm 30 in 76 2 cm 25 7 8 in 65 7 cm 15 1 4 in 38 5 cm 55 1 4 in 140 2 cm 40 in 101 6 cm 34 1 2 in 87 7 cm 20 1 4 in 51 4 cm 73 5 8 i...

Страница 19: ...eserved Adjusting the Focus Rotate the focus wheel to sharpen the image Attaching the Tripod Optional Accessory The bottom of the projector includes a tripod socket that fits most standard camera tripods including the optional 3M tripod 78 6972 0073 7 ...

Страница 20: ... A V port Display Volume Level Press the volume up or down button to display the volume slider Increase or Decrease Volume Press the volume up button to increase the audio volume or press the volume down button to decrease the audio volume Quickly Increase or Decrease Volume Press and hold the volume up button to quickly increase the audio volume or press and hold the volume down to quickly decrea...

Страница 21: ... applications 3 Menu Button Press to open the menu for the current screen or application 4 Search Button Press to open search Press and hold to open the Mouse mode menu 5 Back Button Press to open previous screen or close onscreen keyboard Home button Returning to the Home screen Switching between recently used applications Menu Button Opening options and context menus Press and hold to display th...

Страница 22: ...e mouse pointer selector or cursor on the screen The Touch Sensor has two modes mouse point and trackball t When in mouse pointer mode you move your finger across the Touch Sensor to control the mouse pointer or small arrow on the screen Use the mouse pointer to select screen menu items launch applications and move icons t When in trackball you move a red or gray selector Switching Between Mouse an...

Страница 23: ...ger across the Touch Sensor and move the pointer Moving the mouse pointer Lightly drag your finger across the Touch Sensor in the direction you want the pointer to move Clicking an item on the screen Use the pointer and Touch Sensor to click application icons and settings icons or type letters using the onscreen keyboard Move the pointer to where it is over the item and press the Touch Sensor to cl...

Страница 24: ...reen The selected item is highlighted gray red blue or yellow depending on the screen app or dialog Select an item Gently move your finger across the Touch Sensor in the direction of the item you wish to select This works best if you move your finger up and down or right and left rather than diagonally Click Press the Touch Sensor to select the item You will feel and hear the Touch Sensor click Doub...

Страница 25: ...r Locale To set the locale click Locale This chooses the language that the projector s interface and menus display The following screen will appear Click on your locale If your locale does not appear on the screen you may have to scroll down Note You can customize some parts of the projector s interface such as the tabs on the Home Screen that do not change with this setting ...

Страница 26: ...26 3M Pocket Projector MP220 2012 3M All Rights Reserved Setting the Date and Time To set the date and time click Date Time The following screen will appear Setting the Time Click on Set time ...

Страница 27: ...rved The following screen will appear Click the or symbols to change the hours and minutes To change from AM to PM click on AM Once finished click Set Note Clicking and holding or will cycle through the hours or minutes Setting the Date Click on Set date ...

Страница 28: ...d year Once finished click Set Note Clicking and holding or will cycle through the days months or years To return to the Home screen press the Home key on the navigation panel Note You can change the language and date or time at any time by going into Settings and choosing Language or Date Time For more infomation see Settings on page 138 ...

Страница 29: ...To learn more about customizing the Home screen please see Customizing the Home Screen on page 32 The Status bar is at the top of the Home screen The Status bar displays information about the projector and its status For more information about the status bar and icons you might see there see Status Bar on page 30 1 2 3 4 5 1 Status bar Provides information about the projector such as connectivity ...

Страница 30: ...tatus bar shows the time battery status brightness level and system notifications It appears at the top of every screen The status icons appear on the right and notification on the left 1 2 1 Notifications Area 2 Projector Status Area Projector Status Area The Status icons provide information about the projector such as battery level and projector brightness Below is a list and their descriptions Bat...

Страница 31: ... a way for you to organize the available shortcuts and widgets Each tab contains its own set of shortcuts and widgets and they can be arranged in any order Additionally you can modify the tab labels and decide whether or not the label appears on the Home Screen See Customizing the Home Screen on page 32 Selecting a Home Screen Tab t Mouse Mode Position the mouse pointer over the tab and press the ...

Страница 32: ...r to move the item into the trash can located at the bottom in the center of the screen t Trackball Mode Highlight the item Press and hold the Touch Sensor Select Remove Move a Shortcut or Widget t Mouse Mode Move the mouse pointer over the item to be removed Press and hold the Touch Sensor Drag your finger across the Touch Sensor to move the item towards the location where you want to place it t T...

Страница 33: ... is where you customize the appearance of the Home Screen items and tabs Customizing the Home Screen Tabs You can change the names show or hide the tabs and set the default tab selected Home Screen Tab Label 1 Press the Home button 2 Press the Menu button 3 Select Launcher Settings 4 Select Tab Settings and then Tab Names 5 Select the tab name you want to rename The Rename dialog will appear 6 Sel...

Страница 34: ... Default Tab 5 Place a checkmark beside the tabs you want to appear on the Home screen Customizing the Icons on the Home Screen You can customize the shortcut and widget icons that appear on the Home Screen You can choose to either display or not display the labels icon shadows or large icons Change Icon Appearance Settings 1 Press Home 2 Press Menu 3 Select Launcher Settings 4 Select Appearance S...

Страница 35: ...the software 1 Press the Home button 2 Press the Menu button 3 Select Restore Defaults 4 Select OK when the Restore Defaults dialog appears About 3M Launcher This opens the About 3M Launcher screen which displays the software version and copyright information App Launcher The App Launcher is located at the bottom center of the Home screen When opened the App Launcher screen opens and displays all ...

Страница 36: ...fic item the screen For example you can select a file from a list in the video play and press Menu and the delete option will appear Notifications Icons that appear in the Notifications area of the status bar make you aware of events occurring in the background Notifications will appear when t a new video device is connected or t the SD card is inserted Opening the Notification Panel 1 Press the Home bu...

Страница 37: ...uch Sensor highlight the text field A red border around the text field and a cursor will appear Press the Touch Sensor to open the onscreen keyboard The Touch Sensor will automatically switch to Mouse mode while the onscreen keyboard is displayed Typing into Text Field 1 Select a text field 2 Using the Touch Sensor move the mouse pointer over a letter and press the Touch Sensor to type text 3 While y...

Страница 38: ...placed by it 3 When you press the spacebar the suggestion bar will offer some common punctuation marks Entering New Words into the Dictionary The onscreen keyboard makes suggestions based on words stored in the dictionary You add new words to the dictionary as follows 1 Type a word 2 Move the mouse pointer over the word in the suggestions area 3 Press and hold the Touch Sensor until the text is no...

Страница 39: ...g Numbers and Symbols Select the Numbers and Symbols key and the keyboard will switch to number and symbols Press the Alt key to display addition symbols Entering Accented and Alternate Letters Move the mouse pointer over the letter and press and hold the Touch Sensor A context menu will display the accented or alternate letter available Type the letter by moving the mouse pointer over the letter ...

Страница 40: ...h other punctuation marks and symbols Select one and it will be entered into the text field Changing the Keyboard Language You can change the keyboard language using the spacebar You select the language you want to use in the Input Languages selection in the Language keyboard Settings 1 Position the mouse pointer over the spacebar 2 Press down and slide your finger across the Touch Sensor You will s...

Страница 41: ...nds to projector 2 Arrow Buttons Moves selector or cursor on the screen 3 Standby Turns the projector s lamp off or on 4 OK Button Press to select or click an item 5 Home Button Press to open the Home screen Press and hold to open recently used applications 6 Rewind Rewinds video and music during playback 7 Volume Down Decreases the audio volume 8 Menu Button Press to open the menu for the current...

Страница 42: ...on the projector The receiver is beside volume up button Note Sun light and some indoor lighting may reduce the range of the remote control Replacing the Remote Battery Replace the battery in the remote control with a CR2025 battery 1 Remove the battery and battery tray by holding latch toward the center of the tray and then pull the tray out of the remote control latch 2 Place the new battery int...

Страница 43: ...t Entry Box 2 List of results 3 List Scroll Arrows 4 Keyboard Searching for a file or app Press the Search button and the Search app will appear with a keyboard When the Search app appears the Touch Sensor automatically switches to Mouse mode for use with the keyboard Viewing more results On either side of the results list there are arrows Press the arrow and the next set of results will slide into...

Страница 44: ... Pass Through While you are viewing VGA Pass Through you can quickly switch back to the opened document Note There is no need to exit applications because the projector s operating system manages the applications running in the background so that they do not consume resources unnecessarily Open and Close the App Launcher Select the Launcher Icon from the Home screen to open it Adding an applicatio...

Страница 45: ...projector s internal memory Using the microSD Card Slot The 3M MP220 projector has a microSD card slot that supports SDHC and can read up to a 32 GB card You can either place files on the card before you insert it into the projector s card slot or while the projector is connected to a USB port on a computer The projector must access or mount the file system on the SD Card after a microSD is inserted...

Страница 46: ...icroSD card the projector must be told to unmount the card You will use the SD card Local Storage Settings screen in Settings to unmount the card Unmount microSD card 1 Press the Home button 2 Press the Menu button 3 Select Settings 4 Select SD card local storage 5 Select Unmount SD card and select OK in the Unmount SD card dialog 6 A SD card safe to remove notification will appear in the status ba...

Страница 47: ...ransfer Files Using USB 1 Turn on the projector 2 Connect the USB cable to the projector 3 Connect the USB cable to the computer The projector screen will display the USB Mass Storage screen 4 Select the Turn on USB Storage button and the USB Android icon will turn red 5 Select OK when the Turn on USB storage dialog appears The projector will be detected as a removable drive labeled Internal by th...

Страница 48: ...roperly eject the removable drives on your computer or you may lose data Eject both removable drives on your computer operating system as follows Eject a drive on computers running Microsoft Windows Open Windows Explorer right click the drive and click Eject from the context menu Eject a drive on a computer running Apple Mac OS 10 Open finder choose the drive and then choose File Eject ...

Страница 49: ...Through application Open Video VGA Pass Through Plug a cable into the VGA A V port on the projector or select the app icon in App Launcher Exit Video VGA Pass Through Select the Exit button on the message screen or press the Home button Notifications The Video VGA Pass Through will report changes using notification when the application is not displayed on the screen When you select the notification i...

Страница 50: ...f you get a Save Failed message the projector s memory is being scanned or the microSD card is not mounted Settings These settings let you change how you view the video image coming from a video source The projector displays a WSVGA image or 1024x600 pixels which is a 17 10 image Signal Aspect Ratio Change the aspect ratio width versus height of the image When you choose one of the aspect ratios t...

Страница 51: ...the Home screen will display The 3M MP220 was designed to operate with 3M VGA and AV cables only Tip The video output on some devices is turned off by default Please refer to the device s documentation for details on enabling the video output Connecting to a Composite Video Device requires optional accessory For standard composite video input you must purchase the optional 3M MP220 Composite AV Ca...

Страница 52: ...video device manufacturer Once you have the AV cable use the cable adapters to connect the video device cable and the projector cable Connecting to a Component Video Device requires optional accessory For component video input you must purchase the optional 3M MP220 Component AV Cable This cable sends a higher quality video signal for the best possible image 1 Connect the component AV cable to the...

Страница 53: ...V monitor or your projector and may be purchased from the video device manufacturer Once you have the AV cable use the cable adapters to connect the video device cable and the projector cable Some video devices by default will not output a video signal The video device s manual should provide instructions on how to change the video output setting Connecting to a Computer requires optional accessor...

Страница 54: ...puts 3 Set the computer resolution to one of the supported resolutions Description Resolution width x height Refresh Rate VGA 640 x 480 60 Hz SVGA 800 x 600 60 Hz XGA 1024 x 768 60 Hz WXGA 1280 x 768 60 Hz 1366 x 768 60 Hz 1024 x 600 60 Hz 1280 x 960 60 Hz 1440 x 900 60 Hz MAC 640 x 480 67 Hz 832 x 624 75 Hz 1152 x 870 75 Hz ...

Страница 55: ...in a Folder Album Note Video will not appear in Gallery If you want to view a list of videos or play a video you need to use Video Player Opening Gallery Open Gallery to view albums or folders of your pictures 1 Select Gallery from App Launcher or your Home Screen 2 Once open Gallery displays pictures from the project s internal memory and SD card Gallery may take seconds to a few minutes to displ...

Страница 56: ...llery 2 Select the Album that contains pictures you want to view The screen will display pictures in a chronological ordered grid The Album name will appear at the top of the screen 3 Select the photo you want to view 1 2 3 4 1 Name of Album 2 Picture Thumbnails 3 Highlighted Picture 4 Grid Stack View switch ...

Страница 57: ...elect an Album 2 Move the mouse pointer to the Album View switch 3 Press the Touch Sensor 4 Move the switch to change the view to either grid or stacks view Note If you don t see the mouse pointer switch mouse modes For more detail on switching the mouse modes see Switching Between Mouse and Trackball Mode Getting Details about an Album 1 Press the Menu button twice 2 Place a checkmark on the albu...

Страница 58: ...rk on the albums and files you want to delete 3 Select Delete and a confirmation dialog will appear 4 Select Confirm Delete Select Cancel if you do not want to delete the albums and files Pictures Use the Gallery to view picture s on the internal memory and the SD card You can view edit or delete these pictures Viewing and Browsing Pictures 1 Open Gallery 2 Open an album 3 Select a picture 1 2 3 4 5 1...

Страница 59: ...album t Mouse Mode In one motion press and swipe your finger from across the Touch Sensor from right to left to reveal the next picture in the album or folder Swipe your finger left to right to reveal previous picture in the album or folder t Trackball Mode Move your finger across the Touch Sensor in the direction you want to scroll the page Working with Pictures as a Group or Individually You can wo...

Страница 60: ... picture Getting Details About a Picture 1 Select a picture 2 Open the controls 3 Select More 4 Select Details A dialog will appear with the file title type date album location and GPS location Rotating Pictures 1 Select the picture and open the control 2 Select More and a menu opens 3 Select either Rotate Right or Rotate Left The picture will automatically save in the new orientation Zooming a Pic...

Страница 61: ...an the image Watching a Slideshow of Your Pictures 1 Select the picture and open the control 2 Select Slideshow A slideshow will begin 3 Press the Touch Sensor to end the slideshow Setting Picture as Wallpaper You can set a picture as the wallpaper on the Home screen 1 Select a picture from the Gallery 2 Open the control 3 Press Menu button 4 Select More button 5 Select Set as wallpaper The pictur...

Страница 62: ...ouse pointer near the orange vertical lines and press and hold the Touch Sensor Move your finger to the right and left to change the size of the cropped area t To increase or decrease the vertical size move the mouse pointer near the orange horizontal lines to change the size of the cropped area 4 Select Save The projector will save a copy of the cropped picture Delete a Picture You can delete a pi...

Страница 63: ...ital Rights Management Once Music finds audio files it looks for t The folder containing the songs and uses the folder s label as the album name t A folder containing the album folder and uses the folder s label as the artist name t Album art The album art work must be in the same folder as the music and be labeled albumart jpg For best performance place you music library into one folder such as a f...

Страница 64: ...atalogs your audio files The more audio files the longer it will take MUSIC to open Most of the time Music will open within a few seconds Return to the library from any Music Screen Press the Menu button and then select Library or press the Back button Searching for a Artist Album or Song 1 Begin the search t Mouse Mode Select the sorted list you want to search t Track Mode Highlight the sorted list...

Страница 65: ... a song Press and hold the Touch Sensor and the album dialog will appear Select Delete and then select OK in the delete confirmation dialog Delete a song while in the playback screen Press the Menu button Select Delete and then select OK in the delete confirmation dialog Playing Music The MP220 has built in speakers and headphone jack for listening to music You can use the Volume and Volume buttons ...

Страница 66: ...ed 2 1 9 3 4 5 6 7 8 12 11 10 13 14 1 Now Playing 2 Album artwork 3 Now Playing List 4 Shuffle All 5 Repeat Current or Repeat All Songs 6 Artist 7 Album 8 Song 9 Play time 10 Playback Progress Slider 11 Previous Song 12 Play Pause 13 Next Song 14 Song Time ...

Страница 67: ...While the Music is on the screen select the Now Playing tab Play All Songs in an Album 1 Select the Albums tab in the Library screen 2 Select the album and a list of songs within the album will appear 3 Press the Menu button and select Play all Music will start playing all of the songs in the album starting with the first song in the list Music will stop when it reaches the end of the album or when...

Страница 68: ... Party Shuffle playlist as a new playlist While in the Now Playing screen press the Save as playlist Type a name for the new playlist using the onscreen keyboard and select Save Adding a Song to the Party Shuffle Playlist t Mouse Mode Move the mouse pointer over the song in the list Press and hold the Touch Sensor and the album context menu will appear Select Add to playlist and then select Current ...

Страница 69: ...a Song to a Playlist 1 Select the playlist name 2 Add songs to the playlist t Mouse Mode Move the mouse pointer over the song Press and hold the Touch Sensor and the album context menu will appear Select Add to Playlist Repeat these steps to add additional songs to the Playlist t Trackball Mode Select a song Press and hold the Touch Sensor and the album dialog will appear Select Add to Playlist Re...

Страница 70: ...ch Sensor and the song dialog will appear Select Rename or Delete Create Playlists on Your Computer You can use playlists you have created on your computer in MUSIC Music supports the following computer playlist formats M3U WPL and PLS You copy your playlist file onto the projector s internal memory or SD card in the same folder or directory as the music You can create a playlist using a text edito...

Страница 71: ...ideo File Support mp4 m4a m4v mov avi Xvid mkv mka Xvid 3gp 3gpp 3g2 3ggp2 Audio File Support mp4 m4a mp3 aac adif adts wav amr awb ogg oga mka Video Codec Support MPEG4 SP ASP Xvid DivX 4 5 H 264 Audio Codec Support MP3 ACC LC LTP HEv1 HEv2 AMR NB AMR WB MSADPCM PCM Vorbis The MP220 may not support a specific file although it is listed because the video or audio stream embedded into the file is not ...

Страница 72: ...lect one of the video files and the video will start to play When the play controls disappear you can press the Touch Sensor to display them again 2 4 5 6 7 8 1 3 1 Play time 2 Aspect Ratio Options 3 Progress bar 4 Rewind video 5 Play Pause 6 Fast forward 7 Repeat 8 Total time ...

Страница 73: ...actual speed is displayed above the play pause button Deleting Videos 1 While viewing a file list press Menu 2 Select the file or files you want to delete 3 Select the Delete button 4 Select Confirm Delete Compatible Video Formats Video File Support mp4 m4a m4v mov avi Xvid mkv mka Xvid 3gp 3gpp 3g2 3ggp2 Audio File Support mp4 m4a mp3 aac adif adts wav amr awb ogg oga mka Video Codec Support MPEG4 SP...

Страница 74: ...to screen saver mode Opening the Clock Select Clock on the Home screen or in the Launcher 2 5 6 7 8 1 3 4 1 Next Alarm The next alarm that will sound 2 Dim Puts the clock screen into dim mode 3 Time This is the current system time 4 Date This is the current system date 5 Alarms Opens the alarms screen 6 Photo SlideShow Opens gallery and allow you to start a photo slideshow 7 Music Open music and a...

Страница 75: ...ou can replace the Clock screen with a photo slideshow from your Gallery albums Start the slideshow Select the Photo Slideshow button and the slideshow will begin End the slideshow Press the Back button Playing Music You can play music while the Clock screen is displayed 1 Press the Music icon and the Music application opens 2 Select the song album or playlist 3 After the music begins return to th...

Страница 76: ...arm by modifying an existing alarm or by setting a new one Opening Alarms t Select Alarm button at the bottom of the clock screen t Press the Menu button and select Alarms from the options menu 5 4 1 2 3 1 Add alarm 2 Alarms 3 Alarm on off indicator 4 Return to main Clock screen 5 Current Time ...

Страница 77: ...he Touch Sensor to open Set alarm screen 2 Select Turn alarm on 3 Press the Touch Sensor to check or uncheck Turn alarm on Other Alarm Features While in the Set alarm screen you can change the time of the alarm define how often the alarm goes off select a ringtone for the alarm and finally you can label the alarm ...

Страница 78: ...d save files Registering Documents To Go and Upgrading to the Full Version The MP220 does not have a network connection such as Wi Fi or mobile network Therefore you cannot register or upgrade Documents To Go When you come to the registration screen select Later Documents to Go Home Screen The Documents to Go Home Screen is the starting point when you launch Documents to Go Important Note The Home ...

Страница 79: ... Docs Not supported in the standard version 6 Upgrade Store Not supported in the standard version 7 New Document Not supported in the standard version 8 Locked Feature The standard version has some limitations compared to the Full version The features that are not available have a lock to the right of them 9 Settings About shows the version of Documents To Go The Register Check for Updates and Giv...

Страница 80: ...es which are located in the internal memory or SD card Root Directories for the Internal Memory and microSD card Internal Memory SD Card microSD Card SD Card SD_CARD 3 Upper Level Folder Takes you to the upper level or parent folder 4 Selector Places a checkbox before the files and folders that you want to delete or display information 5 New File Not supported in the standard version 6 Delete Delet...

Страница 81: ...t of files t Trackball Mode Highlight the folder by pressing the Touch Sensor The folder opens with a list of files 3 If you want to go back one level in the folder structure select the Upper Level Folder icon Deleting Files or Folders You can delete one or more files or folders using your Mouse or Trackball Delete One File or Folder 1 Select the file or folder you want to delete t Mouse Mode Position...

Страница 82: ...82 3M Pocket Projector MP220 2012 3M All Rights Reserved Select the file or folder you want to delete Click Select and then click Delete Click Yes to confirm the deletion ...

Страница 83: ...ode Highlight the file or folder you want to delete Move your finger from left to right across the Touch Sensor A checkmark appears next to the file or folder name 3 Repeat Step 2 for each file and folder you want to delete 4 Click Delete 5 When the Delete confirmation dialog appears click Yes The files or folders are deleted Starring and Unstarring Files When you star a file or files the files appear in t...

Страница 84: ...nstar the selected file t Mouse Mode Position the mouse pointer over the star located in the same row as the filename and press the Touch Sensor The star is no longer highlighted t Trackball Mode Highlight the file you want to unstar and drag your finger from right to left across the Touch Sensor The star is no longer highlighted Opening Files After you have located the file you want to open open the fi...

Страница 85: ... Format rtf t HTML html htm t Images bmp jpeg gif tif svg png Important Note If a file in the file list is not supported by Documents To Go the application associated with the file will open instead For example if you select a video from the file list the video player will open and start playing the video Documents To Go does not officially support documents created or edited with Open Office Star Office...

Страница 86: ... a doc or docx file While the file is opening a progress bar appears in the upper right hand corner of the screen and some functions such as creating a new file are disabled Some files may take longer than others due to their content and length Viewing and Navigating in a Document While viewing a document you can zoom and scroll up or down the page go to the top or bottom of the page or go to a bookma...

Страница 87: ...een t Mouse Mode Click on the graphic and a plus and minus button appears at the bottom of the screen The buttons disappear if you do not use them within a few seconds Use the buttons to increase or decrease the zoom level t Trackball Mode To increase or decrease the graphic size you need to use Mouse Mode To change to Mouse Mode hold down the Search button and follow the instructions above 5 Pres...

Страница 88: ...t Mouse Mode Press the Touch Sensor down and drag your finger across the button to scroll Move the button quickly Tap the button on the screen to stop the scrolling t Trackball Mode Move your finger across the button to scroll It moves the cursor up or down while moving the page up or down Go to the Top Bottom of Document or Go to Bookmark 1 Open the Go dialog by pressing the Menu button 2 Select Vi...

Страница 89: ... end the selection 2 Enable Selection mode or Select All by pressing Menu 3 Select Edit 4 Choose Select The Selection Mode will appear in the lower right hand corner Selection Mode icon 5 Move the cursor up or down to select the text and objects 6 Press the Touch Sensor A context menu will appear with the following options for the selected text or object t Cancel Selection Exit Selection Mode and ...

Страница 90: ...he standard version Finding Text in a Document You can search your document for a word or sentence using the Find function 1 Press Menu 2 Select View 3 Select Find 4 Type the text you want to find using the onscreen keyboard Open the onscreen keyboard by pressing the Touch Sensor 5 Press the Enter button on the onscreen keyboard 6 Select Find again to find the next occurrence in the document ...

Страница 91: ...91 3M Pocket Projector MP220 2012 3M All Rights Reserved To find text in a document press Menu and then select View Select Find and type in text you want to find using the onscreen keyboard ...

Страница 92: ...andard version Viewing and Editing Tables Tables will appear as they do in Microsoft Word excluding some table formatting such as border and cell color You can select the text in the table Selecting a Cell Mouse Mode Position the mouse pointer inside the cell Press the Touch Sensor and the cursor will appear in the cell Trackball Mode Move your finger across the Touch Sensor in the direction of the...

Страница 93: ...onscreen keyboard appears 2 Make your changes using the onscreen keyboard 3 When you are finished making changes press Done Trackball Mode 1 Press the Touch Sensor to enter the cell 2 Press again to open the onscreen keyboard 3 When you are finished making changes press Done Exiting a Table Edit Mouse Mode Position the pointer outside the cell Press the Touch Sensor to exit Trackball Mode Press the ...

Страница 94: ...characters within brackets Opening the Comments Pane 1 Press the Menu button 2 Select View and then Comments The Comments pane will open 3 Move to the location in the document where the comment appears t Mouse Mode Position the mouse pointer over the comment s author Press the Touch Sensor and you will be brought to that section in the document t Trackball Mode Move the cursor to one side of the c...

Страница 95: ...cket Projector MP220 2012 3M All Rights Reserved To add comments select View and then select Comments from the menu The Comments pane opens below the document Press the Menu button to use the onscreen keyboard ...

Страница 96: ...supported in the standard version For this version preferences provide a way to fit the table to the screen width t Display table in compressed view When checked Word to Go fits the table to the screen width Notes t The standard version of Word To Go does not handle cropped pictures In Microsoft Word you need to delete the cropped area when compressing the picture t Word To Go does not display track...

Страница 97: ... Excel 1997 2003 xls and Excel 2007 2010 xlsx workbooks t Some features available in Microsoft Excel are not available in Sheet To Go t Some unsupported features are embedded objects and data validation controls t Unsupported features are not affected when a workbook is edited or saved Viewing and Navigating a Spreadsheet You can view and navigate within a spreadsheet and workbook files edit cell c...

Страница 98: ...heet name identifying that worksheet as a chart sheet 3 When number data is greater than the column width the cell displays Opening and Saving Workbooks You can perform many file functions within Sheet To Go Use the File dialog to open and save your files Opening the File Dialog 1 While you have another file open press the Menu button 2 Select File and the File dialog will appear 1 New Not supported ...

Страница 99: ...der another filename and location 6 Send Not supported in the standard version Viewing and Navigating Within a Spreadsheet and Workbook The currently selected cell is noted by a black border around the cell and the cell contents or formula will appear in the formula bar Selecting a Cell Mouse Mode Move the mouse pointer over the cell Press the Touch Sensor Trackball Mode Move your finger across the ...

Страница 100: ... Range of Cells 1 Select a cell 2 Press and hold the Touch Sensor The context menu will appear 3 Select Selection Mode 4 Select the furthest diagonal cell from the initially selected cell and the selected area will be grayed out Select the furthest diagonal Selected area will be grayed out ...

Страница 101: ... in the standard version Going to a Cell Home or End Position of a Spreadsheet 1 Press the Menu button 2 Select Go 3 Select To Cell Home or End t To Cell Specify a cell you want to move using an alphanumerical cell reference t Home Moves the selector to the first row in a column Select it again and it moves the selector to the first column in the row t End Moves the selector to the last populated ce...

Страница 102: ... In one motion press and swipe your finger across the Touch Sensor in the direction you want to scroll the page Tap the Touch Sensor to stop the page from scrolling further Trackball Mode Move your finger across the Touch Sensor Move the cursor up or down on the page Using Freeze Panes 1 Select the cell where you want the freeze pane to appear above and to the left of 2 Press the Menu Button 3 Selec...

Страница 103: ... 1 Move the selector to a cell in the row or column you want to select 2 Press the Menu button 3 Select More 4 Select Row or Column and a context menu will appear 5 Select Select Row or Select Column and the row or column will be highlighted gray Select the row and then press the Menu button and select More ...

Страница 104: ... in the row or column you want to hide 2 Press the Menu Button 3 Select More 4 Select Row or Column and a context menu will appear 5 Select Hide Row or Hide Column Unhiding Rows or Columns 1 Move the selector to a cell next to the hide row or column and press and hold the Touch Sensor 2 Choose Selection Mode and select a cell on the opposite side of the hidden row or column 3 Select More ...

Страница 105: ...d a gray bar will appear below the row 5 Move the gray bar up or down to mark the new cell height t Mouse Mode Move the pointer over the gray bar While pressing and holding the Touch Sensor move your finger up or down across the sensor Release the Touch Sensor once you have the gray bar positioned t Trackball Mode Move your finger up or down across the Touch Sensor and move the gray bar 6 Accept the...

Страница 106: ...gray bar as the starting point for increasing the height of a row Accept the new height by pressing the Touch Sensor Changing Column Widths 1 Move the selector to a cell in the column you want to change the width of 2 Press the Menu Button 3 Select More 4 Select Column Width and a gray bar will appear below the row 5 Move the gray bar right or left to mark the new column width ...

Страница 107: ...se the Touch Sensor once you have the gray bar positioned t Trackball Mode Move your finger right or left across the Touch Sensor and move the gray bar 6 Accept the new row height by pressing the Touch Sensor Select a cell in the column for which you want to change the width After you press the Menu button and select More select Columns Select Column Width and a gray bar appears over the selected c...

Страница 108: ...selected cell and new columns to the left of the selected cell Inserting Rows and Columns 1 Move the selector to a cell where you want to insert the new row or column 2 Press the Menu Button 3 Select Insert 4 Select Row or Column and a dialog will appear 5 Select OK and the new row or column is inserted Deleting Rows and Columns 1 Move the selector to a cell that is the row or column you want to d...

Страница 109: ... the Menu Button 2 Select Format 3 Select Sheet and the Format Sheet dialog will appear 4 Press the Touch Sensor and the onscreen keyboard will appear 5 Use the onscreen keyboard to modify the worksheet name and press the Back button 6 Select OK Finding Text or Data in a Spreadsheet or Workbook 1 Press the Menu Button 2 Select View 3 Select Find and the Find dialog appears 4 Press the Touch Sensor...

Страница 110: ...t Enter the text number or cell reference you wish to find 2 Within Select Sheet or Workbook to direct the search 3 Look in Search formulas values or comments t Formulas Search reports matches within the cell content including individual numbers and letters in formulas t Values Search reports matches from the cell values such as the result of a formula t Comments Search reports matches found in cel...

Страница 111: ... dialog Opens the Find dialog Editing Cells Mouse Mode Modify using the formula bar 1 Select the cell by placing the mouse pointer over the cell and pressing the Touch Sensor 2 Place the mouse pointer inside the formula bar and press the Touch Sensor 3 Use the onscreen keyboard to modify the content of the cell Modify using the context menu 1 Place the mouse pointer over the cell 2 Press and hold ...

Страница 112: ...cross the Touch Sensor in the direction of the cell and press the Touch Sensor 2 Use the onscreen keyboard to modify the content of cell Modify using the context menu 1 Select the cell by moving your finger across the Touch Sensor in the direction of the cell and press and hold the Touch Sensor The context menu will appear 2 Select Edit Cell 3 Use the onscreen keyboard to modify the content of the ...

Страница 113: ...Press the Menu button 3 Select View 4 Select Cell Contents The Cell Contents dialog will appear 5 Press Back or select OK to exit the dialog Trackball Mode 1 Select the cell by moving your finger across the Touch Sensor in the direction of cell 2 Press the Menu button 3 Select View 4 Select Cell Contents The Cell Contents dialog will appear 5 Press Back or select OK to exit the dialog ...

Страница 114: ...ose the Selection Mode option t Menu View Select 1 Select the cell where you want to start your selection 2 Press Menu 3 Select View 4 Choose the Selection Mode option 2 If you want to select multiple cells select a cell that makes up the corner of your final selection 3 Press and hold the Touch Sensor The context menu appears 4 Choose Selection Mode 5 Move the selector to grow or shrink the select...

Страница 115: ...rea of the spreadsheet deletes them 4 Copy Copies the selected cells and allows you to paste them into a new area in the spreadsheet 5 Paste Lets you paste cells you cut or copied into another cell Copy Paste and Cut t Copy and paste data from one area to another or t Cut and paste and move data from one area to another Copy and Paste 1 Select a cell or range 2 Press and hold the Touch Sensor An O...

Страница 116: ...ta 5 Press and hold the Touch Sensor An Options menu will appear 6 Select Paste Formulas Sheet To Go has many of the same functions you use in Microsoft Excel This section will take you through the steps of entering the following formulas t Simple formulas t Formulas with cell references and t Formulas with formulas Simple formulas t Formulas with single cell references and t Formulas with range o...

Страница 117: ...he selector to the A1 cell and press Menu and then Enter 6 Press Menu and select Operators 7 Select and press the Touch Sensor 8 Press Menu and select Cell Reference 9 Move the selector to the A2 cell and press Menu and then Enter 10 Press Menu and then select Enter and the results will appear in the Cell Inserting Functions and AutoSum 1 Select the cell where you want the results of the function ...

Страница 118: ...or a Function or AutoSum When selecting a range of cells in a function you can only use Mouse Mode If you see a mouse pointer on the screen you are already in mouse mode You can easily switch from Trackball Mode to Mouse Mode by pressing and holding the Search button When the Touch Sensor dialog appears select OK 1 Select a cell that marks the corner of the range you want to select 2 Press and hol...

Страница 119: ... cannot edit or save the file Sheet To Go Preferences 1 Open Sheet to Go Preferences by pressing Menu 2 Select More 3 Select Preferences Only one preference is supported in the standard version Preferences allow you to perform location formatting 1 Locale locations Defines how certain numbers such as currency and the characters used for decimal mark and thousand separators will display in Sheet To G...

Страница 120: ... their content and length Files Supported Slideshow To Go opens t PowerPoint 1997 2003 ppt and t PowerPoint 2007 2010 slideshows pptx Some features available in Microsoft Excel are not available in Slideshow To Go Unsupported features are not affected when a slideshow is edited or saved You can view and navigate within a slideshows while in slide view or outline view and edit text in slides When y...

Страница 121: ... Select File and the File dialog will appear 1 New Not supported in the standard version 2 Open Opens local files on the internal memory or SD Card 3 Close Closes the current file and returns you to Slideshow To Go 4 Save Saves your changes to the file 5 Save As Saves a copy of a file with changes under another filename and location 6 Send Not supported in the standard version Viewing and Navigating wi...

Страница 122: ...or the Next Slide Previous Slide options from the slide context menu Move to the Next Slide Mouse Mode Press and hold the Touch Sensor and a context menu opens Select Next Slide Trackball Mode Move your finger across the Touch Sensor from left to right Move to the Previous Slide Mouse Mode Press and hold the Touch Sensor and a context menu opens Select Previous Slide Trackball Mode Move your finger ...

Страница 123: ...2012 3M All Rights Reserved Viewing a Slide 1 Press the Menu button 2 Select View 3 Select Go To Slide and a list of the slide headings will appear The following is an example of the screen you receive with a list of slide headings ...

Страница 124: ...ning Around the Page Mouse Mode In one motion press and swipe your finger across the Touch Sensor in the direction you want to scroll the page Tap the Touch Sensor to stop the page from scrolling further Trackball Mode Move your finger across the Touch Sensor Move the cursor up or down on the page Editing a Slide You can make minor changes to slide text such as changing the slide title or updating t...

Страница 125: ...ess Menu and the onscreen keyboard will appear Use the onscreen keyboard to modify the text Trackball Mode Using the Touch Sensor move the cursor to the line you want to edit Press the Touch Sensor and the onscreen keyboard will appear with text Use the onscreen keyboard to modify the text Finding Text in a Spreadsheet or Workbook 1 Press the Menu Button 2 Select View 3 Select Find and the Find di...

Страница 126: ...d What will find boat boathouse and sailboat The Find toolbar appears at the bottom 1 Find Finds the next occurrence 2 Replace Not supported in the standard version 3 Replace All Not supported in the standard version 4 Open Find dialog Opens the Find dialog Selecting Text for Copy Paste or Cut Two Ways to Enter Selection Mode Press and Hold the Touch Sensor 1 Select the location in the slide text w...

Страница 127: ...ct multiple lines of text 1 Select the first line of text 2 Press and hold the Touch Sensor and the context menu appears 3 Choose Selection Mode 4 Move the selector to grow or shrink the selection area 5 Press and hold the Touch Sensor for more options or press Back button to exit the selection mode Selection Mode Option Menu 1 Cancel Selection Exits Selection Mode 2 Cut Copies the selected text On...

Страница 128: ...f the slide such as bullet points on a slide Copy and Paste 1 Place the cursor before the text you want to copy 2 Press the Menu button 3 Select Move Cursor Over Text to highlight the text you want to copy 4 Press the Menu button 5 Select Edit 6 Select Copy 7 Move to the area in the text where you want to paste the text 8 Press the Menu button 9 Select Edit 10 Select Paste Cut and Paste 1 Place th...

Страница 129: ... Go locks a file when the file contains objects or formulas that are not supported When the file is locked you cannot edit or save the file Slideshow To Go Preferences 1 Use Slide Pre caching Pre loads the slides before starting the presentation for smooth transition from slide to slide 2 Name and Initials When saving a new file Slideshow To Go attaches a name and initials to the new file to distinguish...

Страница 130: ...n view and navigate within pdf files When you select a pdf file PDF To Go opens and displays the first page in the document 1 1 PDF File Name Name of the PDF file you are viewing Opening and Closing PDF files You can use the File dialog to open and close your files 1 While you have another file open press the Menu button 2 Select File and the File dialog will appear t Select Open to open a local file in i...

Страница 131: ...ted in the standard version 4 Send via Email Not supported in the standard version Viewing and Navigating within a PDF File You can page through zoom or rotate the pages while viewing a PDF document While viewing a document you can zoom and scroll up or down the page Changing the Page Zoom Level 1 Open the Zoom dialog by pressing the Menu button 2 Select View 3 Choose the zoom level 100 is the def...

Страница 132: ...ball Mode Move your finger across the Touch Sensor and move the cursor up or down on the page Rotating Pages When the PDF document is not in the orientation you want to view you can rotate the document 90 degrees to the left or right or rotate the document 180 degrees 1 Press Menu 2 Select View and the View option menu appears 3 Select Rotate 4 Select Rotate left Rotate Right or Rotate 180 The enti...

Страница 133: ...ed Fun Pack The Fun Pack is a set of backgrounds for special occasions and games When you click on the Fun Pack icon the main menu appears Animation and Pictures 1 Click the Animations Pictures icon to access animations and pictures for a variety of events ...

Страница 134: ...ou want animations and pictures A menu appears with the animations and pictures for the selected event The example below shows the menu that appears when you select Birthdays Picture Guessing Game 1 Click the Picture Guessing Game icon 2 Choose a photo album from a folder on your ID card ...

Страница 135: ...e When the timer is done before you identify the photo the Time s up dialog appears Click OK Timer for guessing what the picture is Click OK when the Time s Up dialog appears 4 Click Next to continue to the next picture Picture Customizer 1 Click the Picture Customizer icon ...

Страница 136: ...eft hand corner 1 Filters Apply a sepia mosaic or charcoal filter You can also select None 2 Props Insert props into your picture You can select an existing prop to edit or select a new prop 3 Frames Select a photo frame You can also select None 4 Undo Undo the last change you made to the picture 5 Save Saves the new picture to your gallery 6 Cancel Discards all changes and goes back to the main me...

Страница 137: ... points Open Cannonball Pro Click the Cannonball Pro icon to open the game Cannonball Pro Menu 1 Play Starts the game 2 Select Avatar Allows you to select the Avatar image you want to shoot from the cannon 3 Achievements Shows the highest scores for the game 4 Instructions Provides detailed game instructions 5 Options Sets the game options 6 About Shows the current version of the game ...

Страница 138: ...use Mode if you want to use trackball mode Sound Use the Sound settings to change the volume for media or alarms or turn on or off the audible selections Audible selection plays a sound every time you select items in the user system Volume When you select Volume a dialog appears and provides volume controls for media such as music and videos and alarms Display You can use Display settings to config...

Страница 139: ...een Timeout You can set how long to wait before the projector darkens the screen and then turns off the projector lamp The projector turns off the projector lamp after the specified time has passed without activity Some applications such as the video player app and pass through app will prevent the projector from turning off the lamp after the specified time has passed Horizontal and Vertical Flip H...

Страница 140: ...d To sort the application list 1 Press Menu 2 Select Sort By Size 3 Press Menu and Select a z Running Services The Running Services screen shows you a list of applications or portions of an application that provides services to other applications and runs even when the main application is not Each service has a gray bar above it which shows the processes needed and memory used by the service Under...

Страница 141: ...ns will depend on the application Privacy The Privacy screen has a setting for resetting the factory data Factory data reset When you select Factory data reset the projector will erase all personal data from the projector storage such as applications you have installed and date and locale information It will not erase system software updates or any files on the projector s internal memory or SD car...

Страница 142: ...ge screen appears 2 Select the language you wish the projector to display The projector must be turned off and then back on after this is changed Otherwise some text in the menus and screen will not be updated to the new language Date and Time Settings This sets the projector s date and time and how it is displayed Additionally you can set the time zone Set Date Select Set Date to set the date Set...

Страница 143: ...the graphical user interface The kernel software is specific to the projector This line tells you the version that is currently running Build Number When software is made or compiled a build number is assigned to it This provides you and customer support agents with accurate information about the version of the operating system loaded onto the projector Serial Number This is the serial number of th...

Страница 144: ...ANY IMPLIED WARRANTY OF MERCHANTABILITY OR FITNESS FOR A PARTICULAR PURPOSE OR ANY INDUSTRY PRACTICE OR CUSTOM OR TRADE USAGE In the event the 3M product fails to conform to the above stated warranties within the applicable warranty period your exclusive remedy shall be at 3M s option to replace or repair the 3M product or to refund the purchase price of the 3M product All replaced parts or produc...

Страница 145: ...hout condensation 0 1829 m 0 6000 feet above sea level c The air intake and exhaust vent must be clear of obstructions Inadequate air ventilation will cause the 3M product to malfunction or will cause damage to the 3M product which will void the warranty d This warranty does not cover any additional costs including but not limited to those associated with removal cleaning or installation of the 3M...

Страница 146: ...TED TO PERFORMANCE USE OR INABILITY TO USE ANY OF THE 3M PRODUCT This limitation applies regardless of the legal theory upon which damages are sought For warranty support please call or write your local 3M office or a 3M Authorized Service Provider to obtain an RMA Return Material Authorization number before returning the product If you are inside the Continental United States of America please con...

Страница 147: ...t does cause harmful interference to radio or television reception which can be determined by turning the equipment off and on the user is encouraged to try to correct the interference by one or more of the following measures Reorient or relocate the receiving antenna t Increase the separation between the equipment and receiver t Connect the equipment into an outlet on a circuit different from tha...

Страница 148: ... local law RoHS Statement 3M Mobile Interactive Solutions can provide RoHS certification for products meeting the RoHS directive 1 European EU Restriction of Hazardous Substances RoHS Directive 2002 95 EC 1 RoHS compliant means that the product or part does not contain any of the substances in excess of the following maximum concentration values in any homogeneous material unless the substance is i...

Страница 149: ... referenced are the service marks trademarks or registered trademarks of their respective companies Video and Audio Decoder Notices MPEG 4 NOTICE THIS PRODUCT IS LICENSED UNDER THE MPEG 4 VISUAL PATENT PORTFOLIO LICENSE FOR THE PERSONAL AND NON COMMERCIAL USE OF A CONSUMER FOR i ENCODING VIDEO IN COMPLIANCE WITH THE MPEG 4 VISUAL STANDARD MPEG 4 VIDEO AND OR ii DECODING MPEG 4 VIDEO THAT WAS ENCOD...

Страница 150: ...AL INFORMATION MAY BE OBTAINED FROM MPEG LA L L C SEE HTTP WWW MPEGLA COM MPEG LAYER 3 NOTICE Supply of this product does not convey a license nor imply any right to distribute MPEG Layer 3 compliant content created with this product in revenue generating broadcast systems terrestrial satellite cable and or other distribution channels streaming applications via Internet intranets and or other netw...

Отзывы: