3D Hobby Shop 62 inch OSIRIS Скачать руководство пользователя страница 4


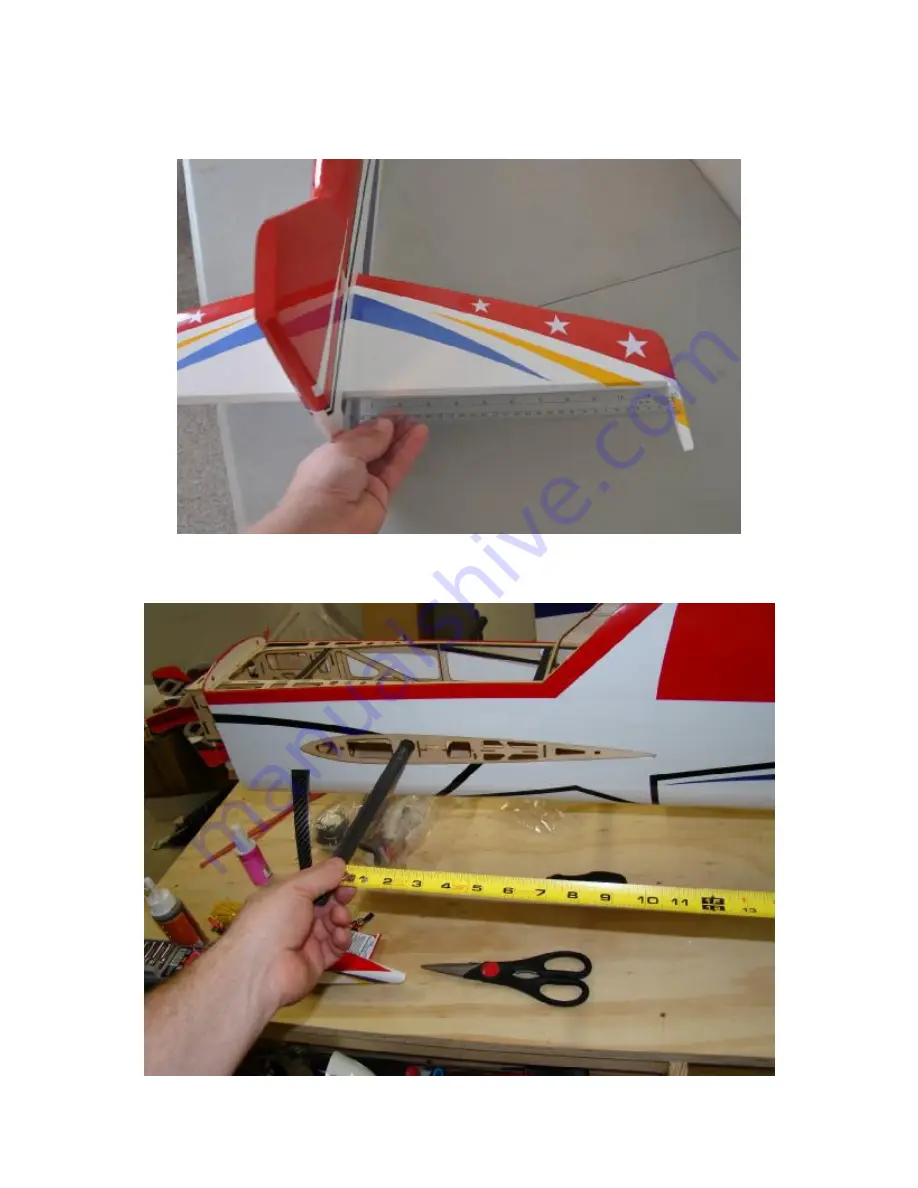
Insert horizontal stabilizer into fuselage cutout.  Do not glue at this time.  NOTE:  Do not remove any 

covering from the horizontal stabilizer.  Align side-to-side as shown. 


Install carbon wing tube into fuselage and measure on both sides form tube to stabilizer, equalize these 

measurements. 


Содержание 62 inch OSIRIS

Страница 1: ...However the ultimate success or failure of this aircraft is dependent upon proper assembly by you If you have questions about an assembly step please contact us or read the assembly thread for your airplane on RCGroups com before proceeding It is always better to slow down and be sure of your assembly than to rush through it and make a mistake which can cause a crash SAFETY in Flying SAFETY NOTICE...

Страница 2: ...ur part of the world wrinkles may appear and disappear Wrinkles may be removed with the gentle application of heat to the covering material on your airplane The best tools to use are a heat gun and covering iron Apply the heat gently the covering material will shrink as you apply the heat and this will remove the wrinkles BE CAREFUL Too much heat applied too quickly can damage the covering either ...

Страница 3: ...h gear into the pre cut slot in the side of the fuselage and attach with QTY 4 4 40 screws and washers Use blue Loctite or similar threadlocker on these screws Remove covering over horizontal stabilizer opening and the single elevator servo opening in fuselage ...

Страница 4: ...age cutout Do not glue at this time NOTE Do not remove any covering from the horizontal stabilizer Align side to side as shown Install carbon wing tube into fuselage and measure on both sides form tube to stabilizer equalize these measurements ...

Страница 5: ...5 Sight from the stabilizer forward to the wing tube as shown If you need to correct the position of the stabilizer add shims of card stock on the bottom of the stabilizer on one side ...

Страница 6: ...u drip any CA onto your covering use CA debonder and a towel to remove unwanted glue from the covering material Assemble tailwheel bracket onto tailwheel wire Drill hole just beneath bottom rudder hinge into rudder Install tailwheel wire into rudder as shown with 30 minute epoxy allow to cure Install wheel and collar onto tailwheel wire ...

Страница 7: ...7 Install rudder onto fuselage using two large drops of thin CA glue per hinge Install tailwheel bracket onto fuselage with QTY 2 woodscrews ...

Страница 8: ...er into stabilizer install with two large drops of thin CA glue on each hinge Trail fit second elevator half with no glue Check for alignment between elevator halves Correct joiner slot in second elevator as necessary Install second elevator half using thick CA or epoxy on joiner and two drops of thin CA on each hinge ...

Страница 9: ...rvo running extension through fuselage to front Be sure to use your favorite kind of servo plug locking device on the servo plug to prevent the extensions from coming unplugged in flight Install elevator pushrod as shown bolting securely to servo arm and control horns with allen screw locking nut ...

Страница 10: ...ll the rudder servo as shown Assemble all 4 ends of the pull pull cables as shown in the diagram Make sure the cables are snug but not banjo string tight The cables cross inside the fuselage to form an X shape ...

Страница 11: ...m screw The standoffs are wood and can be sanded of trimmed as needed Use blue loctite on 4mm screws The cowl mounts using four screws through the four plywood tabs at the front of the fuselage To make the correct holes in the cowl and tabs tape a paper strip over the tab as shown then install the cowl the paper strip will indicate the correct position of the tab for drilling ...

Страница 12: ...12 Glue aileron hinges using two drops of thin CA per hinge Remove covering over aileron servo opening in wing and use the installed pull string to pull the aileron servo wire through the wing ...

Страница 13: ... NOTES Recommended control throws Elevator Low rate 12 degrees up and down Mid rate 17 degrees up and down High rate 22 degrees up and down Aileron Low rate 15 degrees up and down Mid rate 20 degrees up and down High rate 25 degrees up and down Rudder Low rate 25 degrees right and left Mid rate 30 degrees right and left High rate 35 degrees right and left NOTE Fly your initial flights on low rate ...

Страница 14: ...d elevator servo Hitec Hs 5245MG Rudder servo Hitec 7985MG APC 15x10E or 15x12E prop Before flight Make sure wing screws are installed and secure Double check all ball link screws and locknuts Make sure canopy latch is fully engaged Balance prop accurately A full selection of spare and repair parts for your Osiris is available at www 3DHobbyShop com We hope you enjoy your 3D HOBBY SHOP Aircraft Be...

Отзывы: