


26
C
HAPTER
2: I
NSTALLING
THE
S
WITCH
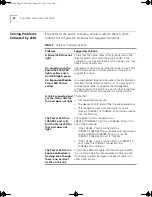
Figure 8
Fitting a bracket for wall-mounting
3
Insert the two screws and tighten with a suitable screwdriver.
4
Repeat steps 2 and 3 for the other side of the Switch.
5
Ensure that the wall you are using is smooth, flat, dry and sturdy. Attach a
piece of plywood, approximately 305mm x 510mm x 12mm (12in. x 20in.
x 0.5in.) securely to the wall if necessary.
6
Mount the Switch as follows:
a
Position the base of the Switch against the wall (or plywood) ensuring
that the ventilation holes face sidewards and that the front of the unit
faces downwards
. Mark the position of the screw holes in both wall
brackets on the wall. Drill the four holes.
b
Using suitable fixings and screws (not provided), attach the Switch
securely to the wall or plywood.
c
Connect network cabling.
16950ua.bk Page 26 Thursday, August 27, 1998 11:55 AM
Содержание SuperStack II Switch 1100
Страница 6: ...vi 16950ua bk Page vi Thursday August 27 1998 11 55 AM...
Страница 22: ...22 CHAPTER 1 INTRODUCING THE SWITCH 1100 16950ua bk Page 22 Thursday August 27 1998 11 55 AM...
Страница 34: ...34 CHAPTER 2 INSTALLING THE SWITCH 16950ua bk Page 34 Thursday August 27 1998 11 55 AM...
Страница 50: ...50 APPENDIX D TECHNICAL SUPPORT 16950ua bk Page 50 Thursday August 27 1998 11 55 AM...
Страница 56: ...56 GLOSSARY 16950ua bk Page 56 Thursday August 27 1998 11 55 AM...
Страница 62: ...16950ua bk Page 62 Thursday August 27 1998 11 55 AM...


