background image

3Com Router 6000 Family 
Installation Manual 

Chapter 3 

Installing the Router


3Com Corporation 

3-8 

z


Ensure that the fiber ends are clean. 


  Warning: 

Laser danger: Invisible laser radiation may be emitted from the fiber-optic ports which 
are connected with lasers. To protect your eyes against radiation harm, never stare 
into an open fiber-optic port. 

Follow these steps to connect a 10/100/1000 Mbps fiber-optic interface on the RPU2: 

Step 1: Use two fibers to connect the Rx and Tx ends of the interface to another device: Rx to 
Tx, and Tx to Rx. 


Step 2: Power on the router and read the LINK LED of the interface: ON means the Rx link is 
present. OFF means no Rx link is present; check the line for the cause.


3.9  Connecting the Router to a WAN 

Many types of WAN interfaces are available with the Router 6000 and the one provided by the 
main control boards is an AUX interface. The following subsections describe how to connect it. 
For connecting the WAN interface on a FIC, refer to the relevant contents in the chapter “FICs”. 


I. AUX port 

AUX is an RS232 asynchronous serial interface, which can back up a WAN interface and 
provide dial connection. In case of console failure, AUX can function as a console interface. 
For the AUX interface attributes, refer to the section “RPU”.


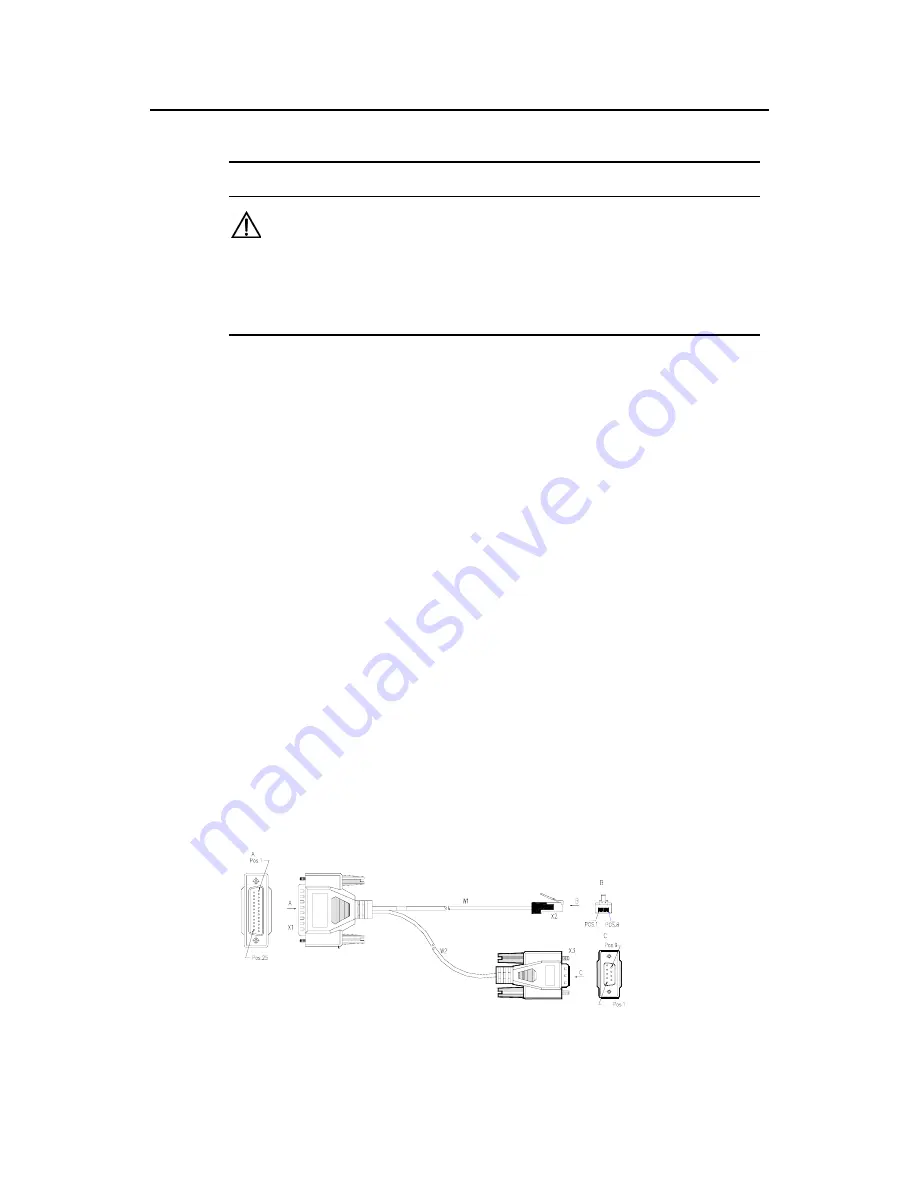
II. AUX cable 

AUX cable is an eight-wire shielded cable. At one end of the cable is an RJ-45 connector 
for connecting the console port on the router. At the other end are DB-9 (male) connector 
and DB-25 (male) connector. You can plug either of them into the serial port on a modem 
as needed. The following figure illustrates the AUX cable.  


Figure 3-7 

AUX cable 

Содержание Router 6040

Страница 1: ...3Com Router 6000 Family Installation Guide Router 6040 3C13840 Router 6080 3C13880 www 3Com com Part Number 10015652 Rev AA November 2006 ...

Страница 2: ...ited States government agency then this documentation and the software described herein are provided to you subject to the following All technical data and computer software are commercial in nature and developed solely at private expense Software is delivered as Commercial Computer Software as defined in DFARS 252 227 7014 June 1995 or as a commercial item as defined in FAR 2 101 a and as such is...

Страница 3: ...ty 2 2 2 1 5 Lightning Protection 2 3 2 1 6 Checking the Rack 2 3 2 2 Safety Precautions 2 3 2 3 Unpacking Check 2 4 2 4 Installation Tools and Meters and Equipment 2 5 Chapter 3 Installing the Router 3 1 3 1 Installation Flow 3 1 3 2 Installing the Cabinet Rack 3 2 3 3 Mounting the Router 3 2 3 3 1 Rack Mounting the Router 3 2 3 3 2 Mounting the Router on a Tabletop 3 3 3 4 Installing the Generic...

Страница 4: ... 1 6 2 Removing Installing PSUs 6 1 6 2 1 Removing a PSU 6 1 6 2 2 Installing a PSU 6 2 6 3 Removing Installing the Fan Module 6 2 6 3 1 Removing the Fan Module 6 2 6 3 2 Installing the Fan Module 6 3 6 4 Removing Installing the Main Control Board 6 3 6 4 1 Removing the RPU2 6 3 6 4 2 Installing the RPU2 6 4 6 5 Replacing the SDRAM 6 4 6 6 Removing Installing the Encryption Daughter Card 6 6 6 6 1...

Страница 5: ... Mounting Cabinets on the Antistatic Floor 8 14 8 3 1 Introduction to Racks 8 14 8 3 2 Introduction to Slide Rails 8 17 8 3 3 Installation Flow 8 17 8 3 4 Positioning Racks 8 18 8 3 5 Installing Racks 8 22 8 3 6 Installing Slide Rails 8 23 8 3 7 Installing Antistatic Floor Supports 8 25 8 3 8 Leveling Cabinets 8 27 8 3 9 Combining Cabinets 8 29 8 3 10 Fixing Cabinets 8 31 8 3 11 Testing Insulation...

Страница 6: ... a simple but highly efficient broadband technology that achieves great data transmission capacity over existing copper wiring by using the digital code modulation technology Installed with an ADSL or G HSDSL card the Router 6000 can connect the medium to small sized enterprises to the digital subscriber line access multiplexer DSLAM equipment through a public switched telephone network PSTN and t...

Страница 7: ...tication protocols such as PAP CHAP data RADIUS and VoIP RADIUS z Packet filter and firewall which fend off external attacks z VPN including GRE L2TP and MPLS and the technologies of IPSec and IKE They can ensure security of private networks in an Internet environment z Backup center and virtual router redundancy protocol VRRP By providing a backup scheme in case of communication line or device fa...

Страница 8: ...llowing front and rear card insertion and can be mounted in 19 inch standard racks The following subsections will give you more details about these two models 1 2 1 3Com Router 6040 1 2 3 6 4 5 1 Slot0 for the main control board 2 FIC Slot1 3 FIC Slot2 4 FIC Slot3 5 FIC Slot4 6 ESD preventive wrist strap port Figure 1 1 Front panel of the 3Com Router 6040 1 2 3 4 5 1 Fan module 2 Grounding screw 3...

Страница 9: ...the main control board 3 FIC Slot1 4 FIC Slot2 5 FIC Slot3 6 FIC Slot4 7 FIC Slot5 8 FIC Slot6 9 FIC Slot7 10 FIC Slot8 11 ESD preventive wrist strap port Figure 1 3 Front panel of the 3Com Router 6080 1 2 3 4 5 1 Fan module 2 Grounding screw 3 ESD preventive wrist strap port 4 PSU 1 PWR1 5 PSU 2 PWR2 Figure 1 4 Rear panel of the 3Com Router 6080 The 3Com Router 6080 has nine slots on the front pa...

Страница 10: ...x D 130 5 x 436 2 x 420 mm 5 1 x 17 2 x 16 5 in 219 5 x 436 2 x 420 mm 8 6 x 17 2 x 16 5 in Weight 18 7 kg 41 2 lb 28 kg 61 7 lb Input voltage AC AC Rated voltage 100 to 240 VAC 50 60 Hz Max voltage 85 to 264 VAC 50 60 Hz Max current 4 0A 2 0A 2 0A 3Com Router 6080 6040 Max power 126 W 213 W Operating temperature 0 to 40 o C 32 F to 104 F Relative humidity non condensing 5 to 90 Note The selection...

Страница 11: ...0 100 1000 Mbps electrical Ethernet interfaces 1 x 10 100 1000 Mbps Ethernet interface providing both electrical and fiber optic connectors 1 AUX port 1 console port CF card slot the CF card is optional Processor 700 MHz Boot ROM 512 KB NVRAM 512 KB DDR SDRAM 512 MB Flash 64 MB Note SDRAM is the memory where the communication data between the system and CPU is stored NVRAM is the place where the a...

Страница 12: ...le FAN ON means the FAN module is not present or its rotation is blocked PWR1 ON means the PSU 1 has failed ALM red PWR2 ON means the PSU 2 has failed ECARD green OFF means no card is present ON means a card is present and initialized Blinking means data is being transmitted or and received CF green OFF means no CF card is present ON means a CF card is present Blinking means the CF card is reading...

Страница 13: ...her PSU can still work and supply all the power required by the system Both AC input PSU and DC input PSU are available with the Router 6000 The PSUs supply 350W power and provide overcurrent and overvoltage protection You can connect a PSU to the backplane by inserting it from the rear of the router chassis It is hot swappable and its switchover does not affect the ongoing system operation Note W...

Страница 14: ... the opposite 1 4 3 FAN module I Functions The 3Com Router 6040 is configured with six fans the 3Com Router 6080 is configured with eight fans These fans are working in pairs and the two fans in each pair are working in redundancy When all these fans are working normally the operating temperature of the system can be maintained between 0 and 55o C 32 to 131o F As the failure of a fan does not affe...

Страница 15: ...r example Figure 1 11 FAN module the 3Com Router 6080 1 4 4 FICs 3Com 6000 Router Family modular routers provide FIC slots for this release and support the following FICs z Router 1 Port T3 ATM FIC 3C13877 z Router 4 Port Fractional T1 FIC 3C13821 z Router 1 Port OC 3 POS FIC 3C13881 z Router 1 Port OC 3 ATM SM FIC 3C13884 z Router 1 Port OC 3 ATM SML FIC 3C13886 z Router 1 Port 10 100 1000 FIC 3C...

Страница 16: ...intained to prevent premature material aging and degraded reliability accompanying high temperature conditions The following table lists the temperature and humidity requirements Table 2 1 Temperature humidity requirements in the equipment room Temperature Relative humidity 0 o C to 40 o C 32 o F to 104 o F 5 to 90 2 1 2 Cleanness Dust is hazardous to the operating safety of your device Dust build...

Страница 17: ...t room is dust proof z Maintain adequate temperature and humidity z Wear an ESD preventive wrist strap and clothes when contacting the circuit board z Place the removed circuit board upward on the ESD preventive workbench or into a static shielded bag z Hold the circuit board by its edge when observing or moving it avoiding direct contact with the elements on it 2 1 4 Electromagnetic Compatibility...

Страница 18: ...he rack has a good ventilation system z Make sure that the rack is sturdy enough to support the weight of the device and the installation accessories z Make sure that the rack is well grounded 2 2 Safety Precautions When reading this manual pay adequate attention to the following Warning appears in operation procedures that if performed incorrectly might cause bodily injury to the operators or dam...

Страница 19: ... Table 2 4 Packing list Item Name Quantity Description 1 3Com Router 6040 6080 unit 1 Router unit 2 Main control board 1 3 PSU AC input or DC input with the power cord For redundancy use two PSUs 4 Fan 1 5 FIC 0 2 4 8 Up to 4 for the 3Com Router 6040 Up to 8 for the 3Com Router 6080 Optional You must specify FIC type and quantity 6 Encryption daughter card 0 1 Optional 7 PGND wire 1 8 Console cabl...

Страница 20: ... Tools and Meters and Equipment 1 Tool z ESD preventive wrist strap z Static shielding bag 2 Cable z Grounding wire and power cord z Console cable z Optional cables 3 Meters and equipment z Hub or LAN switch z Channel service unit data service unit CSU DSU or other DCE equipment z Console terminal it could be a PC z Equipment related to the selected FICs z Multimeter ...

Страница 21: ...e WAN End NO NO NO Mount the chassis Install the PSU and FAN Install the main control board Connect the PGND Connect the power cord Connect to the console terminal Verify installation Power on Connect to the Ethernet Troubleshoot Verify installation Turn off the power switch NO NO NO Mount the chassis Install the PSU and FAN Install the main control board Connect the PGND Connect the power cord Co...

Страница 22: ... 2 x 420 mm 5 1 x 17 2 x 16 5 in 3Com Router 6080 H x W x D 219 5 x 436 2 x 420 mm 8 6 x 17 2 x 16 5 in Take these steps to mount the chassis 1 Check that z The rack is well fixed z The rack is ready for installation without debris inside or around The chassis is near to the rack 2 Attach the mounting brackets onto both sides of the chassis with a Phillips screwdriver Note that the mounting bracke...

Страница 23: ...ric Modules Installing generic modules includes installing the main control board PSUs the fan module and FICs Refer to the chapter FICs for the FIC installation procedures and the chapter Maintaining Hardware for the installation procedures of other modules 3 5 Connecting the PGND Warning The normal connection of the protection ground PGND on the router chassis is an essential safeguard against l...

Страница 24: ...nding resistance less than 5 ohm If you install the chassis in a 19 inch standard rack you must also ground the rack Warning Lightning strikes can damage your router and even the connected devices For secure lightning protection make sure that your router has a good ground connection when it is operating 3 6 Connecting the Power Cord 3 6 1 Connecting the AC Input Power Cord I AC input power supply...

Страница 25: ...ation site Step 3 Check that the PWR LED on the front panel of the router is on for correct connection 3 7 Connecting the Console Terminal I Console port The Router 6000 provides an RS232 asynchronous serial console port CON for router configuration For its attributes refer to the section RPU II Console cable A console cable is an eight wire shielded cable At one end of the cable is a crimped RJ 4...

Страница 26: ... When both electrical and optical connections are available you can use only one at a time For the available SFP options and the interface attributes refer back to the section RPU2 in the chapter Router Overview II Ethernet cable 1 Electrical Ethernet interface cable Electrical Ethernet interfaces usually use category 5 twisted pair cables as shown in the following figure Figure 3 6 Ethernet cable...

Страница 27: ...present the system considers the electrical interface as the operating interface Connect the electrical Ethernet interface cable Follow these steps to connect the cable Step 1 Connect one end of the Ethernet cable to an Ethernet port on the router and the other end to another device z For a 10 100 Mbps port provided by the RPU connect it to a PC or another router using a crossover cable or to a Hu...

Страница 28: ...nnecting the Router to a WAN Many types of WAN interfaces are available with the Router 6000 and the one provided by the main control boards is an AUX interface The following subsections describe how to connect it For connecting the WAN interface on a FIC refer to the relevant contents in the chapter FICs I AUX port AUX is an RS232 asynchronous serial interface which can back up a WAN interface an...

Страница 29: ...alog modem When using the AUX interface for remote configuration or dial backup you need to connect the local modem to the remote modem through PSTN and then to the remote device 3 10 Verifying Installation During router installation you must verify installation each time you power on the router making sure that z Adequate clearance is available around the router sides for dissipation z The rack o...

Страница 30: ...r of the console cable to the console port on the router and the DB 9 connector to the serial port on the console terminal a PC for example as shown in Figure 4 1 Figure 4 1 Local configuration through the console port II Setting terminal parameters Follow these steps to set terminal parameters on the console terminal a PC that is running Windows98 for example Step 1 Start the PC and select Start ...

Страница 31: ... 4 2 Figure 4 2 Set up a new connection Step 2 Enter the name of the new connection in the Name field and click OK The dialog box as shown in Figure 4 3 appears Step 3 Select the serial port to be used from the Connect Using dropdown menu The serial port must be the same port connected by the console cable ...

Страница 32: ...ing the Router 3Com Corporation 4 3 Figure 4 3 Set the connection port Step 4 Click OK The Port Settings tab shown in Figure 4 4 appears where you can set serial port parameters Set the following parameters Baud rate 9600 Databit 8 Parity check none Stopbit 1 Flow control none ...

Страница 33: ...ure 4 4 Set communication parameters Step 6 Click OK The HyperTerminal dialog box appears Step 7 Select Properties Step 8 In the Properties dialog box select the Settings tab as shown in Figure 4 5 Step 9 Select VT100 or Auto detect from the Emulation dropdown menu Step 10 Click OK Figure 4 5 Set the terminal type ...

Страница 34: ...n the router Turn on the power switch on the router III Checking Operating after power on After powering on the router check that z The LEDs on the front panel show that the router is operating normally For description on LED behaviors refer to the section Generic Modules z The console terminal displays normally After you power on the router you can see the startup banner refer to the section Boot...

Страница 35: ... 3Com The prompt indicates that the router has entered user view and is ready for configuration Note z Immediately after 3Com 6000 Router 10 05 appears System starts booting 1 01 disappears 10 05 is the version of the Boot ROM z To have the system enter Boot Menu press Ctrl B within three seconds after Press Ctrl B to enter Boot Menu appears otherwise the system starts decompressing the program To...

Страница 36: ...eters z Then configure the link layer protocol and the related operating parameters according to the type of the WAN Step 4 Assign an IP address or IPX network number to each interface on the router according to subnetting Step 5 Configure routing When enabling a dynamic routing protocol you also need to configure the related operating parameters Step 6 Configure the security settings as needed St...

Страница 37: ...itch between different views through commands Normally you can only execute the commands appropriate to the view that you access However you can execute in any view some commands in common use such as ping display current configuration and interface 4 2 3 Arranging Slots and Numbering Interfaces The Router 6000 provides many types of interfaces such as console AUX Ethernet serial synchronous async...

Страница 38: ...ted by interface type X Y Z where interface type can be serial asynchronous ethernet or ATM and so on X specifies the slot number Y specifies the daughter card number it is 0 when no daughter card is installed and Z specifies the interface sequence number z As shown in the above figures different interfaces on an interface module share the same slot number X z For every interface Y starts from 0 a...

Страница 39: ...e of technical staff 5 2 Maintaining Software of the RPU2 5 2 1 Boot Menu The RPU2 and the share the same Boot Menu which is covered in this section Start the router when the message Press Ctrl B to enter Boot Menu appears press Ctrl B The console screen displays Please input bootrom password Enter the correct password void by default to have the system enter Boot Menu Boot Menu 1 Download applica...

Страница 40: ...r 2 Download From Net to Flash 3 Download From Net to Ram 4 Exit to Main Menu Enter your choice 1 4 1 3 Download an application image from the network to the CF card For the procedures refer to the section Upgrading the Application Image Using TFTP If you select this option the following Net Port Download Menu appears Net Port Download Menu 1 Change Net Parameter 2 Download From Net to CF 3 Downlo...

Страница 41: ...ct option 5 The console screen displays M MAIN B BACKUP S SECURE NO Name Size Type Time 1 main bin 5988025 N A Oct 10 2002 10 10 10 2 backup bin 5985198 B Oct 10 2002 10 10 10 3 a bin 5987491 M Oct 10 2002 10 10 10 4 s_system bin 5988022 S Oct 10 2002 10 10 10 5 Exit to main menu Where you can see that the type of a bin is now M Press Enter to return to Boot Menu 6 Clear the application configurat...

Страница 42: ...mpleting the configuration 9 Boot ROM Operation Menu Select option 9 to enter Boot ROM Download Menu as follows for upgrade backup or recovery Boot ROM Download Menu 1 Download Boot ROM with XModem 2 Download Extended Segment of Boot ROM with XModem 3 Restore Extended Segment of Boot ROM from FLASH 4 Backup Extended Segment of Boot ROM to FLASH 5 Exit to Main Menu Enter your choice 1 5 10 a Ignore...

Страница 43: ...lowing message appears Download speed is 115200 bps Change the terminal s speed to 115200 bps and select XModem protocol Press ENTER key when ready Step 3 Change your terminal s baud rate see Figure 4 4 to the same baud rate for software download 115200 bps in this example After that select Dial in Disconnect to disconnect the terminal and Dial in Dialing to reconnect it Then press Enter to start ...

Страница 44: ...n the screen Download completed Then the system asks you to select a file type please select file to be saved as 1 main application file 2 backup application file 3 secure application file 4 cancel downloading Enter your choice 1 4 After you select an option the system begins writing the file to Flash memory Writing to flash memory Please waiting it need a long time about 5 min Write Flash Success...

Страница 45: ...quent steps are the same as those described in the section for upgrading the application image Caution You are recommended to upgrade the entire Boot ROM program unless necessary and with the guide of technical staff because no means is available for on field restore in case of an update failure III Upgrading the extended segment of the Boot ROM image Step 1 Enter Boot Menu refer to the section Bo...

Страница 46: ...ion 8 to enter Boot ROM Download Menu Step 2 Select option 4 in the menu to copy the current extended segment to Flash memory Backup Extended Segment are you sure Y N Enter Y The system displays Writing to FLASH Please wait Backuping Boot ROM program to FLASH successed Step 3 When Boot ROM Download Menu appears again select option 5 to exit and reboot the router II Restoring the extended segment o...

Страница 47: ...nu select option 3 to enter Net Port Download Menu as follows Net Port Download Menu 1 Change Net Parameter 2 Download From Net to Flash 3 Download From Net to SDRAM and Run 4 Exit to Main Menu Enter your choice 1 4 1 3 Select option 1 in Net Port Download Menu for example to change the download parameters as follows Change Download parameter Download device eth0 Download file Max 60 char vrp bin ...

Страница 48: ...o Net Port Download Menu If you select option 3 in the menu to directly download the program to the SDRAM and run it there the downloaded application image cannot survive a reboot because the file is not written to Flash memory Note Upon completion of application image upgrade the router reboots and checks Boot ROM version for consistency before starting the VRP software If the version of the curr...

Страница 49: ... or consequence resulting from users operation without permission z Do not replace the hardware unless necessary and under the guidance of technical staff z Ensure that no electricity is present before servicing the device to avoid bodily injuries and device damage z Wear an ESD preventive wrist strap when servicing the device making sure it has good skin contact z Use the SDRAMs provided by 3Com ...

Страница 50: ...ong the guides until it well touches the power backplane inside the power slot Step 2 Fasten the two captive screws in the PSU panel Step 3 Check that the power switch on the panel is on Step 4 Plug one end of the power cord shipped with the router into the socket on the PSU and the other end to the power source Step 5 Power on the router and check that the RUN LED on the RPU2 is ON 6 3 Removing I...

Страница 51: ... Fan Module Step 1 Hold the handle on the fan module with one hand and the bottom with the other hand Slowly insert the fan module into the chassis along the guides until it well touches the backplane Step 2 Fasten the captive screws on the fan module Step 3 Power on the router and check that the FAN LED is solid ON 6 4 Removing Installing the Main Control Board Take RPU2 removal and installation ...

Страница 52: ...emory on the RPU2 cannot be replaced The following flowchart provides an overview of the SDRAM replacement process End Remove the RPU Locate the SDRAM on the RPU Remove the SDRAM Install the RPU Prepare tools Start End Remove the RPU Locate the SDRAM on the RPU Remove the SDRAM Install a new SDRAM Replace the RPU Prepare tools Start End Remove the RPU Locate the SDRAM on the RPU Remove the SDRAM I...

Страница 53: ...erexert I Removing the RPU SDRAMs are located on the RPU Before removing an SDRAM you must remove the RPU following the procedures described in the section Removing Installing the Main Control Board and locate the position of the SDRAM II Removing the SDRAM Step 1 Locate the position of the SDRAM see the following figure 1 1 SDRAM Figure 6 5 Position of the SDRAM on the RPU Step 2 Press the lockin...

Страница 54: ...the clip snap into the notches at both sides of the SDRAM IV Installing the RPU For RPU installation procedures refer to the section Removing Installing the Main Control Board 6 6 Removing Installing the Encryption Daughter Card The slot for the encryption daughter card is located on the RPU2 The following subsections describe the removal installation procedures assuming that the RPU2 has been rem...

Страница 55: ...on daughter card on the RPU2 Step 2 Fasten four bolts on the RPU2 using four screws which can fix and support the card Figure 6 7 Install the encryption daughter card I Step 3 Install the encryption daughter card on the RPU2 and fix it using another four screws Make sure that the two connectors on the bottom of the card are aligned with the connectors on the RPU2 to avoid connector damages Figure ...

Страница 56: ... 264 V off means the input voltage is abnormal 7 2 Troubleshooting the Configuration System If the router passes POST after powered up the console screen displays the startup banner if faults occur to the configuration system the console screen displays nothing or only illegible characters Symptom 1 After the router is powered on the console screen displays nothing Solution Step 1 Check that z The...

Страница 57: ...ber 0 processor number 0 file name Router6000 bin inet on ethernet e 1 1 1 1 host inet h 1 1 1 2 user u user ftp password pw password flags f 0x80 Loading Loading Failed Solution Fault occurs due to selection of the incorrect boot device ErrDev Change ErrDev to wancom the application upgrade device of the Router 6000 Symptom 2 Start the router and upgrade the application image using TFTP The conso...

Страница 58: ...uter and upgrade VRP software using TFTP The console screen displays DownLoad Program To Flash Through Net Port boot device wancom unit number 0 processor number 0 file name Router6000 bin inet on ethernet e 1 1 1 1 host inet h 1 1 1 3 user u user ftp password pw password flags f 0x80 Attached TCP IP interface to wancom0 Attaching network interface lo0 done Loading tftpGet Error occurred while tra...

Страница 59: ...user u user ftp password pw password flags f 0x80 Loading Done 1000 Bytes Downloaded Crc Error Solution Fault occurs because an incorrect application image file is downloaded Download the correct application image file Note The bar code labels on the chassis and the FICs contain information about production and servicing Before you ask your agent for servicing provide its bar code ...

Страница 60: ...s 8 1 1 Planning the Site Plan the installation site before installing the cabinet allowing adequate clearance around the cabinet for operation and maintenance Figure 8 1 shows the footprint of a single cabinet and Figure 8 2 shows the footprint of combined cabinets 1 Inner wall or reference 2 Cabinet rear 3 outer dimensions of the cabinet Figure 8 1 Footprint of the cabinet ...

Страница 61: ...mbined cabinets Figure 8 2 Footprint of the combined cabinets 8 1 2 General Installation Procedures You can mount your B68 cabinet on the concrete floor or antistatic floor as shown in Figure 8 3 Start Installation environment Cement floor Antistatic floor End Start Installation environment Cement floor Antistatic floor End Figure 8 3 General cabinet installation flow ...

Страница 62: ... installation and clean the area 8 2 Mounting Cabinets on the Concrete Floor To mount B68 cabinets on the concrete floor use the integrated anchor strips to fasten the cabinet feet The height of the feet is adjustable for installation on the floor that is not flat Caution The feet are insulated and the anchor strips include insulating units Correctly install the insulating units to insulate the eq...

Страница 63: ...2 big flat washer 7 Insulation washer 8 Insulating washer of the strip 9 Expansion tube 10 Expansion nut 11 Anchor strip Figure 8 5 Installing the mounting fixtures onto the anchor strip 8 2 2 Installation Flow As shown in Figure 8 6 installing the cabinet on the concrete floor includes these steps 1 Position the cabinets 2 Level the cabinets 3 Combine cabinets 4 Fix the cabinets 5 Test insulation...

Страница 64: ... to drill the mounting holes 2 Measure mark dots with a tape 3 Draw two lines parallel with the reference and 720 mm 28 3 in away from each other with an ink fountain 4 According to the design mark the position of a mounting hole on one of these two lines Based on this mark mark the position of other mounting holes 5 Verify marking and sizes to prevent mistakes Figure 8 7 and Figure 8 8 illustrate...

Страница 65: ...mark 3 Outer dimensions of the cabinet 4 Cabinet rear 5 Inner wall or reference Figure 8 7 Layout of the mounting holes and cabinet feet single cabinet 1 M12 expansion bolt 2 Foot mark 3 Outer dimensions of the cabinet 4 Cabinet rear 5 Inner wall or reference Figure 8 8 Layout of the mounting holes and cabinet feet two cabinets ...

Страница 66: ...e that the precision of marking and drilling is essential to hardware installation Low precision can cause many problems during installation Caution The depth of drilling is between 52 mm and 60 mm 2 0 in to 2 4 in Otherwise you will be unable to install or fasten the expansion bolts III Installing expansion bolts Prior to installation clean dust inside and outside the holes with a dust collector ...

Страница 67: ...abinet Feet After finishing marking move the cabinet to the planned location with its feet aligning with the corresponding feet marks Then follow these steps to adjust cabinet feet ensuring the cabinet is sturdy as shown in Figure 8 10 1 Place two horizontal rulers perpendicular to each other on the top of the cabinet to check that the cabinet is straight 2 Adjust the cabinet feet with a spanner t...

Страница 68: ... you only install one cabinet If multiple cabinets are used follow these steps to connect them together 1 Remove the cabinet covers as shown in Figure 8 11 2 Rotate the combining brackets on top of the cabinets 180 degrees tighten them and connect the cabinets with flat washers spring washers bolts and nuts as shown in Figure 8 12 3 Figure 8 11 illustrates the original position of the combining br...

Страница 69: ...binets 3Com Corporation 8 10 1 Upper frame of the cabinet 2 Combining bracket 3 M16x10 bolt 4 Cabinet cover Figure 8 11 Remove install the cover 1 M8 nut 2 Flat washer 8 3 Spring washer 8 4 M8x35 bolt 5 Combining bracket Figure 8 12 Install brackets for combining cabinets ...

Страница 70: ...e anchor strip 2 M16 cabinet feet 3 Anchor strip Figure 8 13 Install anchor strips II Installing insulating parts and fixing the anchor strips Follow these steps to install insulating parts and fix an anchor strip 1 Put the insulating washers under the anchor strip and align them vertically with the anchor strip fixing holes one anchor strip needs two insulating washers 2 Screw M12 70 bolts into t...

Страница 71: ...rips Fasten the retaining nut on the anchor strip as shown in area B in Figure 8 14 8 2 7 Testing Insulation Switch the multimeter to Mohm range and measure the resistance between the fastening bolts M12 70 and the anchor strips If the resistance is larger than five Mohm you can finish installation If not remove all anchor strip parts check that the insulation washers are installed and without dam...

Страница 72: ...3Com Router 6000 Family Installation Manual Chapter 8 Installing B68 Cabinets 3Com Corporation 8 13 Figure 8 15 Install a single cabinet on the concrete floor ...

Страница 73: ... are insulated and the anchor strips include insulating units Correctly install the insulating units to insulate the equipment from the earth ground before it is grounded 8 3 1 Introduction to Racks Racks are used for raising cabinets for flooring and cabling sake They are made of steel sheets Insulation can be ensured however because the cabinet feet are insulated and the anchor strips include in...

Страница 74: ...om Corporation 8 15 I Number of racks in use When installing multiple cabinets you need to use N 1 racks where N is the number of cabinets as shown in Figure 8 17 Figure 8 17 Mount a cabinet on the slide rails on a rack II Shape of racks Figure 8 18 illustrates an H800 series rack ...

Страница 75: ...mponents are available with the H800 series three of which are height adjustable and one is height fixed Table 8 1 gives the height range of the height adjustable components Table 8 1 Height ranges of the height adjustable components Component Height of antistatic floor mm I 210 to 255 mm 8 27 to 10 0 in II 256 to 345 mm 10 1 to 13 6 in III 346 to 525 mm 13 6 to 20 7 in IV Customized according to ...

Страница 76: ...ns stronger and keep the cabinets horizontal As shown in Figure 8 19 a slide rail segment is 600 mm 23 6 in long The standard shipment includes two segments for each cabinet 600mm 23 6 in 75mm 3 in 50mm 2in 600mm 23 6 in 75mm 3 in 50mm 2in Figure 8 19 Dimensions of slide rail segments 8 3 3 Installation Flow As shown in Figure 8 20 installing the cabinet on the concrete floor includes these steps ...

Страница 77: ...imensions of the cabinets and dimensions of racks do the following 1 Measure mark dots with a tape 2 Draw two lines parallel with the reference and 760 mm 29 9 in away from each other with an ink fountain 3 According to the design mark the position of the installation holes for a rack on these two lines Based on the marks mark the position of other rack installation holes 4 Verify marking and size...

Страница 78: ...ets 3Com Corporation 8 19 Figure 8 21 Layout of the installation holes on the H800 series racks 1 M12 expansion bolt 2 Foot mark 3 Outer dimensions of the cabinet 4 Cabinet rear 5 Inner wall or reference Figure 8 22 Layout of the mounting holes and cabinet feet single cabinet ...

Страница 79: ...tion Manual Chapter 8 Installing B68 Cabinets 3Com Corporation 8 20 1 M12 expansion bolt 2 Outer dimensions of the cabinet 3 Cabinet rear 4 Inner wall or reference Figure 8 23 Layout of the mounting holes and cabinet feet two cabinets ...

Страница 80: ...floor to prevent damages to the floor or tilted holes All the holes must have the same depth in the range 52 mm to 60 mm 2 0 in to 2 4 in Clean the holes before measuring their net depth After drilling a hole use a dust collector to clean the dust The bit is difficult to position on the floor that is hard and smooth In this case punch a small hole on the marks for the mounting holes before drillin...

Страница 81: ...rtically 3 Punch the expansion tube with rubber hammer until the expansion tube is completely buried into the floor Figure 8 25 illustrates how to install an expansion nut to an expansion tube 1 Expansion tube 2 Alignment groove 3 Expansion nut 4 Alignment rib Figure 8 25 Install an expansion nut onto an expansion tube Caution You must insert the alignment rib of expansion nuts into the alignment ...

Страница 82: ...nstallation Repeat these steps to install other racks 1 M12 60 bolt 2 Φ12 spring washer 3 Φ12 big flat washer 4 Expansion tube 5 Expansion nut 6 Height retaining bolt both sides 7 Retaining bolt middle 8 Height silkscreen of antistatic floor Figure 8 26 Fix a rack onto the floor Caution When fixing a rack fasten the retaining bolt in the middle first and then those at the two sides 8 3 6 Installin...

Страница 83: ...will not drop down 2 Insert the bolts into the rack holes in sequence 3 Measure in both transverse and longitudinal directions the slide rail segments with a horizontal ruler to check that the bubble in the horizontal ruler is in the middle If the slide rail is horizontal tighten the bolts in sequence and measure horizontality again If not adjust by adding or reducing washers See Figure 8 29 4 The...

Страница 84: ...0 bolt 5 Washer 6 Slide rail 7 Slide protective side Figure 8 28 Fix and level slide rails and racks 1 Measure in traverse direction 2 Measure in longitudinal direction 3 Slide rail Figure 8 29 Measure levelness of slide rails 8 3 7 Installing Antistatic Floor Supports Antistatic floor supports are used for supporting the antistatic floor around the cabinet ...

Страница 85: ...ts flat washers and spring washers Caution Make sure to use left and right brackets correctly 1 12 flat washer 2 12 spring washer 3 M12 20 bolt 4 T shape nut 5 Floor pallet fixing bracket 6 Left bracket 7 Right bracket Figure 8 30 Install the floor pallet fixing brackets and slide rail brackets II Installing the supports for the antistatic floor As shown in Figure 8 31 fix the front and side suppo...

Страница 86: ...de of the antistatic floor Then fasten the M12 35 bolts 8 3 8 Leveling Cabinets I Moving the cabinets to the position Lift the cabinets on the slide rails and align centers of the cabinet feet with the centers of the troughs on the slide rails vertically Align all cabinets II Leveling the cabinets Follow these steps to level the cabinets as shown in Figure 8 32 1 Unfasten the retaining nuts of the...

Страница 87: ... B68 Cabinets 3Com Corporation 8 28 1 M16 cabinet feet leveling screw Figure 8 32 Level cabinets III Locking cabinet feet As shown in Figure 8 33 fasten the retaining nuts on the cabinet feet until they mate the downside of the lower enclosure frame of the cabinets ...

Страница 88: ...mbining Cabinets If multiple cabinets are used follow these steps to connect them together 1 Remove the cabinet covers as shown in Figure 8 34 2 Rotate the combining brackets on top of the cabinets 180 degrees tighten them and connect the cabinets with flat washers spring washers bolts and nuts as shown in Figure 8 35 3 Figure 8 34 illustrates the original position of the combining brackets and Fi...

Страница 89: ...1 Cabinet front frame 2 Combining bracket 3 M16x10 bolt 4 Cabinet top cover Figure 8 34 Remove install the cover 1 M8 nut 2 8 flat washer 3 8 spring washer 4 M8x35 bolt 5 Combining bracket Figure 8 35 Install bracket combining brackets Caution After you combine the cabinets replace the removed covers ...

Страница 90: ...6 install the anchor strips two for each cabinet Caution The anchor strips must be installed in the orientation as shown in Figure 8 36 1 Retaining nut of anchor strip 2 Cabinet foot 3 Anchor strip Figure 8 36 Install anchor strips III Installing insulating parts and fixing anchor strips Follow these steps to install insulating parts and fix an anchor strip 1 Put the insulating washers under the a...

Страница 91: ...8 37 3 Torque the bolts to 45 Nm 1 Anchor strip retaining nut 2 Anchor strip 3 M16 cabinet feet 4 Insulating washer of anchor strip 5 M12 35 bolt 6 12 spring washer 7 12 big flat washer 8 Insulation washer Figure 8 37 Fix anchor strips IV Fixing the retaining nuts of the anchor strips Fasten the retaining nuts on the anchor strips as shown in area B in Figure 8 37 Torque the nuts to 45 Nm 8 3 11 T...

Страница 92: ...e requirement is satisfied Figure 8 17 illustrates how to install cabinets on the concrete floor 8 3 12 Restoring the Floor Cut the antistatic floor around the cabinets and restore the floor Figure 8 38 shows how to restore the floor and Figure 8 39 shows what the site should look like after the floor is restored Caution You may install the framework of the antistatic floor onto the side supports ...

Страница 93: ...3Com Router 6000 Family Installation Manual Chapter 8 Installing B68 Cabinets 3Com Corporation 8 34 Figure 8 39 B68 cabinets installed on the antistatic floor ...

Отзывы: