background image

13

For optimal performance, ensure the access point operates in temperature ranges 
between 0° C to 40° C (32° F to 104° F). When used with external antennas, the access 
point operating temperature range must be 15° C to 40° C (59° F to 104° F).

B

EFORE

 Y

OU

 B

EGIN

Record the access point MAC address and serial number in a safe place before the 
access point is installed in a hard-to-reach location. The MAC address is printed on the 
back of the access point housing.

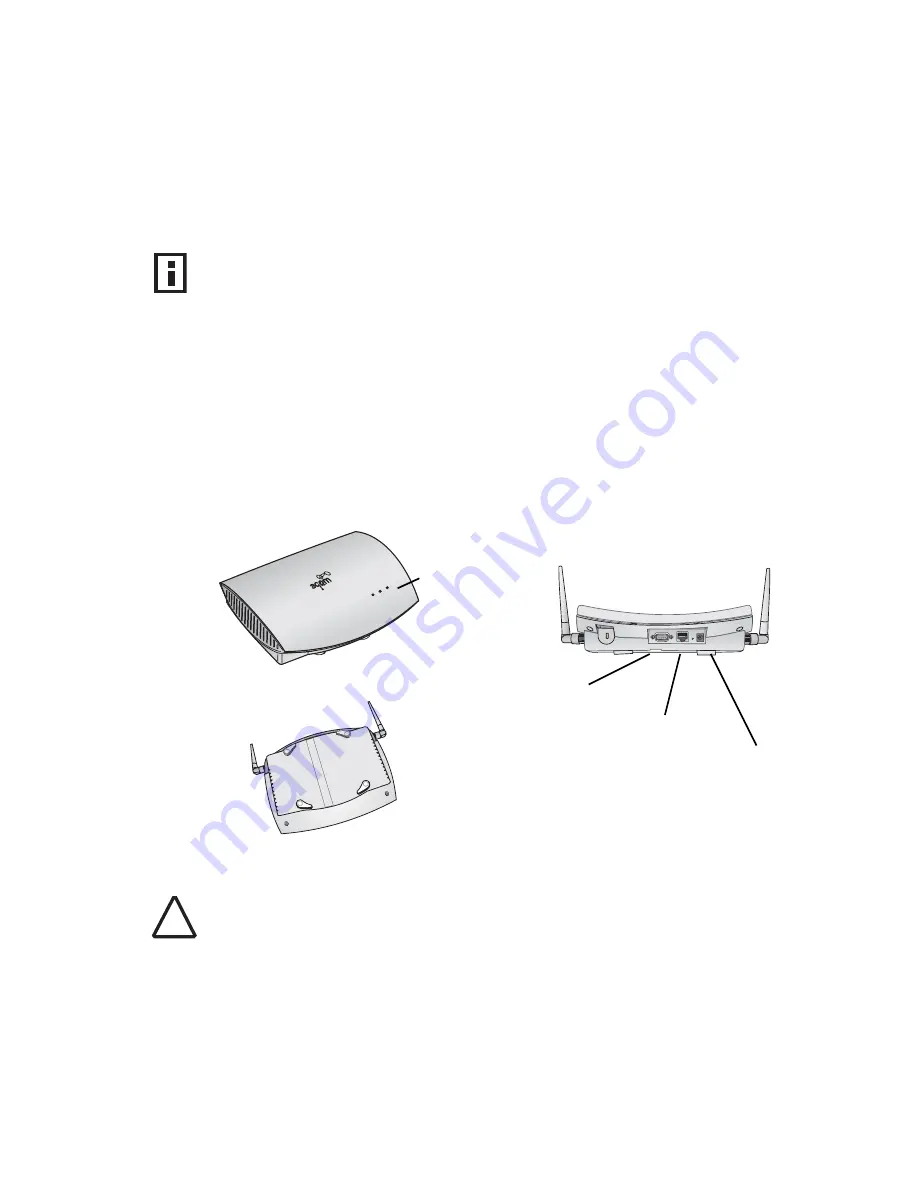
The following illustration shows the front and rear views of the access point, including 
the LEDs and connecting ports.

NOTE:

 Regulatory restrictions dictate that when this device is operational, the 

minimal body-to-antenna distance is 1 Meter (3 Feet).

R

a

d

io

E

th

e

rn

et

P

o

w

e

r

Access Point 7250 - Front

LEDs

Console port

Ethernet port

Power supply

Access Point 7250 - Back

CAUTION: 

Do not connect a telephone cable into the Ethernet port; doing so can cause 

serious damage to the access point.

!

Содержание 3CRWE725075

Страница 1: ...http www 3com com http www 3com com support en_US productreg frontpg html User Guide Wireless LAN Access Point 7250 3CRWE725075 Model WL 455 Published December 2003 ...

Страница 2: ...copy will be provided to you UNITED STATES GOVERNMENT LEGEND If you are a United States government agency then this documentation and the software described herein are provided to you subject to the following All technical data and computer software are commercial in nature and developed solely at private expense Software is delivered as Commercial Computer Software as defined in DFARS 252 227 701...

Страница 3: ...ace Equipment and Performing A Site Survey 12 Before You Begin 13 Connecting the Standard Antennas 13 Connecting Power 14 Using The Included AC Adapter 15 Using An Optional Power Over Ethernet Injector 15 Using a Power Over Ethernet LAN Port 16 Checking the LEDs 17 Mounting on a Wall 18 Flat Surface Installation 19 Selecting and Connecting a Different Antenna Model 20 Power Settings on the Access ...

Страница 4: ...ing 34 Filtering by Ethernet Protocol Type 35 SNMP 35 Administration 36 System Log 37 Status 38 Radio Interface 39 Radio Settings 39 Security 40 Configuring Authentication 40 Configuring Encryption 41 WPA Configuration 42 WEP Configuration 43 How to setup the access point for RADIUS authentication 44 How to setup the access point for WPA with 802 1x Session keys 45 How to setup the access point fo...

Страница 5: ...t 52 Register Your Product to Gain Service Benefits 52 Purchase Value Added Services 52 Where To Go For Help 52 Troubleshoot Online 52 Access Software Downloads 53 Contact Us 53 Telephone Technical Support and Repair 53 REGULATORY COMPLIANCE INFORMATION ...

Страница 6: ...The single wireless interface 802 11g 2 4 GHz 54 Mbps access point creates an enterprise class wireless LAN supporting up to 250 simultaneous users SECURITY 3Com offers one of the most robust suite of standards based security on the market today To protect sensitive data broadcast over the wireless LAN 3Com supports Wireless Equivalent Privacy WEP RC4 40 64 bit 128 bit and 152 bit shared key encry...

Страница 7: ...eless device software on multiple devices using 3Com Network Supervisor to simplify bulk updates With Power over Ethernet PoE support the same Category 5 cable that connects your access point to the data network also provides its power A single cable installation dramatically improves your choice of mounting configurations because you no longer need to consider AC power outlet locations PoE suppor...

Страница 8: ...ess network cards adapters and access point can be configured as Ad hoc for departmental or SOHO LAN Infrastructure for wireless LAN Infrastructure wireless LAN for roaming wireless PCs AD HOC WIRELESS LAN An ad hoc wireless LAN consists of a group of computers each equipped with a wireless adapter connected via radio signals as an independent wireless LAN Computers in a specific ad hoc wireless L...

Страница 9: ...r signal through one or more access points A wireless infrastructure can be used for access to a central database or for connection between mobile workers as shown in the following figure INFRASTRUCTURE WIRELESS LAN FOR ROAMING WIRELESS PCS The Basic Service Set BSS is the communications domain for each access point For wireless PCs that do not need to support roaming set the domain identifier SSI...

Страница 10: ...s a base station is the central radio transmitter receiver that maintains communications with the mobile radiotelephone sets within its range In cellular and personal communications applications each cell or micro cell has its own base station each base station in turn is interconnected with other cells bases BSS Basic Service Set It is an access point and all the LAN PCs that are associated with ...

Страница 11: ...ication and session based keys Roaming A wireless LAN mobile user moves around an ESS and maintains a continuous connection to the infrastructure network RTS Threshold Transmitters contending for the medium may not be aware of each other they are hidden nodes The RTS CTS mechanism can solve this problem If the packet size is smaller than the preset RTS Threshold size the RTS CTS mechanism will not...

Страница 12: ...af Power over Ethernet LAN equipment use the 3Com AC adapter that comes with the access point If your LAN equipment complies with the IEEE 802 3af Power over Ethernet standard you can connect directly to the equipment and the 3Com AC adapter is not needed Standard category 5 straight 8 wire Ethernet cable The cable must be long enough to reach the power supply or the Power over Ethernet LAN port I...

Страница 13: ...N Port on page 17 SAFETY INFORMATION This equipment must be installed in compliance with local and national building codes regulatory restrictions and FCC rules For the safety of people and equipment only professional network personnel should install the access point cables and antennas Note For use of the 3Com AC adapter part number 61 0107 000 in Norway This product is also designed for use on a...

Страница 14: ...mission If your location includes these kinds of obstructions you may need to add additional access points to improve coverage Configuring a wireless LAN can be as easy as placing a 3Com Wireless Access Point in a central area and making the necessary connections to the AP and the clients However installing multiple Access Points may require more planning Using the 3Com Site Survey tool located on...

Страница 15: ...reach location The MAC address is printed on the back of the access point housing The following illustration shows the front and rear views of the access point including the LEDs and connecting ports NOTE Regulatory restrictions dictate that when this device is operational the minimal body to antenna distance is 1 Meter 3 Feet R ad io E th er n et P o w er Access Point 7250 Front LEDs Console port...

Страница 16: ...up you may need to adjust the antennas to fine tune coverage in your area Depending on the coverage required for your site you may want to replace the standard detachable antennas with one of the external antennas available for use with the access point See Selecting and Connecting a Different Antenna Model on page 20 CONNECTING POWER It is advisable to connect the power and check the Ethernet cab...

Страница 17: ... the IEEE 802 3af standard If you supply your own Ethernet cable for connecting power be sure that it is standard category 5 straight through 8 wire cable that has not been altered in any way Use of nonstandard cable could damage the access point USING THE INCLUDED AC ADAPTER The power supply included with the Access Point 7250 is an AC adapter 1 Connect the power cord to the AC adapter and plug t...

Страница 18: ...ernet port on the access point 2 Connect the other end of the Ethernet cable to the port labeled To Access Point on the power supply 3 Connect the power cord to the power supply and plug the cord into a power outlet 4 To link the access point to your Ethernet network plug one end of another Ethernet cable into the port labeled To Hub Switch on the power supply and plug the other end into a LAN por...

Страница 19: ...ccess point LEDs light The illustration and the following table describe the LEDs and their functions Name Description Radio LED blinks red to indicate radio activity Faster blinking indicates more activity Ethernet LED lights yellow when a 10 Mpbs Ethernet link is established LED lights green when a 100 Mbps Ethernet link is established LED blinks to indicate activity on the Ethernet Faster blink...

Страница 20: ...ud install the top screw into the stud as shown at left in the illustration and then vertically align the mounting plate before installingthe bottom screw For installation on to drywall mark three screw holes using the mounting plate as a template for vertical alignment as shown at right in the illustration above Use a 5 mm 3 16 in drill bit if using the plastic anchors provided For drywall mounts...

Страница 21: ...of the access point 4 Position the access point at an angle to the mounting plate bayonet connection and turn the unit clockwise until it snaps into place as shown below FLAT SURFACE INSTALLATION The access point can also be placed on a flat surface such as a table desktop or filing cabinet Do not install the access point on any type of metal surface If you choose a flat surface mount select a loc...

Страница 22: ...point follow the building codes for antenna installations in your area Connect Ethernet cable Rotate antennas for best reception R ad io E th er ne t P ow er Note Regulatory restrictions dictate that when this device is operational the minimal body to antenna distance is 1 Meter 3 Feet Important Notes For FCC regulatory compliance reasons in the United States Canada and other countries governed by...

Страница 23: ...ccess is available for routing the antenna cable from the antenna to the access point 2 If they are installed remove both arms of the standard detachable antennas making sure not to handle the tips of the antennas 3 Connect one end of the optional antenna cable to the antenna and secure the antenna in place 4 Connect the free end of the antenna cable to either side connection on the access point a...

Страница 24: ...dBi 3CWE492 4dBi 3CWE490 3CWE497 8dBi 3CWE491 3CWE498 6 ft 3CWE480 100 100 100 20ft 3CWE481 100 100 100 50 ft 3CWE482 100 100 100 2 5dBi 3CWE492 4dBi 3CWE490 3CWE497 8dBi 3CWE491 3CWE498 13dBi 3CWE495 6 ft 3CWE480 100 100 25 12 5 20ft 3CWE481 100 100 100 25 50 ft 3CWE482 100 100 100 100 ...

Страница 25: ...ork Supervisor The 3Com Network Supervisor 3NS graphically discovers maps and displays network links and IP devices including 3Com wireless access points It is not required for access point management 3Com Site Survey Tool This utility assists in selecting the best location for your access point before installing the device permanently Use the Site Survey Tool to determine if the intended mounting...

Страница 26: ...ess network or connected directly to the computer and connected to power If more than one device using the factory default name is connected make a note of the MAC address of the device you want to select so that you can identify it in the device manager LAUNCHING A WIRELESS DEVICE CONFIGURATION If you do not have a DHCP server on your network it can take up to one minute for a device to become di...

Страница 27: ... For more information see Using the Pre IP Configuration Wizard on page 26 The next window prompts for an administrative password to allow the new IP address to be set When the units are shipped from the factory there is no administration password and you should leave the password field blank If an administration password has been set for the device enter the password and click Next The 3Com Web C...

Страница 28: ...ld blank If an administration password has been set for the device enter the password and click Next The Configuration Management System main page appears in the Web browser CONFIGURATION LOGIN After you launch the configuration from the device manager the login page appears in your browser The default Username is admin and the default password is no password For an initial configuration enter the...

Страница 29: ...eric characters and is case sensitive 4 In the Channel page select the channel options for the access point radios and click Next The channel options are 802 11g You can select from these options 802 11g Radio Channel Set the operating radio channel number Auto Channel Select When this mode is enabled the access point selects a radio channel automatically 5 In the TCP IP Settings page you can choo...

Страница 30: ...finished configuring items on this page click Apply DHCP CLIENT When DHCP Dynamic Host Configuration Protocol Client is enabled and a DHCP server is located on the network the network DHCP server assigns the IP address subnet mask and default gateway to the access point If there is no DHCP server on the network the access point automatically uses its default IP address 169 254 2 1 When DHCP Client...

Страница 31: ...etwork There are no special settings on the access point to distinguish between the various RADIUS policies or authentication types for example EAP MD5 EAP TLS EAP TTLS These policies are setup and controlled on the AAA server Note that for most RADIUS software packages the access point is actually called the RADIUS client and has a shared secret or secret key corresponding to the RADIUS setup pag...

Страница 32: ...ntication and Accounting RADIUS servers can have different secret keys Timeout The number of seconds the access point waits for a reply from the RADIUS server before it resends the request Retransmit attempts The number of times the access point will try to authenticate logon access Update Interval RADIUS Accounting Only This is the interval in seconds between accounting updates sent to the RADIUS...

Страница 33: ...ss related checks are performed on a client requesting authentication to the access point 802 1x Wireless Setup 802 1x is designed to enhance the security management of the wireless network Select one of the following options Disable The access point will neither initiate nor respond to any 802 1x authentication requests to or from wireless clients Supported Legacy clients non 802 1x and 802 1x cl...

Страница 34: ...entication to Network with Supplied Username and Password is selected the access point with authenticate using the username and password supplied If you press the Apply button when no password is specified the previous password will continue to be the one used You must enter the same password twice to successfully change the password Local MAC Authentication Client computers can be filtered using ...

Страница 35: ...back to the authenticating client The AP s IP address is the RADIUS Client Radius User Tunnel_type 64 VLAN 13 Tunnel_Medium_type 65 802 Parameter Description System Default Define the default filtering setting as Deny or Allow MAC Address Enter the MAC address of a client for the access control You can find the MAC address of a network card as follows Windows 95 98 ME Click Start Run Type winipcfg...

Страница 36: ...ting a more secure wireless network AP Management Filter Enable this filter to prevent wireless clients from accessing the access point for management for example through TELNET or SNMP CLIENT LIST TIMEOUT This option sets the timeout for inactive clients to be disassociated and removed from the associated client list The interval can be set to 1 5 10 30 or 60 minutes default is 30 minutes UPLINK ...

Страница 37: ...p to eight MAC addresses that WILL be allowed to communicate with clients of the AP Make sure to include the MAC of the local DHCP server if it not the same as the gateway as well as and redirect gateways and other servers that should be allowed to communicate with the AP s wireless clients Make sure to click on the save button on both the Uplink Filter List page as well as the Filter page to acti...

Страница 38: ...ty string box for a trap manager that will receive these messages Maximum length 23 characters ADMINISTRATION The Administration page allows you to perform access point management tasks as described below Change Password A password is required to configure the access point Enter the user name and new password in the spaces provided and click Apply It is recommended that you change the password fro...

Страница 39: ...nd management setup information are restored Parameters that are unique to individual access points such as device names IP addresses and administration passwords are neither affected nor overwritten Before restoring a configuration you can view a description of the restoration point by clicking the Restore User Comment button Comments made at the point the backup was created will appear in the Us...

Страница 40: ... saving time When the SNTP Server setting is disabled date and time settings revert to the defaults after an access point is reset affecting the accuracy of log reports To avoid this situation enable the SNTP server setting and allow the access point to obtain the date and time from an SNTP server The event log page will display the default time after a reset until the access point receives the co...

Страница 41: ...re to choose channels separated by at least five channels to avoid channel interference You can deploy up to three access points in the same area for example Ch1 Ch6 and Ch11 Auto Channel Select Select Auto Channel Select Enable to allow the access point to select a radio channel automatically Default Enable Transmit Power Set the signal strength transmitted from the access point The longer the tr...

Страница 42: ...rame the station sends a CTS Clear to Send frame to acknowledge the right of the sending station to send data frames The access points contending for the medium may not be aware of each other The RTS CTS mechanism can solve this hidden node problem Default 2346 Preamble Setting IEEE 802 11 frames begin with an alternating pattern of 1s and 0s called the preamble which tells receiving stations that...

Страница 43: ...ws user authentication If you check the Require Windows user authentication check box clients will be required to enter a user name and password every time they associate with the network If you leave this box unchecked the system will authenticate clients based on the access control list and the saved passwords on the clients 3 Create a User Access List There must be at least one entry in the Use...

Страница 44: ...ticast Cipher Mode and is only provided for support of legacy clients which do not fully support WPA Clients associated with WPA TKIP will have unicast packets directed at them with corresponding encryption keys However with WEP selected as the Cipher Mode ALL multicast traffic is sent out with WEP encryption It is recommended to only select WEP as the Cipher Mode if legacy client support is criti...

Страница 45: ...eys and the popular RC4 encryption algorithm At least one transmit key must be defined in the WEP Configuration Wireless devices without a valid WEP key will be excluded from network traffic The key selected as the transmit key index is used by the access point for all transmissions Other keys defined can be used by the access point for decrypting station communications When enabling 802 1x securi...

Страница 46: ...he left frame page Menu 5 Enter all the settings of your Primary RADIUS Authentication Server make sure the IP Address and Key match those on the RADIUS Authentication software 6 Click on Apply 7 Choose Authentication from the left frame page Menu 8 Make sure the following settings are set on the Authentication page a MAC Authentication is Disabled if Local or RADIUS MAC Authentication is chosen M...

Страница 47: ...t on the Authentication page a MAC Authentication is Disabled if Local or RADIUS MAC Authentication is chosen MAC address filtering or authentication respectively will be done before the 802 1x authentication Therefore these setups must be validated individually and verified functional before 802 1x can be done b 802 1x Wireless Setup is set to Optional if non RADIUS clients need access too or Req...

Страница 48: ...cation Therefore these setups must be validated individually and verified functional before 802 1x can be done b 802 1x Wireless Setup is set to Disabled or Optional if RADIUS clients need access too c Click on Apply 6 Click Security on the 802 11a b g radio from the left frame page Menu 7 Make sure the following settings are set from the Security page a Authentication is set to Open System b Encr...

Страница 49: ...Configuration Required check box and enter an appropriate WEP key For all WPA configurations 802 1x must be enabled on the Authentication page Windows XP Wireless Zero Configuration Access Points 7250 8250 8500 8750 Authentication Encryption Authentication Encryption Other Open Disabled Open System Disable WEP Open System Enable Enter static keys under WEP Configuration Shared Disabled Not availab...

Страница 50: ...ement WPA PSK Select Key Type and enter Pre Shared Key WEP Open System Enable WPA Configuration Required Multicast Cipher Mode WEP WPA Key Management WPA PSK Select Key Type and enter Pre Shared Key Windows XP Wireless Zero Configuration Access Points 7250 8250 8500 8750 Authentication Encryption Authentication Encryption Other ...

Страница 51: ...e subnet as the wired LAN If necessary reset the access point to the factory defaults Try the solutions in the following table If you need further assistance contact 3Com Technical Support through the following Web page http www 3com com products en_US supportindex jsp Symptom Solutions Access point does not power up Make sure the Ethernet cable is plugged into the port labeled To Access Point on ...

Страница 52: ...sers can roam are configured to the same WEP setting SSID and authentication settings Slow or erratic performance Try changing the wireless channel on the access point Check the access point antennas connectors and cabling for loose connections Check the wired network topology and configuration for malfunctions Running on a computer connected to the wired LAN the 3Com Device Manager cannot find an...

Страница 53: ... area to match If you change the IP address and save the change you cannot continue to configure the access point using the old IP address Therefore if you want to continue configuring this access point after you save this change you must do the following 1 Close your browser 2 Return to the 3Com Device Manager Wireless Network Tree and click Refresh 3 Select the access point and click Configure t...

Страница 54: ...24x7 telephone technical support software upgrades onsite assistance or advance hardware replacement Experienced engineers are available to manage your installation with minimal disruption to your network Expert assessment and implementation services are offered to fill resource gaps and ensure the success of your networking projects More information on 3Com Extended Warranty and Professional Serv...

Страница 55: ...te telephone number URL or e mail address from the list below You will find a current directory of support telephone numbers posted on the 3Com web site at http csoweb4 3com com contactus TELEPHONE TECHNICAL SUPPORT AND REPAIR To obtain telephone support as part of your warranty and other service benefits you must first register your product at http eSupport 3com com When you contact 3Com for assi...

Страница 56: ...om com Or request a repair authorization number RMA by fax using this number 65 543 6348 Europe Middle East and Africa Telephone Technical Support and Repair From anywhere in these regions call 44 0 1442 435529 You can also obtain support in this region using the following URL http emea 3com com support email html From the following countries you may use the numbers shown Austria Belgium Denmark F...

Страница 57: ...800 988 2112 0 810 444 3COM 1 800 998 2112 1 800 998 2112 1 800 998 2112 52 5 201 0010 1 800 998 2112 1 800 998 2112 0800 13 3COM 1 800 998 2112 AT T 800 9982112 AT T 800 998 2112 AT T 800 998 2112 1 800 998 2112 AT T 800 998 2112 AT T 800 998 2112 Guatemala Haiti Honduras Jamaica Martinique Mexico Nicaragua Panama Paraguay Peru Puerto Rico Salvador Trinidad and Tobago Uruguay Venezuela Virgin Isl...

Страница 58: ...used in accordance with the instructions may cause harmful interference to radio communications However there is no guarantee that interference will not occur in a particular installation If this equipment does cause harmful interference to radio or television reception which can be determined by turning the equipment off and on the user is encouraged to try to correct the interference by one or m...

Страница 59: ...igital apparatus complies with Canadian ICES 003 Avis de Conformité à la Réglementation d Industrie Canada Cet appareil numérique de la classe B est conform à la norme NMB 003 du Canada European Community CE Notice WL 455 802 11g Radio Module Marking by the symbol indicates compliance with the essential requirements of Directive 73 23 EC and the essential requirements of articles 3 1 b 3 2 and 3 3...

Страница 60: ...ance Metropolitan Departments Indoor Channels 1 13 Outdoor Channels 1 7 only Guadeloupe Martinique St Pierre et Miquelon Mayotte Indoor Channels 1 13 Outdoor Channels 1 13 Reunion et Guane Indoor Channels 1 13 Outdoor Channels 5 13 only Italy Indoor Channels 1 13 Outdoor Requires license from national spectrum authority for outdoor operation Austria Denmark Finland Germany Greece Iceland Ireland L...

Страница 61: ...installation 10 IP address troubleshooting 50 resetting 37 accounting 30 ad hoc 6 adapter choosing 25 administration 36 administration tool 24 advanced setup 28 antenna 13 20 comparison data 20 options 20 standard detachable 13 AP management filter 34 AP status 38 authentication 30 40 local MAC 32 MAC 31 open system 40 RADIUS MAC 31 shared key 40 automatic channel selection 39 B backup configurati...

Страница 62: ...unity name 36 configuration 24 advanced 28 basic 27 login 26 Configuration Management System 25 26 configuration backup and restore 36 Configure button 25 configuring encryption 41 connecting power 11 14 contact 36 country code 26 D data encryption 41 transfer speed 39 date and time settings 38 default gateway 28 device configuring 25 26 device manager 24 launching 24 DHCP client 28 ...

Страница 63: ...ntrol 33 firmware upgrade 36 flat surface installation 19 fragment length 39 G gateway default 28 glossary of wireless networking terms 8 I identification 28 IEEE 802 3af power over Ethernet 14 infrastructure configuration 6 installation 10 access point 10 antenna 13 cable 10 flat surface 19 location 12 power 11 requirements 10 software utilities 22 23 wall mount 18 IP address 28 ...

Страница 64: ...ices 24 25 MAC address 33 location configuration parameter 36 for installation 12 log 37 login 26 M MAC address locating 33 recording 13 use in locating devices 24 25 MAC authentication 31 maximum station data rate 39 mounting on a wall 18 plate 18 N native VLAN ID 34 network configuration and planning 6 NIC choosing 25 O open system 40 P passphrase 43 ...

Страница 65: ...io interface 38 RADIUS accounting 30 RADIUS Authentication Setup Steps 44 RADIUS MAC authentication 31 reauthentication refresh rate 32 recording MAC address 13 Refresh button 25 resetting a bridge 29 resetting the access point 37 restore configuration 36 RF preamble 40 roaming 7 RTS threshold 40 S safety information 11 secure web server connection 29 session key refresh rate 31 setting the time a...

Страница 66: ...tem configuration 24 system log 37 T TCP IP settings 28 terminology 8 time and date settings 38 transmission power 39 trap destination 36 troubleshooting 49 U upgrading firmware 36 user access list 128 bit Dynamic Security Link 41 V VLAN 34 VLAN ID 34 W wall mount installation 18 web server secure connection 29 WEP 41 43 Windows XP Wireless Zero Configuration 46 wireless network tree 24 WPA 41 42 ...

Отзывы: