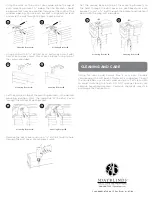
• Using a drill with a
1
/
16
" drill bit or an awl make a small pilot
hole at each pencil mark. Mount each bracket using two of
the screws provided.
• Set the cornice on top of the mounting brackets in the desired
mounting position. Mark the underside of the dust cover
through the bottom of each bracket.
• Set the cornice back on top of the mounting brackets so
the holes through the dust cover are positioned over each
bracket. Insert a
5
/
8
" bolt through the bracket and tighten it
down with the wing nuts provided.
• Remove the dust cover and use a
3
/
16
" drill bit to drill a hole
through the dust cover at each pencil mark.
Part #00001-074-000 © 3 Day Blinds, Inc. 03/09
800-800-3329 | 3dayblinds.com
• Using the mark on the wall as your guide, place the top of
each mounting bracket
1
/
4
" below the line. Brackets should
be equidistant from one another throughout the width of the
window opening. Ensure each bracket is aligned and level
and mark the wall through the hole in each bracket.
1
/
4
"
1
/
4
"
A
A
b
b
Mounting Bracket
b
Mounting Bracket
b
Mounting Bracket
A
Mounting Bracket
A
A
b
Mounting Bracket
b
Mounting Bracket
A
A
b
Mounting Bracket
b
Mounting Bracket
A
clEANING AND cARE
Caring for your wood Cornice Box is very easy. Periodic
vacuuming with a soft brush attachment is suggested. To dust
the Cornice Box, use a lamb’s wool duster or a soft clean cloth
to avoid scratching the finish. DO NOT sponge clean or use
abrasive household cleansers. Corrosive chemicals may stain
or damage the Cornice Box.


