background image

2N® Indoor View User Manual

35

 /  

110

3.2.2 Directory

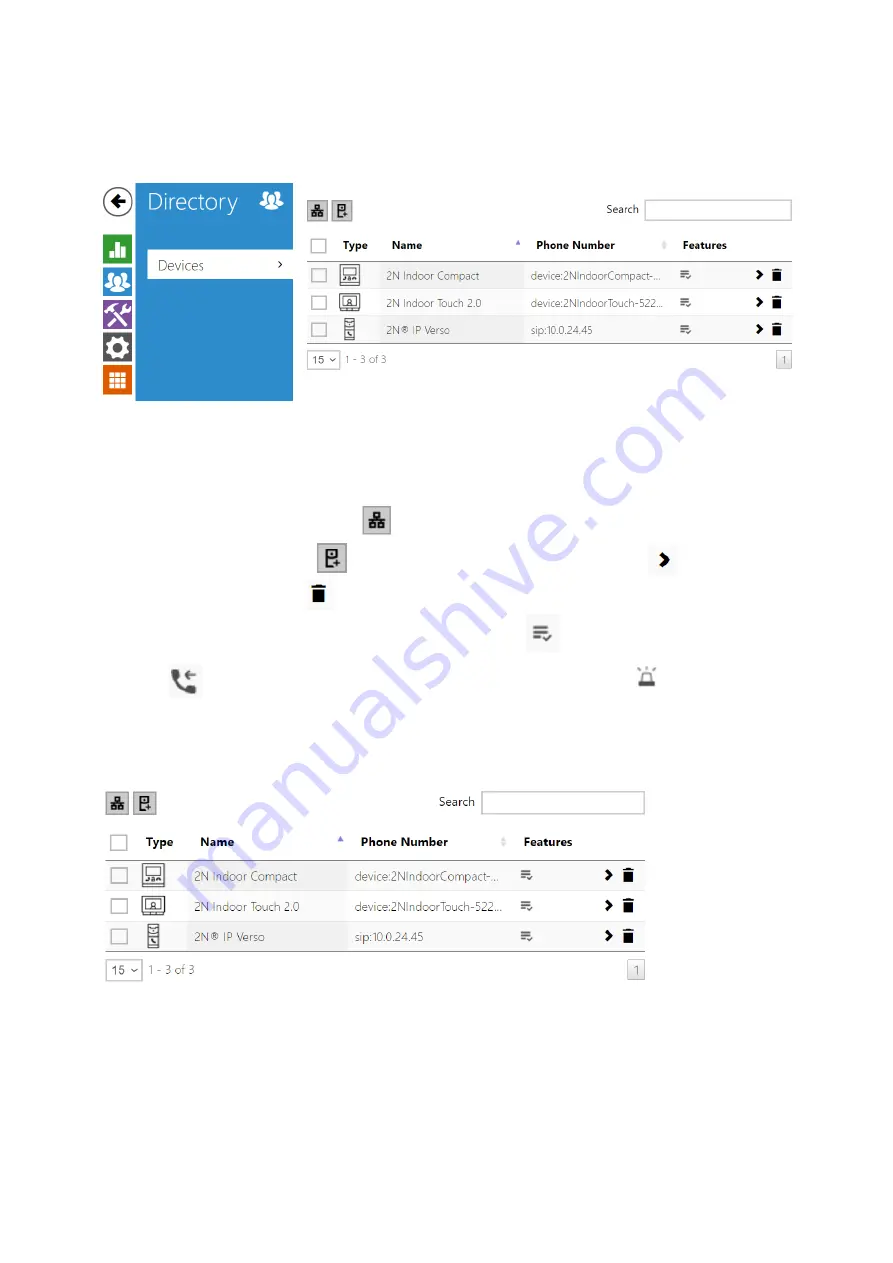
Directory is one of the crucial parts of the device configuration. It helps add new devices (2N IP 

intercoms and other answering units) and provides essential information on them. 

Up to 200 

devices can be added to the directory.

The Search function works as a fulltext search in names and phone numbers. It searches for all 

matches in the whole directory. The 

 icon helps find registered devices and add them to the 

Directory list if necessary. The 

 icon helps create a new device and the 

 icon displays 

the user settings details. The 

 icon helps remove a device from the list deleting all its data. 

You can arrange the list according to the name or feature ( 

indicates that the device may be 

displayed, 

 indicates that incoming calls are allowed to the device, 

 indicates the 

feature of the device to which the call started with a short call button press is created and 
indicates the feature of the device to which the alarm call started with a the doorbell button 
press is created). One list page can include 15, 25 or 50 devices.


Each device list item includes the following data:

Содержание 91378601

Страница 1: ...2N Indoor View User Manual v 2 34 www 2n com ...

Страница 2: ...2 Quick installation guide 2 3 Installation Conditions 2 4 2N Indoor View LAN Location via 2N Network Scanner 2 5 IP Address Lookup 3 Configuration 3 1 Factory Reset 3 2 Software Configuration 4 Device Control via Display 4 1 Call Log 4 2 Directory 4 3 Settings 5 Operational Statuses 6 Maintenance Cleaning 7 Technical Parameters 8 Supplementary Information 8 1 Troubleshooting 8 2 Directives Laws a...

Страница 3: ...ternal supply connectors 2N Indoor View is a top quality cost efficient and easy to install and configure answering unit One installation can combine variable answering units manufactured by 2N Telekomunikace a s 2N Indoor View is equipped with a specific user interface for an increased user comfort and safety 2N Indoor View basic features 7 color LCD video display full duplex handsfree HD audio c...

Страница 4: ...oor units 2N Part No 91378601 Axis Part No 02087 001 2N Indoor View black Indoor answering audio video unit with touchscreen designed for all 2N IP intercoms 2N Part No 91378601WH Axis Part No 02088 001 2N Indoor View white Indoor answering audio video unit with touchscreen designed for all 2N IP intercoms ...

Страница 5: ...2 0 black WiFi version third and fourth Part Nos 2N Indoor Touch 2 0 an elegant indoor touch panel is designed for all of the 2N IP intercoms The display panel shows you the person standing at your door and helps you make conversation with the visitor open the door lock or switch on the entrance hall lights 2N Part No 91378382 Axis Part No 01425 001 2N Indoor Touch desk stand black ...

Страница 6: ...ersion third and fourth Part Nos 2N Indoor Touch 2 0 an elegant indoor touch panel is designed for all of the 2N IP intercoms The display panel shows you the person standing at your door and helps you make conversation with the visitor open the door lock or switch on the entrance hall lights 2N Part No 91378382W Axis Part No 01426 001 2N Indoor Touch desk stand white ...

Страница 7: ... touchscreen designed for all 2N IP intercoms 2N Part No 91378501WH Axis Part No 01936 001 2N Indoor Compact white Indoor answering audio video unit with touchscreen designed for all 2N IP intercoms 2N Part No 91378401 Axis Part No 01698 001 2N Indoor Talk black Indoor answering audio unit with touchscreen designed for all 2N IP intercoms ...

Страница 8: ...ned for all 2N IP intercoms Mounting Accessories 2N Part No 91378800 Axis Part No 01700 001 Installation box for 2N indoor answering units for installation in a wall or plasterboard Not included in the 2N Indoor View package 2N Part No 91378803 Axis Part No 02320 001 Wall mounting box for 2N answering units Not included in the 2N Indoor View package ...

Страница 9: ...phone GXV3240 is the successor to the popular GXV3140 model which provides comfortable video calls in the IP network Touchscreen and keypad control 2N Part No 91378357 Axis Part No 01422 001 Grandstream GXV3275 VoIP video telephone GXV3275 is the successor to the popular GXV3175 model which provides comfortable video calls in the IP network Touchscreen control 1 3 Terms and Symbols Used The follow...

Страница 10: ...s as it emits electromagnetic interference The permitted scope of operating temperatures is specified in chapter 6 Technical Parameters The device may not be operated at places exposed to direct sunlight or near heat sources 2N Indoor View is designed for indoor use It may not be exposed to rain flowing water condensing moisture fog and so on It may not be exposed to aggressive gases acid and solv...

Страница 11: ...n and configuration techniques are not intended for persons with diminished physical sensory or mental capacities or persons with limited experience and knowledge unless expertly supervised or duly advised as to the use of this product by a person responsible for their safety ...

Страница 12: ...installation guide 2 3 Installation Conditions 2 4 2N Indoor View LAN Location via 2N Network Scanner 2 5 IP Address Lookup 2 1 Before You Start Package Completeness Check Please check the product delivery before starting installation Contents 1x 2N Indoor View 2x External power and doorbell button terminals 1x Certificate of ownership 1x 2 5 mm hexagon key wrench 1x Quick Start manual 1x display ...

Страница 13: ...2N Indoor View User Manual 13 110 1 2 3 4 Front Layout Display Microphone Speaker Anchoring holes ...

Страница 14: ...oorbell button input 12 V 1 A DC power supply input Ethernet 2N Indoor View is designed for flush mounting brick plasterboard wood Use the flush mounting box Part No 91378800 which is not included in the package Alternatively the product can be mounted into a desk stand Part No 91378802 which is not included in the package Caution ...

Страница 15: ...ugh If the hole complies with the box size wall in the box and level the box using a water level on the holding clips When the mortar hardens break off the clips and cap the box with the cover provided Use anchoring elements to fix the device into plasterboard Before starting the mechanical installation on a selected place make sure carefully that the preparations connected with it drilling wall c...

Страница 16: ...First plug the green power doorbell connector Connect the LAN connector Put the cables carefully in the pre drilled 2N Indoor View back slot to prevent them from blocking any horizontal levelling movement during the final installation stage Insert 2N Indoor View in the flush mounting box making sure that it clicks onto the levelling pins The pins allow for a 5 6 inclination on either side for accu...

Страница 17: ...e humidity and abrupt temperature changes The device may not be exposed to aggressive gas acid vapors solvents etc The device is not intended for direct connection into the Internet WAN The device must be connected to the Internet WAN via a separating active network element switch router The device is designed for indoor use It may not be exposed to rain flowing water condensing moisture fog etc T...

Страница 18: ...ols Ethernet cable connector Ethernet socket Firmware Upload We recommend you to upgrade the 2N Indoor View firmware during installation Refer to www 2n com for the latest FW version Refer to 3 2 5 System for the firmware upgrade procedure Caution Factory reset results in a change of the Ethernet interface configuration A defective Ethernet cable may lead to a high packet loss in the Ethernet and ...

Страница 19: ...Make sure that Microsoft NET Framework 2 0 is installed for successful app installation Run the 2N Network Scanner Use the Setup Wizard for successful installation Setup Wizard application 2N IP Network Scanner Having installed the 2N IP Network Scanner start the application using the Microsoft Windows Start menu Once started the application begins to automatically search for all the 2N IP interco...

Страница 20: ...vice IP address select Config and enter the required static IP address or activate DHCP The default configuration password is 2n If the found device is grey highlighted its IP address cannot be configured using this application In that case click Refresh to find the device again and check whether multicast is enabled in your network Tip Double click the selected row in the 2N IP Network Scanner li...

Страница 21: ...4 2N Indoor View LAN Location via 2N Network Scanner Once started the application begins to automatically search for all the 2N IP intercoms in the LAN including their smart extensions 2N Indoor View 2N Indoor Compact 2N Indoor Talk 2N Indoor Touch which are DHCP statically assigned IP addresses All the devices are displayed in a table including the IP addresses assigned to them To find the 2N Ind...

Страница 22: ...ndoor View is connected to the LAN and has to be assigned a valid IP address or obtain the IP address from the LAN DCHP server Configure the IP address and DHCP in the System Network menu Use DHCP server enable automatic obtaining of the IP address from the LAN DHCP server If there is no DHCP server or the DHCP cannot be used in your network use the manual network setting ...

Страница 23: ...ameters below unless Use DHCP server is enabled Network mask set the network mask Default gateway address of the default gateway which provides communication with off LAN equipment Primary DNS primary DNS address for domain name to IP address translation Secondary DNS secondary DNS address where the primary DNS is unavailable ...

Страница 24: ...canner Language Selection Use the menu in the right hand upper corner of the web interface to select language Language Selection 3 1 Factory Reset 3 2 Software Configuration 3 1 Factory Reset Reset Button Located among the main unit connectors the Reset button helps you reset the factory default values restart the device find the device IP address and switch the static dynamic mode IP Address Find...

Страница 25: ... approx 15 35 s Wait until the red LED goes off and the acoustic signal can be heard approx for another 3 s Release the RESET button The following network parameters will be set after restart IP address 192 168 1 100 Network mask 255 255 255 0 Default gateway 192 168 1 1 Note The delay after pressing RESET till the first light and sound signalling is set to 15 35 s depending on the 2N IP intercom ...

Страница 26: ...on again and the acoustic signal can be heard approx for another 3 s Release the RESET button Factory Reset Follow the instructions below to reset the factory default values Press and hold the RESET button Wait until the red and green LEDs go on simultaneously and the acoustic signal can be heard approx 15 35 s Wait until the red LED goes off and the acoustic signal can be heard approx for another...

Страница 27: ...2N Indoor View User Manual 27 110 ...

Страница 28: ...evice Restart Press the button shortly 1 s to restart the system without changing configuration Note For the 2N Indoor View the time interval between a quick press of the RESET button and reconnection of the device to the network is 20 s ...

Страница 29: ... to return to this screen anytime The screen header includes the device name refer to the Display Name parameter in the Services Phone SIP menu Use the buttons to select the web interface languages Click the Log out button in the right hand upper corner to log out The start screen also provides the first menu level and quick tile navigation to selected 2N Indoor View configuration sections Some ti...

Страница 30: ...2N Indoor View User Manual 30 110 3 2 1 Status 3 2 2 Directory 3 2 3 Services 3 2 4 Hardware 3 2 5 System ...

Страница 31: ... clear status and other current information on the device The menu consists of three tabs Device Services Events 3 2 1 1 Device 3 2 1 2 Services 3 2 1 3 Events 3 2 1 1 Device Device The tab displays information on the model its features firmware and bootloader versions etc ...

Страница 32: ...evice is equipped with control backlight 2N IP Verso 2N IP Solo 2N IP Base 2N IP Vario 2N IP Force 2N IP Safety a 2N IP Uni 2N Indoor View 2N Indoor Compact 2N Indoor Talk 2N Indoor Touch 2 0 2N IP Indoor Touch If a speaker is not integrated in the device make sure than an external speaker is connected 2N IP Audio Kit a 2N IP Video Kit to use sound signalling 3 2 1 2 Services Services The Services...

Страница 33: ...2N Indoor View User Manual 33 110 ...

Страница 34: ...2 1 3 Events Events The tab displays the last 500 events captured by the device Every event includes the capturing time and date event type and detailed description The events can be filtered by type in a dropdown menu above the event log ...

Страница 35: ... the Directory list if necessary The icon helps create a new device and the icon displays the user settings details The icon helps remove a device from the list deleting all its data You can arrange the list according to the name or feature indicates that the device may be displayed indicates that incoming calls are allowed to the device indicates the feature of the device to which the call starte...

Страница 36: ...ng calls account 1 or 2 Enter S or N to force an encrypted or unencrypted call respectively The account and encryption selections can be combined into the suffix 1S for example Enable Camera Switching set whether or not an external camera is available at the contact terminal equipment accordingly the internal external camera button is is not displayed during calls and call previews With some 2N te...

Страница 37: ...ame enter the code assigned to unlock button 1 2 3 4 Lift select the door lock lift unlock button icon on the display Code 1 2 3 4 It is used for remote unlocking of the entrance door for example Make sure that the code includes at least two door unlocking characters via the intercom keypad and at least one door unlocking DTMF character via a phone The supported characters also inlcude or Four cha...

Страница 38: ...2N Indoor View User Manual 38 110 3 2 3 Services Here is what you can find in this section 3 2 3 1 Phone 3 2 3 2 Unlocking 3 2 3 3 HTTP Command 3 2 3 4 User Sounds 3 2 3 5 Web Server 3 2 3 6 Weather ...

Страница 39: ... 2N Indoor View Phone includes the following four tabs SIP 1 complete SIP account settings SIP 2 complete SIP account settings Calls incoming and outgoing call settings Audio audio codec DTMF and other audio stream parameter transmission settings Video video codec and SDP codec settings 2N Indoor Units general parameters and count of identified LAN devices SIP 1 and SIP 2 2N Indoor View helps you ...

Страница 40: ... the device is registered Typically it is equivalent to the SIP Proxy or Registrar address Test Call display a dialogue window enabling you to make a test call to a selected phone number see below Use Authentication ID select the use of an alternative ID for device authentication Otherwise the Phone number value from the previous section is used for authentication Authentication ID set the alterna...

Страница 41: ...et the SIP Registrar port typically 5060 Backup Registrar Address set the backup SIP Registrar IP address or domain name The address is used where the main registrar fails to respond to requests Backup Registrar Port set the backup SIP registrar port typically 5060 Registration Expires set the registration expiry which affects the network and SIP Registrar load by periodically sent registration re...

Страница 42: ...or verifying the intercom s authority to communicate with the SIP server Local SIP Port set the local port for thedevice for SIP signaling A change of this parameter will not be applied until the deviceis restarted The default value is 5060 PRACK Enabled enable the PRACK method for reliable confirmation of SIP messages with codes 101 199 REFER Enabled enable call forwarding via the REFER method Se...

Страница 43: ...ss set the public IP address or router name to which the device is connected If the device IP address is public leave this parameter empty Starting RTP Port set the initial local RTP port in the range of 64 ports used for audio and video transmission The default value is 4900 i e the range is 4900 4963 The parameter is only set for account 1 but applies to both the SIP accounts RTP Timeout set the...

Страница 44: ... keypad button to pick up Automatic the device picks up incoming calls automatically You can set the call receiving mode for each SIP account separately Pick up in this parameter is only active when the Automatic pickup mode is enabled The call is picked up automatically after the preset timeout Ring Time Limit set the maximum call setup and ringing time in which all outgoing calls are automatical...

Страница 45: ... Image Count set the count of snapshots that shall be automatically taken during a call and saved into the call log Caution If the Save Image during Call function is disabled all the snapshots will be deleted but the call logs will be preserved ...

Страница 46: ... make the function work properly In Band Audio enable the classic method of sending DTMF in the audio band using standardized dual tones RTP RFC 2833 enable DTMF sending via the RTP according to RFC 2833 SIP INFO RFC 2976 enable DTMF sending via SIP INFO messages according to RFC 2976 The tab below helps you define how DTMF characters shall be received from the intercom Check the opponent s DTMF r...

Страница 47: ...he set value is sent in the TOS Type of Service field in the IP packet header Jitter Compensation set the buffer length for compensation of interval unevenness in audio packet arrivals A higher capacity improves the transmission resistance at the cost of a greater sound delay Video Enable disable the use of video codecs for call setups and set their priorities H 264 Payload Type 1 2 set the video ...

Страница 48: ...evice device_ID in these devices Access Key 1 2 set the access key shared by the 2N answering units and intercoms If the keys in the 2N answering units and the intercoms fail to match the devices cannot communicate i e the intercom cannot call the 2N answering unit and vice versa Access Key set the access key shared by the 2N answering units and intercoms If the keys in the 2N answering units and ...

Страница 49: ...g is another function of 2N Indoor View which sets the remote door unlocking parameters Default Unlock Code use this code when a call has been set up with a device phone number that is not added to the unit phone book Hang Up After Door Unlocking end the call when the door unlocking request has been sent successfully Hang Up Timeout end the call when the door unlocking request sending timeout has ...

Страница 50: ..._address path E g http 192 168 1 50 relay1 on If the parameter is empty the command is not sent Icon choose the HTTP command button icon The button is displayed on the device home page and can be used for sending the set HTTP command Name set the HTTP command name Username set the user name for authentication of the HTTP command to be sent by pressing a button The parameter is mandatory only if th...

Страница 51: ...llowing states Ringtone before call pickup Ringing tone Busy tone Call end signaling Doorbell Sound Mapping Ringing before Call Pickup set the ringtone to be played before an incoming call is picked up device ringtone Ringback Tone set the sound to be played when the called user is ringing The PBX ringtone is preferred to the user ringtone in the device Call Busy Tone set the tone to be played whe...

Страница 52: ...load up to 10 user sound files to the device and name each of them for better orientation Press to upload a sound file to the device Select a file from your PC and click Upload Press to remove a file Click to play a successfully uploaded sound file locally on your PC Press to record a sound file via your PC microphone ...

Страница 53: ...ssible List of Parameters Device Name set the device name to be displayed in the right hand upper corner of the web interface in the login window and in other applications if necessary Network Scanner etc Web Interface Language set the default language after the administration web server login Use the upper toolbar buttons to change the web interface language temporarily any time Password set the ...

Страница 54: ...r communication encryption between the device HTTP server and the user web browser Choose one of the three sets of user certificates and private keys refer to the Certificates subs or keep the Self Signed setting in which the certificate automatically generated upon the first intercom power up is used Remote Access Enabled enable remote access to the device web server from off LAN IP addresses Ori...

Страница 55: ...on the device Location set the device location for weather forecast If Show Weather is enabled and the Location parameter is empty Prague will be displayed by default Otherwise the weather and Location values will be hidden Displayed Location location Shown on Display If not completed the weather forecast location is displayed Temperature Units select the temperature units to be displayed Last Upd...

Страница 56: ...2N Indoor View User Manual 56 110 Location Found weather forecast location found by the weather service Country country of the automatically defined or completed location ...

Страница 57: ...2N Indoor View User Manual 57 110 3 2 4 Hardware Here is what you can find in this section 3 2 4 1 Audio 3 2 4 2 Display 3 2 4 3 Digital Inputs ...

Страница 58: ...cluding call volume signaling tone volume and so on Consider the noise level of the ambient environment while setting this parameter List of Parameters Call Volume set the phone call volume Ringtone Volume set the incoming call ringtone volume Call Progress Tone Volume set the dialtone ringtone and busy tone volume levels In case the call progress tones are automatically generated by the PBX this ...

Страница 59: ... address lost User Sound Volume set the volume of the user sounds The volume values are relative against the set master volume DND Mode for Doorbell Button if this function is activated the device will not ring when the doorbell is pressed Reject Call if this function is activated the device reject calls in the Do not Disturb mode The function can be used for immediate call redirection at absence ...

Страница 60: ... the Setting menu Display Time in Idle Mode switch off the device display and all backlight in the idle mode Display Backlight Intensity set the backlight brightness level Set the value as a percentage of the maximum possible LED brightness Reduction of intensity in idle mode to sets the level of reduction of the intensity of backlighting if the device goes into Idle Mode Go to Idle Mode in set th...

Страница 61: ...eed as follows Download the original language file English Modify the file using a text editor replace the English texts with your own ones Upload the modified localization file back to the intercom Set Language Settings Language to Custom Check and correct if necessary the texts on the intercom display ...

Страница 62: ... 2 4 3 Digital Inputs This subsection describes the digital input options of the device Doorbell Button Function select doorbell function doorbell alarm call The button is used either as a classical doorbell or for alarm call activation ...

Страница 63: ...Indoor View User Manual 63 110 3 2 5 System Here is what you can find in this section 3 2 5 1 Network 3 2 5 2 Date and Time 3 2 5 3 Certificates 3 2 5 4 Auto Provisioning 3 2 5 5 Syslog 3 2 5 6 Maintenance ...

Страница 64: ...server The Network section helps you configure the IP address and DHCP Tip If you want to ascertain the current IP address of your 2N Indoor View you can use the 2N Network Scanner application which can be freely downloaded from www 2n com and use the mechanism described in chapter 2 4 Searching for the 2N Indoor View device in the network with the aid of 2N Network Scanner ...

Страница 65: ...f the device The address is used together with the parameters below unless Use DHCP server is enabled Network Mask network mask setting Default Gateway default gateway address for off LAN communication Primary DNS primary DNS address for domain name to IP address translation Secondary DNS secondary DNS address where the primary DNS is unavailable Hostname set the device LAN identification Vendor C...

Страница 66: ...bps or 100 Mbps Verify the network address accessibility verify the network address accessibility via the Ping command in standard operating systems Press Ping to display a dialogue for you to enter the IP address domain name and press Ping to send the test data to the set address If the IP address domain name is invalid a warning is displayed and the Ping button remains inactive until the IP addr...

Страница 67: ...entication of network devices via the 802 1x EAP TLS protocol Do not enable this function if your LAN does not support 802 1x If you do so the intercom will become inaccessible Trusted Certificate specify the set of trusted certificates for verification of the RADIUS server public certificate validity Choose one of three sets of certificates refer to the Certificates subsection If no trusted certi...

Страница 68: ...2N Indoor View User Manual 68 110 the LAN Choose one of three sets of user certificates and private keys refer to the Certificates subsection ...

Страница 69: ...sted certificate is included the RADIUS public certificate is not verified Password enter the access password for PEAP MSCHAPv2 authentication Trace The Trace tab helps you trigger capturing of incoming and outgoing packets via the 2N Indoor View LAN interface The captured packets are stored in a 4 MB buffer When the buffer storage capacity is full the oldest packets are rewritten automatically Yo...

Страница 70: ...time Time in 2N Indoor View can be synchronised with any available SNTP server In standard operational conditions the 2N Indoor View real time circuit accuracy is 0 005 which may represent an error of up to 2 minutes per month Note A correct date time value is unnecessary for the basic function of 2N Indoor View but crucial for a proper function of time profiles and correct event times in variable...

Страница 71: ...able or disabled N A is displayed Manual Selection set the installation site time zone Set the time shift and summer winter time transitions Custom Rule if the device is installed on a site that it not included in the Time Zone parameter set the time zone rule manually The rule is applied only if the Time Zone parameter is set to Manual Use NTP Server enable the use of the NTP server for internal ...

Страница 72: ...ou to download up to 3 sets of certificates from certification authorities which help you authenticate the communicating device and also 3 user certificates and private keys for encryption purposes Each certificate requiring service can be assigned one certificate set refer to the Web Server E mail and Streaming subsections The certificates can be shared by the services 2N Indoor View accepts the ...

Страница 73: ...for the current list of trusted and user certificates Note If you use the Self Signed certificate for encryption the 2N Indoor View web server browser communication is secure but the browser notifies you that it cannot authenticate the 2N Indoor View certificate ...

Страница 74: ...ick Upload Press to remove a certificate from 2N Indoor VIew Caution Note that a certificate with a private RSA key longer than 2048 bits may be rejected The private key file or password has not been accepted by the device For certificates based on elliptic curves use the secp256r1 aka prime256v1 aka NIST P 256 and secp384r1 aka NIST P 384 curves only ...

Страница 75: ...e remote device management via the TR 069 protocol TR 069 helps you reliably configure the device parameters update and back up configuration and or upgrade device firmware The TR 069 protocol is utilized by the My2N cloud service Make sure that TR 069 is enabled and Active profile set to My2N to make the device work with My2N properly Only then the device will be able to log in to My2N periodical...

Страница 76: ...mote ACS Connection Status display the current ACS connection state or error state description if necessary Communication Status Detail server communication error code or HTTP status code Connection test test the TR069 connection according to the set profile see the Active profile The test result is displayed in the Connection status My2N ID unique identifier of the company created via the My2N po...

Страница 77: ...his service for common operations List of Parameters Send Syslog Messages enable sending of syslog messages to the Syslog server Make sure that the server address is valid Server Address set the IP MAC address of the server on which the Syslog application is running Severity Level set the severity level of the messages to be sent Error Warning Notice Info Debug 1 3 Debug 1 3 level setting is only ...

Страница 78: ...2N Indoor View User Manual 78 110 General overview of local syslog messages ...

Страница 79: ...p Press the button to display a dialogue window to select a configuration file and upload it to the device Before uploading choose whether or not the LAN settings and SIP PBX connection settings are to be applied Backup Configuration back up the complete current device configuration Press the button to download the configuration file to your PC Caution As the configuration may include delicate inf...

Страница 80: ...t firmware version for your device from www 2n com FW upgrade does not affect configuration The device checks the firmware file and prevents you from uploading an incorrect or corrupt file Check check online if a later firmware version is available If so the downloading option is offered followed by automatic upgrade Notify of Beta Versions enable monitoring and downloading of the latest firmware ...

Страница 81: ... device usage to the manufacturer No such delicate information as passwords access codes or phone numbers are included This information helps 2N TELEKOMUNIKACE a s improve the software quality reliability and performance You can participate in this voluntarily and cancel your statistic data deliveries any time ...

Страница 82: ...he current date time temperature and location and provides access to the Logs Directory and Settings as well as direct activation of the Do Not Disturb mode The dominant of the Home page is a phone earpiece icon on a blue background which allows you to make calls to the destinations listed in the Directory Detailed device settings are described in the following subchapters 4 1 Call Log 4 2 Directo...

Страница 83: ...onfiguration Call list Incoming call ringtone volume up Incoming call ringtone volume down Incoming call ringtone volume mute Value up Value down Microphone mute in call Locked screen lock Unlocked screen lock activated deactivated Camera Preview Camera 1 Camera 2 Back ...

Страница 84: ...2N Indoor View User Manual 84 110 Icon Description Move up Move down ...

Страница 85: ...date time status outgoing incoming missed and information on from to which destination the call was made The maximum call count is 20 You can choose any of the following actions from the 2N Indoor View call list Return to Home page using the left hand upper button Display detail of the call which was made using the button Display the camera snapshots if available caller s ID and call time Move up ...

Страница 86: ...he eye button to show the camera preview the button is only available if the device is equipped with a camera The camera preview option is based on the 2N Enhanced Video license of the selected device Click the lock button to open the door during an incoming outgoing call for the selected device When the intercom camera view is displayed on 2N Indoor View during the call you can choose any of the ...

Страница 87: ...to the Directory the basic parameters are not completed automatically but have to be added manually Make sure to complete the proper parameter in the Display section to display the CLIP This helps the user choose and call any device displayed refer to 3 2 2 Directory for more details 4 3 Settings Press the button on the Home page to display the device settings Use the Settings menu for local devic...

Страница 88: ...utomatically goes into the Sleep mode if there is no activity Ringtone volume set the incoming call ringtone volume Call volume set the phone call volume Call Ringtone set the ringtone for incoming calls on the device Doorbell tone set the tone to be played when the doorbell is used ...

Страница 89: ...e zone for your installation site to define time shifts and summer winter time transitions Time format set the time format to be displayed Date format set the date format to be displayed Language set the language for the texts to be displayed Choose one of the seven pre defined languages CZ EN DE FR ES IT RU Custom Language set the language for the texts to be displayed from an uploaded language f...

Страница 90: ...code to disable the screen lock Do Not Disturb mode switch the Do Not Disturb mode on off This allows you to switch off the ringtone for the incoming call while this mode is active By default the DND mode does not apply to doorbell notification i e the incoming ringtone is off and the doorbell ringtone is on Change this setting via the web interface in the Hardware Audio menu ...

Страница 91: ... device location for weather forecast Press the Home page weather area shortly to set the location in the Weather Settings section which will be displayed automatically Use the keypad to enter the location name with diacritic marks Prague is the default location value Units set the metric C or imperial F units to be displayed ...

Страница 92: ...2N Indoor View User Manual 92 110 This section provides basic information on the device serial number MAC address FW version IP address My2N ID ...

Страница 93: ... current date time and weather are shown on the display End relax mode Touch of the display Home page parental lock is displayed Parental Lock The device shows the instruction Enter PIN code and codelist Parental lock settings Activation of the function and setting of the 4 digit PIN code with subsequent confirmation Parental lock is activated Deactivate parental lock Correct PIN entering Device i...

Страница 94: ...d Display Settings Button pressed The Settings section is displayed Access Logs The device displays a list of all accomplished calls including date time status outgoing incoming missed and information on from to which destination the call was made Show call detail Press row of selected call The call detail is displayed Outgoing Call Press button for taking call in call detail Creation of an outgoi...

Страница 95: ... A device symbol is displayed if the call initiating device is not equipped with a camera Furthermore the call day date and time description of the calling called device and call status outgoing incoming missed are displayed Return to Home page Press back button 2x The device returns to Home page Return to call list Press back button 1x The device returns to the call list Outgoing Call Press the c...

Страница 96: ...t Once the end of the list has been reached scrolling stops Outgoing Call Press call receipt button in the row of the selected device The device gets in the In call mode Door unlocking Press the lock button A call is set up or not depending on the connection type and the door is unlocked If automatic call end after unlocking is enabled the call is ended after door unlocking Directory format list P...

Страница 97: ...on type and the door is unlocked If automatic call end after unlocking is enabled the call is ended after door unlocking The camera is switched if installed and configured in the 2N IP intercom Press the button for switching the camera The display shows a preview from the other camera identification of the device being called to and the message Incoming Call Increase and decrease ringtone volume P...

Страница 98: ...tton A call is set up or not depending on the connection type and the door is unlocked If automatic call end after unlocking is enabled the call is ended after door unlocking Switch camera Press the button for switching the camera The display shows a preview from the other camera identification of the device being called to and the message Incoming Call Reject call The call is rejected by the call...

Страница 99: ... not transferred to the calling device The Mute icon turns red No one hears you message is displayed End call Press the call end button The outgoing call is discontinued and Home page is returned to Door unlocking Press the lock button A call is set up or not depending on the connection type and the door is unlocked If automatic call end after unlocking is enabled the call is ended after door unlo...

Страница 100: ... the volume marker is moved the ringtone is increased or decreased according to the position on the volume bar Cancel call muting Press the Mute button The device is in the In call mode and sound is transmitted again to the calling device Do Not Disturb Mode The device is in the basic relax status The doorbell icon is red Display Directory Press the blue backlit phone earpiece button The list of a...

Страница 101: ...tton The incoming call is discontinued and Home page is returned to Switch camera Press the button for switching the camera The display shows a preview from the other camera identification of the device being called to and the message Incoming Call Incoming Call with Parental Lock On The device is playing the selected ringtone The display shows a preview from the camera if available identification...

Страница 102: ...vice RESET button with long press option for factory reset Signalling protocol SIP UDP TCP TLS Audio Microphone integrated Speaker 2 W integrated Induction loop output 600 mV RMS Audio stream Protocols RTP RTSP Codecs G 711 G 729 G 722 L16 16kHz Video stream Protocols RTP RTSP HTTP MJPEG Codecs H 264 M JPEG Interface LAN 10 100BaseT RJ 45 Cat5e or higher Doorbell Input Input type switching contact...

Страница 103: ...2N Indoor View User Manual 103 110 Operating temperature 0 to 50 C Relative humidity 10 to 90 non condensing Storing temperature 20 to 70 C Recommended altitude 0 2000 m ...

Страница 104: ... with clean water to clean the device You are recommended to follow the principles below while cleaning Do not use aggressive detergents such as abrasives or strong disinfectants Use appropriate cleaning agents suitable for glasses optical devices screens etc Alcohol based cleaners may not be applied We recommend you to use IT cleaning wipes ...

Страница 105: ...8 Supplementary Information This section provides supplementary information on the 2N Indoor View product Here is what you can find in this section 8 1 Troubleshooting 8 2 Directives Laws and Regulations General Instructions and Cautions ...

Страница 106: ... protection against harmful interference in a residential installation This equipment generates uses and can radiate radio frequency energy and if not installed and used in accordance with the instructions may cause harmful interference to radio communications However there is no guarantee that interference will not occur in a particular installation If this equipment does cause harmful interferen...

Страница 107: ...nických možností umožňují aktualizaci v konfiguračním rozhraní Používá li zákazník jinou než nejnovější verzi produktu či zařízení popř používá li verzi kterou výrobce označil za nekompatibilní s určitými verzemi jiných produktů nebo používá li zákazník produkt či zařízení v rozporu s pokyny návodem či doporučením výrobce nebo ve spojení s nevyhovujícími produkty či zařízeními jiných výrobců je sr...

Страница 108: ...l disaster or any other unfavourable natural condition The manufacturer shall not be held liable for any damage of the product arising during the shipping thereof The manufacturer shall not make any warrant with regard to data loss or damage The manufacturer shall not be liable and responsible for any direct or indirect damage incurred as a result of a use of the product in contradiction herewith ...

Страница 109: ...ectric appliances and battery packs removed from them to dedicated dumpsites or containers or give them back to the dealer or manufacturer for environmental friendly disposal The dealer or manufacturer shall take the product back free of charge and without requiring another purchase Make sure that the devices to be disposed of are complete Do not throw battery packs into fire Battery packs may not...

Страница 110: ...2N Indoor View User Manual 110 110 ...

Отзывы: