


– 32 –
RU
Инструкция по эксплуатации
Комплектация и дополнительное оборудование
Перед сборкой и установкой проверьте наличие всех комплектующих.
4
5
4
5
4
5
4
5
4
5
4
5
4
5
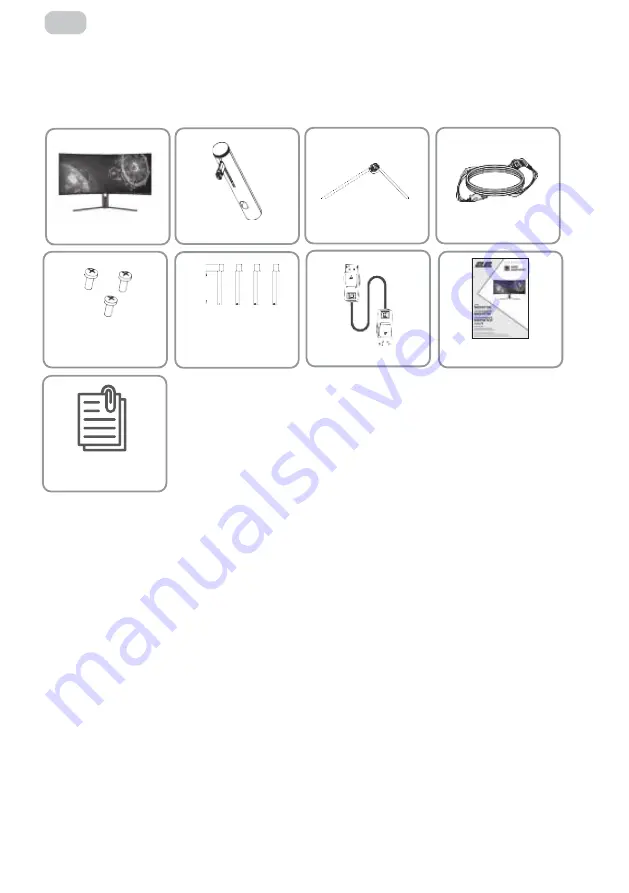
Монитор х 1
Винты x 3
для установки
подставки
Опора подставки х 1
Винты x 4
для монтирования
на стену
DP signal cable
Основа подставки х 1
4
5
Электрический кабель х 1
Руководство
пользователя х 1
Power adapter
7
m
m
Встановлення
Встановлення основи
Відкрийте коробку та дістаньте монітор із пакувальними матеріалами Обережно покладіть
його на робочу поверхню або стіл.
Зніміть пінопласт і внутрішню обгортку, покладіть на робочу поверхню або стіл, коробку
тримайте під монітором.
Закріпіть стійку та основу гвинтом, як зображено на малюнку нижче
Натисніть кнопку, щоб зняти панель підставки. Закріпіть пластину підставки на штоку
підставки гвинтами, що входять у комплект.
Закріпіть всю зібрану підставку на моніторі та ретельно перевірте, чи вона закріплена
Візьміться за ніжку підставки та поставте монітор на пласку рівну робочу поверхню або стіл.
Через велику вагу та розміри екрану ми рекомендуємо, щоб до розпакування та збирання
пристрою було задіяно декілька людей
Підставку можна зняти із задньої частини монітора, натиснувши кнопку швидкого зняття на
задній панелі монітора.
4
5
4
5
Микрофиша
и энергетическая этикетка
Содержание G3422B
Страница 1: ...LCD MONITOR G3422B User Manual Read this manual carefully before use www 2egaming com...
Страница 15: ...15 UA 16 16 16 17 18 18 19 19 20 21 21 21 21 23 23 25 27 28 28 45...
Страница 16: ...UA...
Страница 17: ...UA 1 2 3 4 5 10 6 7 8 9 10 11 12 13 14...
Страница 18: ...18 UA 1 x3 1 x4 DP 1 1 1 1 Power adapter 7 m m...
Страница 20: ...20 UA 1 2 3 4 75x75 2 Mount hexagon irons Mount Not included...
Страница 21: ...21 UA 1 2 3 4 5 6 HDMI interface HDMI HDMI HDMI HDMI DVI HDMI DVI DVI...
Страница 22: ...22 UA 1 2 3...
Страница 23: ...23 UA used t he 1 2 used t he...
Страница 24: ...24 UA 3 used t e used t e H used t he 4 ss to...
Страница 26: ...26 UA English 0 100 50 0 100 50 0 100 20 5 100 20 90 180 270 DP DP1 1 DP1 2 DP1 4 FreeSync Adaptive Sync HDR...
Страница 28: ...28 UA ERC2E YYYYMMDD YYYYMMDD...
Страница 29: ...29 RU OSD 30 30 30 31 32 32 33 34 35 35 35 35 37 37 39 41 42 42 46...
Страница 30: ...30 RU...
Страница 31: ...31 RU 1 2 3 4 5 10 6 7 8 9 10 11 12 13 14...
Страница 32: ...32 RU 1 x 3 1 x 4 DP signal cable 1 1 1 Power adapter 7 m m...
Страница 33: ...33 RU 1 2 3 4 5 11 5 6 6 5 11 5 11...
Страница 34: ...34 RU 1 2 3 4 75x75 2 Mount hexagon irons Mount Not included...
Страница 35: ...35 RU 1 2 3 4 5 6 HDMI interface HDMI HDMI HDMI HDMI DVI HDMI DVI DVI...
Страница 36: ...36 RU 1 2 3...
Страница 37: ...37 RU used t e H 1 2 used t he...
Страница 38: ...38 RU 3 used t e used t he used t he 4 ss to...
Страница 40: ...40 RU English 0 100 50 0 100 50 0 100 20 5 100 20 90 180 270 DP DP1 1 DP1 2 DP1 4 Adaptive Sync HDR...
Страница 42: ...42 RU ERC2E YYYYMMDD YYYYMMDD...
Страница 48: ......


