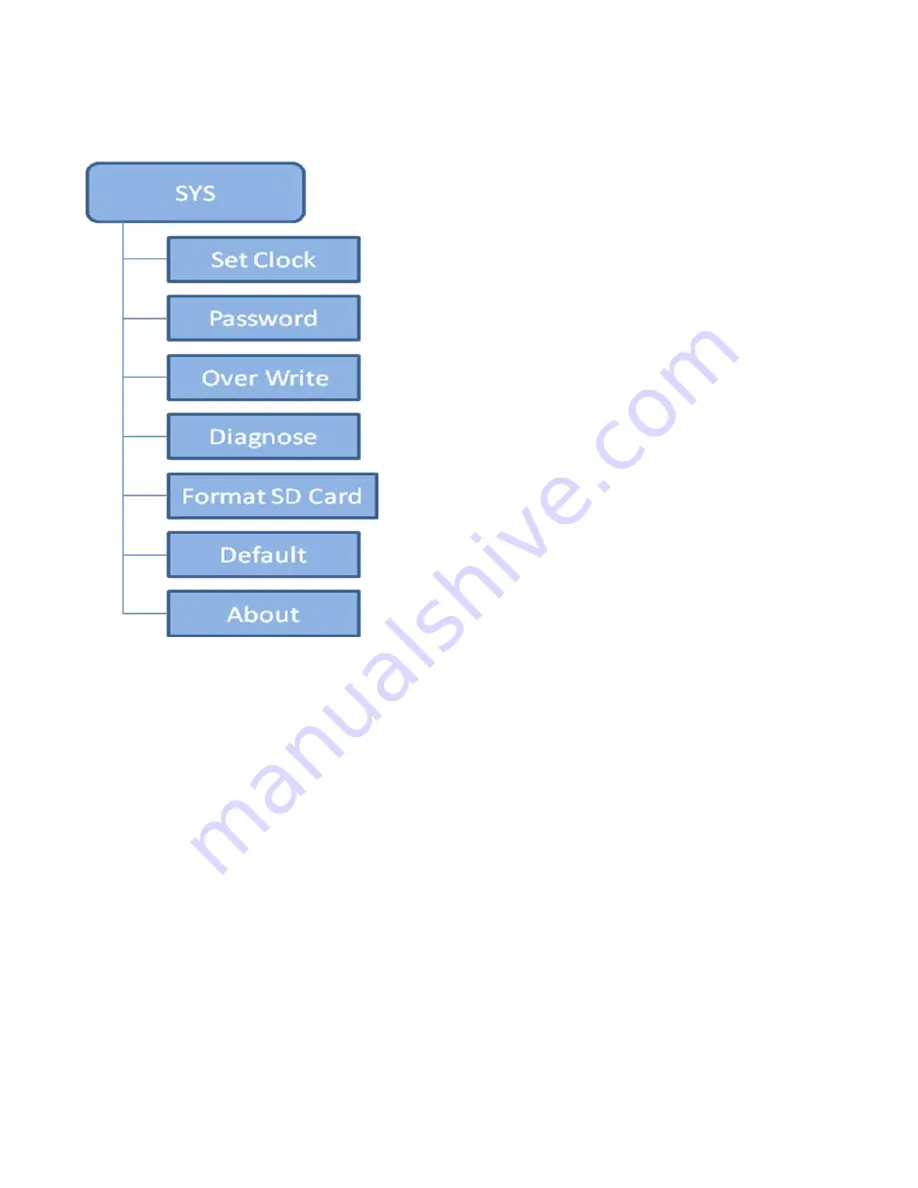
1stCampro 200-002 Скачать руководство пользователя страница 14

Page 11

Set Clock

Supports MM/DD/YYYY, DD/MM/YYYY and

YYYY/MM/DD format.

Password

If you set a password, make sure you write

it down or save it to your mobile phone so you can

access your camera.

Overwrite

: The overwrite function will save new

photos over the old photos on your SD card if it

becomes full.

Diagnose

: Use this function to generate a Log file for

problem analysis.

Содержание 200-002

Страница 1: ...Wireless Infrared Trail Camera Enigma LTE Instruction Manual Model 200 002 ...

Страница 2: ... the Mobile App 3 2 5 Power Switch and Buttons 3 2 6 Settings Map 5 3 Connecting Your Camera 12 3 1 Connecting Camera to Network Cloud Server 12 3 2 Sending a Test Photo to the Cloud Server 16 3 3 Changing Settings with Web Portal or APP 18 4 Auxiliary Power 19 5 Mounting tips 20 AppendixⅠ Technical Specifications 22 Appendix Ⅱ Parts List 24 WARRANTY 25 ...

Страница 3: ...What you will need to set up this camera Internet Access to 1stCamPro Data Plans and 1stCloud Web Portal 12 AA Batteries SD Card SIM Card ...

Страница 4: ...Page 1 1 Camera Overview 1 Black Vision IR flash 2 Lens 3 Light Sensor 4 Power Switch 5 PIR sensor 6 Keyboard 7 HD TFT Screen 8 LTE Main Antenna Fig 1 Operation Interface ...

Страница 5: ...mix different types of batteries Do not mix old and new batteries Recommended high density and high performance batteries such as Alkaline or Lithium batteries Remove batteries when not in use to prevent battery leakage 2 2 Installing the SD Card To enable power to the camera you will need to install an SD Card in the slot located at the bottom right side of the camera You can use any SD Card size...

Страница 6: ... side of the camera 2 4 Downloading the Mobile App Search firstcam in your Google Play Store or Apple Store 2 5 Power Switch and Buttons Slide the power switch to SETUP position to begin changing the camera settings as desired Fig2 Power switch Power Switch OFF Power off Please remove batteries when not in ...

Страница 7: ... up the camera settings ON Working mode the screen will power off Buttons MENU Enter menu Navigation buttons OK Confirm operation Playback photos or video clips To manually take photo or video Click again to stop the video ...

Страница 8: ...Page 5 2 6 Settings Map Fig3 Main Screen ...

Страница 9: ...Page 6 Settings Module Switch Off Disable the transmission function On Enable the instant transmission Sending File Limit The number of photos that the ...

Страница 10: ...ol your camera via the mobile phone app or web portal Choose Real Time if you would like the wireless module to continuously work throughout the day The Real Time setting significantly increases power consumption Delay 24H means the wireless module will wake up at least one time in a 24 hour period to make remote settings changes if completed and transmit data ...

Страница 11: ... Burst The number of images taken per trigger event If photo burst is set to 3 it means the camera will take 3 images per one trigger You also can choose which one of the images will be transmitted via Send Option ...

Страница 12: ...itable for most application scenarios Fast can be used to reduce motion blur PIR Interval Allows you to customize how often the camera will take a photo when the camera is triggered by motion This prevents the card from filling up with ...

Страница 13: ...elect BOTH in the PIR Trigger Mode settings Work Time This camera offers 4 operational Work Time settings modes To have your camera operate only during desired days of the week or times during the day you can select a start stop time for your camera to operate Work hour 00 00 00 00 means 24 hours If the selected times cross over to the next 24 hour period for example Start 20 00 Stop 10 00 means 0...

Страница 14: ...u set a password make sure you write it down or save it to your mobile phone so you can access your camera Overwrite The overwrite function will save new photos over the old photos on your SD card if it becomes full Diagnose Use this function to generate a Log file for problem analysis ...

Страница 15: ...os to your cloud account or mobile phone you will first need to purchase a data plan by signing up at https wireless firstcam pro After completing signup purchasing an AT T data subscription plan and entering your camera and sim ID s your camera will be activated and connected to the AT T wireless network ...

Страница 16: ...Page 13 Fig 4 ...

Страница 17: ...egistered or logged in you can Add New Devices using this same website An option to add a line or new subscription plan will be available You will be required to enter the IMEI and Sim ID s for your new Cameras Fig 5 ...

Страница 18: ...to the free cloud account using your web browser Go to https www cloudfirstcam com Login using the same username and password created when you signed up for a subscription plan and registered your device on https wireless firstcam pro Fig 6 ...

Страница 19: ...Photo to the Cloud Server 1 Switch camera to Setup mode press button to take a picture then press OK button to view the picture 2 Press the MENU button choose send You will see sending progress shown on the LCD screen Fig 7 Fig 8 ...

Страница 20: ... phone App to see if you received the correct photo If the above test was successful you can now slide the power switch to on and start using your camera If the sending fails choose SYS Diagnose to generate a Log file and the FAQ will help you with your Log file Fig 9 ...

Страница 21: ...Page 18 3 3 Changing Settings with Web Portal or APP The Camera can be set up conveniently using the cloud server or Mobile APP Fig 10 The APP process is similar to the cloud server ...

Страница 22: ...Page 19 Fig 11 4 Auxiliary Power Your camera comes with an Auxiliary power jack If you want to connect an external 6V battery to power ...

Страница 23: ...tips For best results mount the camera approximately 4 feet off the ground and aim 10 30 feet from your target To enhance the flash we recommend positioning the camera in an area with a backdrop to reflect the maximum amount of light Note a The sun should not be shining directly on the face of the camera Fig 15 b Reflect with trees or other objects to add more light to your target ...

Страница 24: ... where the air flow is surging or has too much vegetation False triggers mostly occur on sunny breezy days When the wind moves the vegetation the camera detects this and cannot distinguish it from a warm blooded animal moving through the scene ...

Страница 25: ...2 B4 B12 WCDMA B2 B4 B5 GSM Not supported Flash Range High Low Display Screen 2 0 LCD Memory Card Up to 32GB Video Resolution 1080P 720P WVGA PIR Sensor MultiZone PIR Sensitivity Adjustable High Normal Low Trigger Time 0 6s Trigger Interval 5s 60 min Time Lapse 3min 24hours Work Time Up to Four operation settings PhotoBurst 1 10 Video Length 5 60s ...

Страница 26: ...A batteries can transmit 3000 VGA Photos Temperature Reminder Supported with cloud platform Low Battery Alert LED Indicator Cloud Platform Mounting Belt Bungee CableLock Threaded Dimensions 6 X 4 5 X 2 75 Weight 16 oz without batteries OperationTemp 20 60 C OperationHumidity 5 90 Security Authentication FCCID AT T ...

Страница 27: ...Page 24 Appendix Ⅱ Parts List PART NAME QUANTITY Wireless Camera 1 External Antenna 1 Mounting Strap 1 SIM Card 1 User Manual 1 Quick Start Guide 1 ...

Страница 28: ...e The purchase receipt must be included from an authorized retailer to validate the warranty Improper use of the camera resulting in damage is not covered by this warranty FirstCam Outdoor Inc can provide repair service after the warranty expiration In this case the customer will be responsible for any charges on parts labor and shipping costs Please contact us for more details Our complete warran...

Отзывы: