background image

02

03

EN

DE

FR

ES

IT

EN

DE

FR

ES

IT

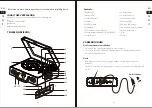
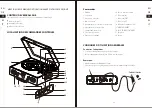
Controls:

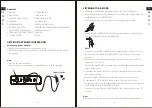
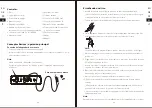
Connecting power adapter

1. Plug the power adapter into a normal power outlet. 
2. Insert the DC plug of the power adapter cord into the DC INPUT jack at the back of 

the turntable. 

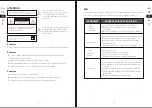
Note: 

1.  Only use the supplied adapter. 
2.  Please ensure your outlet voltage is compatible before using this turntable.

Note:

When playing records, the sound output of the built-in amplifier and speakers are

GETTING STARTED/MAIN OPERATION

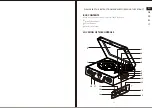
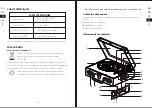
1. PLATTER
2. DUST COVER
3. HEADSHELL AND STYLUS
4. TONE ARM
5. 45-RPM ADAPTER
6. TONE ARM LIFT LEVER
7. AUTO STOP CONTROL SWITCH
8. SPEED SELECTOR (33/45/78 RPM)
9. LOCKING CLAMP

10. TONE ARM REST
11. LINE-IN JACK
12. LINE-OUT RCA JACKS
13. DC INPUT JACK
14. ON/OFF LED INDICATOR
15. POWER ON/OFF AND VOLUME CONTROL KNOB
16. HEADPHONE JACK
17. HANDLE
18. LOCK

LISTENING TO A RECORD

1. Lift the DUST COVER all the way up until it stops. The cover will stay open.
2. Remove the tie-wrap from the TONE ARM (when using for the first time) and secure 

the TONE ARM on the TONE ARM REST.

3. Remove the white protective needle cover by gently pulling it forward.

5. Turn the Power On/Off and VOLUME CONTROL knob clockwise to turn on the 

turntable. 

6. Place a record on the turntable platter and select the desired speed (33/45/78) 

appropriate for your record.

7. Lift the TONE ARM CONTROL lever and move the TONE ARM to the desired starting 

point over the record.

8. Lower the TONE ARM CONTROL lever and the TONE ARM will move down and 

music will start playing.

9. Turn the VOLUME CONTROL dial to adjust the volume to the desired level.
10. Slide the AUTO STOP CONTROL switch to choose the auto stop function.
11. At the end of the record, the TONE ARM will stop automatically. You should return 

the TONE ARM to the TONE ARM REST manually.

12. Turn the Power On/Off and VOLUME CONTROL knob anti-clockwise to turn off 

the unit.

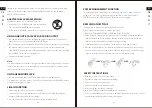
4. Release the TONE ARM LOCKING CLAMP by gently pushing to the right. This will 

unlock the TONE ARM from the TONE ARM REST.

Note:

Re-engage the LOCKING CLAMP when moving the turntable to another location.

To Wall Outlet

Содержание Belt-Drive 3

Страница 1: ...Instruction Manual Bedienungsanleitung Manuel d instructions Manual de instrucciones Manuale di istruzioni 1byone Products Inc 1230 E Belmont Street Ontario CA USA 91761 Customer Service 1 909 391 3888 www 1byonebros com ...

Страница 2: ... sure the items listed below are included in the box PLEASE READ THIS INSTRUCTION MANUAL BEFORE USING THE PRODUCT Main Turntable Unit Power Adapter Instruction Manual LOCATION OF THE CONTROLS 1 2 3 4 6 8 9 10 11 12 13 14 15 7 5 16 17 18 ...

Страница 3: ... the TONE ARM when using for the first time and secure the TONE ARM on the TONE ARM REST 3 Remove the white protective needle cover by gently pulling it forward 5 Turn the Power On Off and VOLUME CONTROL knob clockwise to turn on the turntable 6 Place a record on the turntable platter and select the desired speed 33 45 78 appropriate for your record 7 Lift the TONE ARM CONTROL lever and move the T...

Страница 4: ...POWER MANAGEMENT FUNCTION The turntable will automatically go into standby mode after 15 minutes if it is not being used To resume operation simply turn the Power On Off and Volume CONTROL knob to the Off position and then turn it back on again 1 You can run the audio from the turntable through your home stereo television or other stereo sources by using the LINE OUT RCA jacks 2 This connection re...

Страница 5: ...w symbol inside an equilateral triangle is intended to alert the user of the presence of un insulated hazardous voltage within the product s enclosure which may be of sufficient magnitude to induce a risk of electric shock 8 Do not defeat the safety of the polarized or grounding type plug A polarized plug has two blades with one wider than the other A grounding type plug has two blades and a third...

Страница 6: ...ct again after 2 minutes Ensure the turntable is on the correct source The protective needle cover was not removed Remove it first The tie wrap was not removed from underneath the tone arm Remove it first Tone arm LOCKING CLAMP was not released Release it first The stylus is dirty Remove dust on the stylus with a stylus cleaning brush Dust or dirt has collected on the record Clean the record with ...

Страница 7: ... des Adapters in den DC Input Anschluss auf der Rückseite des Plattenspielers Notiz 1 Bitte benutzen Sie nur den beigelegten Adapter um den Plattenspieler zu bedienen 2 Stellen Sie sicher dass die Spannung der Steckdose sich mit der des Plattenspielers deckt VORBEREITUNGEN 1 Plattenteller 2 Staubschutz 3 Sockel und Nadel 4 Tonarm 5 45 RPM Aufsatz 6 Tonarmhebel 7 Automatischer Stopp Schalter 8 Gesc...

Страница 8: ...alten Sie die Lautstärke direkt am Gerät niedrig und erhöhen Sie stattdessen die Lautstärke an den angeschlossenen Boxen um die gewünschte Lautstärke zu erreichen Notiz Sie können die Musik trotz des Kabels auch noch weiter vom Plattenspieler wiedergeben lassen Wenn Sie nur das angeschlossene System als Wiedergabe nutzen wollen drehen Sie die Lautstärke am Plattenspieler auf ein Minimum ADAPTER FÜ...

Страница 9: ...n einrasten zu lassen Wir empfehlen die Tonnadel nach 400 Stunden Abspielzeit zu wechseln Bitte folgen Sie diesen Schritten um die Tonnadel auszusetzen 8 Schützen Sie das Stromkabel vor Verknicken drauf Treten und Einstichen besonders an der Stelle wo das Stromkabel aus dem Gerät kommt 9 Nutzen Sie nur Zusatzteile die vom Hersteller freigegeben wurden 10 Nehmen Sie den Stecker aus der Steckdose we...

Страница 10: ...pieler angeschaltet ist Stellen Sie sicher dass die Lautstärke des externen Gerätes hoch genug ist Stellen Sie sicher dass die Musik auf dem externen Gerät korrekt ausgewählt wurde Entfernen Sie das Verbindungskabel und verbinden Sie die Geräte erneut Kein Strom Keine Musik oder Musikaus gabe Schlechter Sound bei PHONO Ausgabe Keine Tonaus gabe beim Audio Out PROBLEMBEHANDLUNG Problem Möglicher Lö...

Страница 11: ...ANUEL D UTILISATION AVANT D UTILISER CE PRODUIT Unite principale Adaptateur secteur Manuel d instruction LOCALISATION DESCOMMANDES CONTROLES CONSIGNES D UTILISATION GENERALES 1 Plateau 2 Couvercle 3 Protection et stylus 4 Bras de lecture 5 Adaptateur pour levier bras de lecture 6 Levier pour bras de lecture 7 Commande auto stop 8 Selecteur de vitesse 9 Pince de verouillage 10 Reoise bras de lectur...

Страница 12: ...e remettre le bras de lecture sur son socle manuellement 13 Allumer l appareil et ajuster le volume en tournant le bouton 4 Manipuler la pince en la poussant vers la droite pour déverrouiller le bras de lecture Remarque Remettre la pince dans sa position initiale lorsque vous changez le tourne disque de locations ADAPTATEUR 45 RMP ACCESSOIRE Cet adaptateur vous permet de jouer les 45 tours 1 Insta...

Страница 13: ...it pas etre utilisé lorsque le cable électrique est endommagé ou bien que du liquide a été introduit dans l appareil ou bien en cas de moisissure sur la appareil 13 Le produit ne doit pas etre exposé a des objets contentant du liquide MESURE DE SECURITE GESTION DU COURANT Le tourne disque s arrete automatiquement apres 15 minutes sans utilisation Pour arreter le tourne disque veuillez simplement t...

Страница 14: ...oduit dispose d une double systeme ATTENTION POUR REDUIRE LE RISQUE D INCENDIE NE PAS RETIRER LA COUVERCLE OU LA PROTECTION ARRIEERE CE DE PRODUIT RSIQUE DE CHOC ELECTRIQUE NE PAS OUVRIR ATTENTION Si vous avez des problemes d utilisation avec ce produit veuillez suivre les consignes ci dessous Vérifier les causes et solutions possibles pour chaque probleme S assurer que le tourne disque est bien a...

Страница 15: ...ter votre centre de recyclage CARATCTERISTIQUES MISE AU REBUT CARATCTERISTIQUES Adaptateur AC Vitesse record Puissance en sortie Puissance avec USB AC 100 240V 50 60Hz DC 9V 600mA 33 45 78 RPM 0 3W x2 RMS power output 1 8W x2 RMS power output L emballage est réalisé à l aide de matériaux écologiques qu il est possible de confier aux centres de recyclage proches de chez vous Contenido del paquete A...

Страница 16: ...te el envoltorio del brazo de lectura cuando lo use por primera vez y asegure el brazo de lectura en el reposador del brazo de lectura 3 Quite la cubierta protectora blanca de la aguja tirando de ella hacia adelante 5 Mueva el interruptor de encendido y volumen hacia la derecha para encender el tocadiscos 6 Ponga un disco encima del disco del tocadiscos y seleccione la velocidad deseada 33 45 78 a...

Страница 17: ...ulares 2 Para esta conexión simplemente conecte sus auriculares a la entrada de auriculares 3 Opere de manera habitual 1 Lea estas instrucciones y sígalas 2 Guarde estas instrucciones y preste atención a todas las advertencias 3 No use este producto cerca de agua 4 Limpie el tocadiscos solo con un paño seco 5 No obstruya ninguna rendija de ventilación 6 Instale de acuerdo con las instrucciones del...

Страница 18: ... o quitar la cubierta puede exponerse a voltajes peligrosos u otros peligros No hay componentes de uso para el usuario en el interior Nota Este dispositivo digital no excede los límites de clase B por emisiones de ruido de radio de aparatos digitales establecidos por el CI y la FCC Estos límites están diseña dos para proporcionar una protección razonable frente a interferencias perjudiciales en un...

Страница 19: ...men de su dispositivo externo Compruebe que la fuente correcta está seleccionada en el dispositivo externo Quite el cable de audio y conéctelo de nuevo No hay energía No hay sonido en la fuente de audio Baja calidad de la fuente de audio No hay sonido en la salida de audio Solución de problemas Problema Posible causa y solución Eliminación del producto Especificaciones y funciones en relación con ...

Страница 20: ...Manuale di Istruzioni POSIZIONE DEI COMANDI PREPARAZIONE OPERAZIONI PRINCIPALI 1 PIATTO 2 COPERTURA ANTIPOLVERE 3 TESTINA A COCHIGLIA E STILO 4 BRACCIO 5 ADATTATORE 45 GIRI 6 LEVA DI CONTROLLO 7 INTERRUTTORE PER STOP AUTOMATICO 8 SELETTORE VELOCITÀ 9 MORSETTO DI BLOCCAGGIO 10 SUPPORTO DEL BRACCIO 11 JACK LINE IN 12 JACK RCA LINE OUT 13 DC INPUT JACK 14 INDICATORE LED ON OFF 15 MANOPOLA CONTROLLO O...

Страница 21: ...MORSETTO DI BLOCCAGGIO premendo leggermente a destra In questo modo si sblocca il BRACCIO dal suo SUPPORTO 3 Rimuovere il cappuccio bianco a protezione della puntina tirandolo via delicata mente Note Riagganciare il MORSETTO DI BLOCCAGGIO quando si sposta il giradischi ADATTATORE PER 45 GIRI ACCESSORIO Questo adattatore consente di riprodurre dischi 45 RPM 1 Posizionare con attenzione il 45 giri s...

Страница 22: ...egare questo prodotto durante temporali con fulmini o se non lo si usa per molto tempo 12 Per l assistenza rivolgersi a personale qualificato L assistenza è richiesta quando il prodotto è stato danneggiato in qualche modo se il cavo di alimentazione o la spina sono danneggiati se si sono rovesciati sopra liquidi o se sono caduti oggetti all interno del prodotto se è stato esposto a pioggia o umidi...

Страница 23: ... A PIOGGIA O UMIDITÀ Simbolo di equipaggiamento Classe II Questo simbolo indica che il giradischi ha un doppio sistema ATTENZIONE PER RIDURRE IL RISCHIO DI INCENDI O SCOSSE NON RIMUOVERE LA COPERTURA O IL RETRO ALL INTERNO NON CI SONO CAVI O COMPONENTI UTILI ALL UTENTE PER SUPPORTO TECNICO CONSULTARE PERSONALE QUALIFICATO RISCHIO DI SCOSSE ELETTRICHE NON APRIRE ATTENZIONE Se si sono seguite le ist...

Страница 24: ... TECNICHE Trasformatore AC Velocità di Riproduzione Corrente in Uscita su Phono Corrente in Uscita su USB AC Input 100 240V 50 60Hz DC Output 9V 600mA 33 45 78 RPM giri 0 3W x 2 RMS potenza output 1 8W x 2RMS potenza output La confezione è fatta di materiale riciclabile e può essere smaltita nell apposita raccolta differenziata Declaration of Conformity We the 1byone Products Inc confirm that the ...

Страница 25: ...6 00pm UTC Email ukhelp 1byonebros com DE Für eine zügige Bearbeitung ihres Problems melden Sie sich bei uns wie folgt Email euhelp 1byonebros com FR Pour vous assurez une assistance rapide en cas de problème veuillez envoyer un e mail Email euhelp 1byonebros com ES Para garantizar una rápida atención de su problema favor envíenos un email para ayudarle Email euhelp 1byonebros com IT Per supporto ...

Отзывы: