
11/3/16 3:24 PM
Copyright 1010 Music 2016
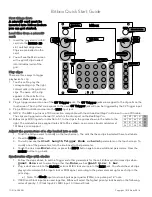
Adjust the parameters for a track:
A Track is a column of cells on the Main screen.
1.
Press the
HOME
button to return to the Main screen.
2.
Touch the on-screen
Tracks
button.
3.
Select a Track by touching one of the vertical columns that represents the desired column of cells, and then
press
INFO.
4.
You will see the track parameters screen. Turn the knob next to one of the displayed parameters to adjust the
settings for the selected track. The track parameters are:
a.
Exclusive mode: works like Ableton tracks where only one cell in each column can play at a time
b.
Level: The overall gain of the track
c.
Output: The output the track will use: OUT 1+2, FX1, or FX 2
Change banks or switch to a new microSD card while operating:
1.
Press the
HOME
button to return to the Main screen.
2.
Touch the on-screen
Preset
button.
3.
Touch one of the 12 on-screen bank buttons to select a different bank. Please be patient, it can take a few
seconds to load and update the screen.
Load files from a microSD card:
1.
Use your laptop or other device to load clips in WAV format into the root folder of a microSD card.
2.
Insert the microSD card into the
MICRO SD
slot, notched edge down.
3.
Touch an empty, light colored cell in the grid on the touchscreen to select it.
4.
Press the
INFO
button and then touch the on-screen
Load
button.
5.
Use any of the
Control Knobs
to select a WAV file from the list that appears on the touchscreen.
6.
Touch
Load
again. You will see the Main screen with the selected clip loaded into the selected cell.
Record a clip:
1.
Touch an empty, light colored cell in the grid on the touchscreen to select it.
2.
Press the
INFO
button.
3.
Plug the recording source into the
IN1
or
IN2
jack.
4.
The source will play through the corresponding output jack,
OUT1
or
OUT2.
5.
Touch the on-screen
Rec
button. Bitbox will start recording. The timing of the recording can be synchronized
with other modules by using the Rec Quant parameter setting with a MIDI or CLOCK input. (See
Synchronize
with Clocks or Inputs
below.)
6.
Touch the on-screen
Stop
button. The recording will end.
7.
Press the
HOME
button to return to the Main screen.
Export a set to Ableton Live:
1.
Press
HOME
until you see the Menu screen containing three buttons:
Main
,
Presets
and
Tracks
.
2.
Touch the on-screen
Preset
button. You will see a 4x3 grid of numbers 1 through 12 representing the presets.
3.
Touch one of the on-screen preset number buttons to load the preset. You will now see the Main screen with the
selected preset loaded.
4.
Remove the microSD card and connect it to your computer.
5.
Double click or open the SE000001.als and similar files to open your set in Ableton Live.
6.
For best results, use the Save As option as well as the Collect and Save menu item to migrate the relevant
WAV files onto your machine and into the customary Ableton directory structure.
Learn more:
You can find videos and more content about how to use Bitbox on our website at 1010music.com/support.


