1001Espions SH1006 Скачать руководство пользователя страница 24

www.1001espions.com 


              2.4.1.2 Insert the SD memory card to the SD slot like pic.4.1; 

              2.4.1.3 Replace the battery cover, push the battery cover lock to the right, then buckle up. 


2.4.2 SD memory card remove 

SD slot 

SD


4.2 

SD card 

pic.4.1


Содержание SH1006

Страница 1: ...w w w 1 0 0 1 e s p i o n s c o m Judas Numérique Enregistreur Photos Vidéos Détecteur de mouvement ...

Страница 2: ... digital door viewer in the recommended places to ensure safety To guard against the explosion please use the original battery Please ask for maintenance from qualified service professionals Equipment Maintenance Do not shake and tap equipment violently If dust or water droplets splashing on the device carefully wipe with a dry cloth Please charge with our specially equipped battery charger ...

Страница 3: ... 1 3 Main features functions 1 4 Main specifications Chapter II Install diagram 2 1 Structure chart 2 2 Installation process 2 3 Battery installation and remove method 2 3 1 Battery installation method 2 3 2 Battery remove method 2 4 SD memory card insertion and remove 2 4 1 SD memory card insertion Catalog ...

Страница 4: ...harge Chapter III Intellicorder use instruction 3 1 Live mode 3 1 1 System setting 3 1 2 Time setting 3 1 3 Parameters setting 3 1 4 Playback setting 3 2 Record mode Chapter IV FAQ Chapter V Fault solution and Precautions Note Please read the user manual carefully before using this product and Kindly safe keep this manual for future reference ...

Страница 5: ... 1pc 2 Intellicorder outdoor host 1pc 3 Indoor host mounting plate 1pc 4 Power adaptor 1pc 5 Lithium battery 1pc 6 Clock battery 1pc Loaded Not installation for will loss of power fitted when using 7 Fixed nut 1pc 8 Screw 2pcs 9 Phillips screwdriver 1pc Chapter I Product introduction ...

Страница 6: ...www 1001espions com 10 User manual 1pc In the event the packing accessories are incomplete to ensure your interests kindly contact the dealer or the company immediately 1 2 Product Appearance ...

Страница 7: ... unique assembly method user can enjoy easy and convenient installation without the need of any wiring and any need to alter or modify their current traditional peep hole on their door construction This is indeed a simple practical and yet highly technologically advanced home security product Main features and functions 1 2 8 LCD display screen 2 Attractive Fashionable appearance 3 Easy to operate...

Страница 8: ...me the video length facilitate to provide valuable data when inquiry 9 No radiation low power consumption 10 3X digital zoom 11 0 3 mega pixel high resolution 12 Automatic power saving mode 1 4 Product specifications Item Spec Remarks Machine Part Indoor unit size 138mm 103mm 25mm Outdoor unit size 18mm Dia 50mm Adapter plate 100mm 78mm 9 5mm 环境照度适应性 门外机的工作环境照度 在 20 lux 3500 lux 范围内 ...

Страница 9: ...Camera Part Camera Pixel Width 640 Height 480 300K Pixel Camera Angle Diagonal 115 5 degrees Horizontal 102 3 degrees Vertical 85 3 degrees Digital Zoom 3X digital zoom Loudspeaker Part Loudspeaker Diameter 20MM Power 1W Impedance 8 OHM Display Screen Display Type 240 R G B 320 Dots LCD Type 2 8 inch TFT LCD Viewing Direction 6 O colock Backlight 4 LED white color ...

Страница 10: ...mm Can be customized so that fit for any thickness of the door Door peephole size Dia 15mm Memory Own memory 256M Memory Extension Maximum support 32G SD card and backward compatible Power Part Charger Input 110 V to 240 V 50 60 Hz 0 3 A Output Dc 5 0 V 1 0A 5 0V Power 3 7V 1800mA Lithium battery Clock battery Dia 20 0 thick 3 2 3 0V CR2032 ...

Страница 11: ...5 相对湿度 10 95 大气压力 86 kPa 106 kPa 其它 是否帶 SD 卡銷售 根據客人要求可選 是否帶電池銷售 配一塊 1800mA 鋰電池 Language Kinds of language to set Settings function time and date settings function Sleep automatically Can automatically go to sleep File save format JPEG MP4 2 1 Intellicorder structure chart Chapter II Install diagram ...

Страница 12: ...1001espions com 2 1 host underside 13 12 11 10 9 8 7 6 5 4 3 host underside host front 16 15 14 Explain the various parts of the structure or button 1 Battery Cover SD memory card and lithium battery inside ...

Страница 13: ... adaptor is connected light on 9 New record indicator green recording when in recording mode light on 10 Speaker Play the recorded audio sound under record mode 11 Charging interface 12 RESET use a pointer or alike to press this button to reset the unit 13 Mode switch key switch btw RECORD and LIVE mode 14 Lens 15 Microphone 16 Infrared motion activated Sensor detects motion up to 2 5m 2 2 Install...

Страница 14: ...t completely first from the outdoor part Remove the backing of double sided adhesive pic 2 1 2 Pass the Outdoor slave through the peephole and stick it to the outside of the door like shown in pic 2 2 sleeve Double sided adhesive pic 2 2 pic 2 1 ...

Страница 15: ...w w w 1 0 0 1 e s p i o n s c o m 3 Removing the double sided adhesive on the mounting bracket pic 2 3 Double sided adhesive pic 2 3 ...

Страница 16: ...ww 1001espions com 4 Follow pic 2 4 to stick the mounting bracket on the door then install the Screw for fixing and buckle the male connector of the FPC with the female Connector on the mounting bracket ...

Страница 17: ...w w w 1 0 0 1 e s p i o n s c o m 5 Remove the insulate sheet on the clock battery pic 2 5 Director buckle Door Fixed nut FPC pic 2 4 ...

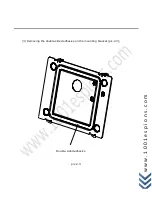
Страница 18: ...www 1001espions com Insulate sheet Square groove pic 2 5 ...

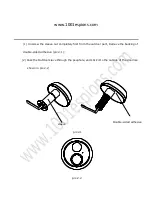
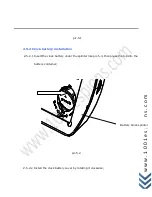
Страница 19: ...w w w 1 0 0 1 e s p i o n s c o m 6 Follow pic 2 6 install the indoor host to the mounting bracket pic 2 6 ...

Страница 20: ...www 1001espions com 7 Lock the screws with the Philips screwdriver pic 2 7 Screw pic 2 7 ...

Страница 21: ...llation method 2 3 1 1 Push the battery cover lock to the left it will open automatically pic 3 1 2 3 1 2 Install the battery like in Pic 3 2 push the battery Buckle outward then install the battery in 2 3 1 3 Replace the battery cover push the battery cover lock to the right then buckle up Battery cover ...

Страница 22: ...www 1001espions com 2 3 2 Battery remove method Opposite to the battery install steps pic 3 1 Battery cover lock pannel Battery ...

Страница 23: ...w w w 1 0 0 1 e s p i o n s c o m 2 4 SD memory card insertion and remove 2 4 1 SD memory card insertion 2 4 1 1 Follow step 2 3 1 1 to open the battery cover Battery buckle pic 3 2 ...

Страница 24: ...ions com 2 4 1 2 Insert the SD memory card to the SD slot like pic 4 1 2 4 1 3 Replace the battery cover push the battery cover lock to the right then buckle up 2 4 2 SD memory card remove SD slot SD card pic 4 1 ...

Страница 25: ...n s c o m 2 4 2 1 Follow step 3 1 1 to open the battery cover 2 4 2 2 Press and release SD card pic 4 2 2 4 2 3 Replace the battery cover push the battery cover lock to the right then buckle up SD card Release SD card pic 4 2 ...

Страница 26: ...1 1 Remove the two screws on the indoor host then take down the indoor host 2 5 1 2 Remove the cover on the back of the clock battery by rotating tabs into unlocked position pic 5 1 2 5 1 3 Take out the clock battery by using a sharp object pic 5 1 Clock battery cover Pick out hole ...

Страница 27: ...Clock battery installation 2 5 2 1 Insert the clock battery under the splinter like pic 5 3 then press the top into the battery container 2 5 2 2 Install the clock battery cover by rotating it clockwise pic 5 1 Battery block splinter pic 5 2 ...

Страница 28: ...ect the power adaptor to the power supply 2 6 2 Insert the DC plug to charging pot of the host the indicate Light turn on red 2 6 3 On the LCD screen you can see the battery icon is rolling this is the charging indicate 2 6 4 The battery icon stops rolling and shows full power when fully charged ...

Страница 29: ... 1 0 0 1 e s p i o n s c o m Press power on key to turn on the device 5 seconds Mode selection Live mode LIVE Record mode RECORD through the mode switch in the lower side for selection Chapter III Operation ...

Страница 30: ... Under record mode RECORD automatically store data and standby after auto recording 15 seconds and start again if have trigger 3 1 Live mode LIVE Press to zoom in out image with 3X Press to switch btw camera mode and recording mode Camera mode Press OK to take photos Recording mode Press OK to start stop ...

Страница 31: ...w w 1 0 0 1 e s p i o n s c o m Shortly press OK to enter main menu Press to select setting Press OK to enter setting press once to return to previous menu shortly press to return to monitoring interface ...

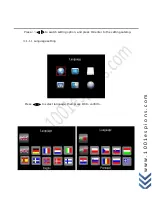
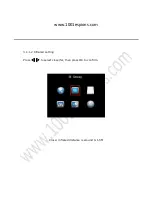
Страница 32: ...www 1001espions com System setting Time setting Parameter setting Playback setting 3 1 1 System setting ...

Страница 33: ...w w w 1 0 0 1 e s p i o n s c o m Press to switch setting option and press OK enter to the setting catalog 3 1 1 1 Language setting Press to select language then press OK to confirm ...

Страница 34: ...www 1001espions com 3 1 1 2 Infrared setting Press to select close far then press OK to confirm Close infrared distance is around 0 1 5M ...

Страница 35: ...w w w 1 0 0 1 e s p i o n s c o m Far infrared distance is around 0 2 5M ...

Страница 36: ...o select YES NO then press OK to confirm your selection Note Format will delete what saved in the SD memory card please use with caution 3 1 1 4 Default setting Press to select YES NO then press OK to confirm whether to restore factory settings ...

Страница 37: ...w w w 1 0 0 1 e s p i o n s c o m 3 1 1 5 Version No Show software Version No 3 1 1 6 NAND Remove to SD Card Press to select Yes or No then press OK key to confirm if removing the built in ...

Страница 38: ...www 1001espions com memory to SD card 3 1 2 Time setting Press OK to select or switch setting position then press to adjust time ...

Страница 39: ...0 0 1 e s p i o n s c o m 3 1 3 Parameter setting Press to switch setting option then press OK enter to the setting catalog Note Settings updates take effect when you reboot the intellicorder 3 1 3 1 Back light ...

Страница 40: ...t back light or NO if need to open screen under record mode then press OK to confirm your selection default NO 3 1 3 2 Timestamp Press to select YES NO if show time when camera record then press OK to confirm your selection default YES ...

Страница 41: ...w w w 1 0 0 1 e s p i o n s c o m 3 1 3 3 Record setting Press to select camera record mode then press OK to confirm your selection default record mode ...

Страница 42: ...ck setting Press OK to enter the sub content then press to make your desired selection and press OK to enter root content lastly press to select play back menu and press OK to play back Playing back photos press to review your photos ...

Страница 43: ...ss to select backward forward Volume Volume Press When the storage space is full the below reminder will come to the interface Delete the directory or file Select the file or directory you need to delete press button for long time then choose yes then press OK button to confirm the deletion ...

Страница 44: ... time is 15 seconds Note When switch to RECORD MODE the infrared motion detector will work the live display screen turn off SH1006 is equipped with internal memory for immediate recording after recorded 15 seconds the recording will be finished and stored automatically and the green light will turn out Note If the recording is stopped without 15 seconds the recorded video couldn t be read when pla...

Страница 45: ...frequency radiation interference to be away from sources of interference 2 Away from the air conditioning refrigerator stove and other places sensitive to temperature changes 3 Motion sensor may not be activated in the following situations When the action is very slow or very fast When the moving object is very small When the action only in a corner of the viewing area ...

Страница 46: ...ds it will enter to standby mode and save power 3 Q How long will the full charged battery last for A It can last for around one to two months estimate 5times day 40 seconds time 4 Q Why the image is fuzzy A May display or camera protective film does not tear up please tear away the protective film 5 Q What thickness of the door will the SH1006 fit A The ranges are 35mm 55mm 55 85mm 85 105mm 6 Q W...

Страница 47: ...mory store A It own 256M memory except for system memory about 240M left available so can store pictures about 1113pcs and 11 minutes of video Please consult below chart for details Capacity GB Number of pictures pcs Video time minutes 1 6625 65 2 13250 130 4 26500 260 8 53000 520 16 106000 1040 32 212000 2080 Note Capacity for pictures capacity size of each picture 1GB 1000MB 1000 1000KB Video ti...

Страница 48: ...ease do not rotate both of the indoor and outdoor hosts If the connecting line break caused by above reason then the product will not be in the warranty 5 Turn off the display each time you finished a conversation this can help to save power of the battery 6 Discard your battery properly to avoid pollution the environment 7 To prevent misconduct please use the product Keep out of direct sunlight K...

Страница 49: ...w w w 1 0 0 1 e s p i o n s c o m Keep out of strong dry such as central heating vents ...

Отзывы: