4
5
PRODUCT DESCRIPTION
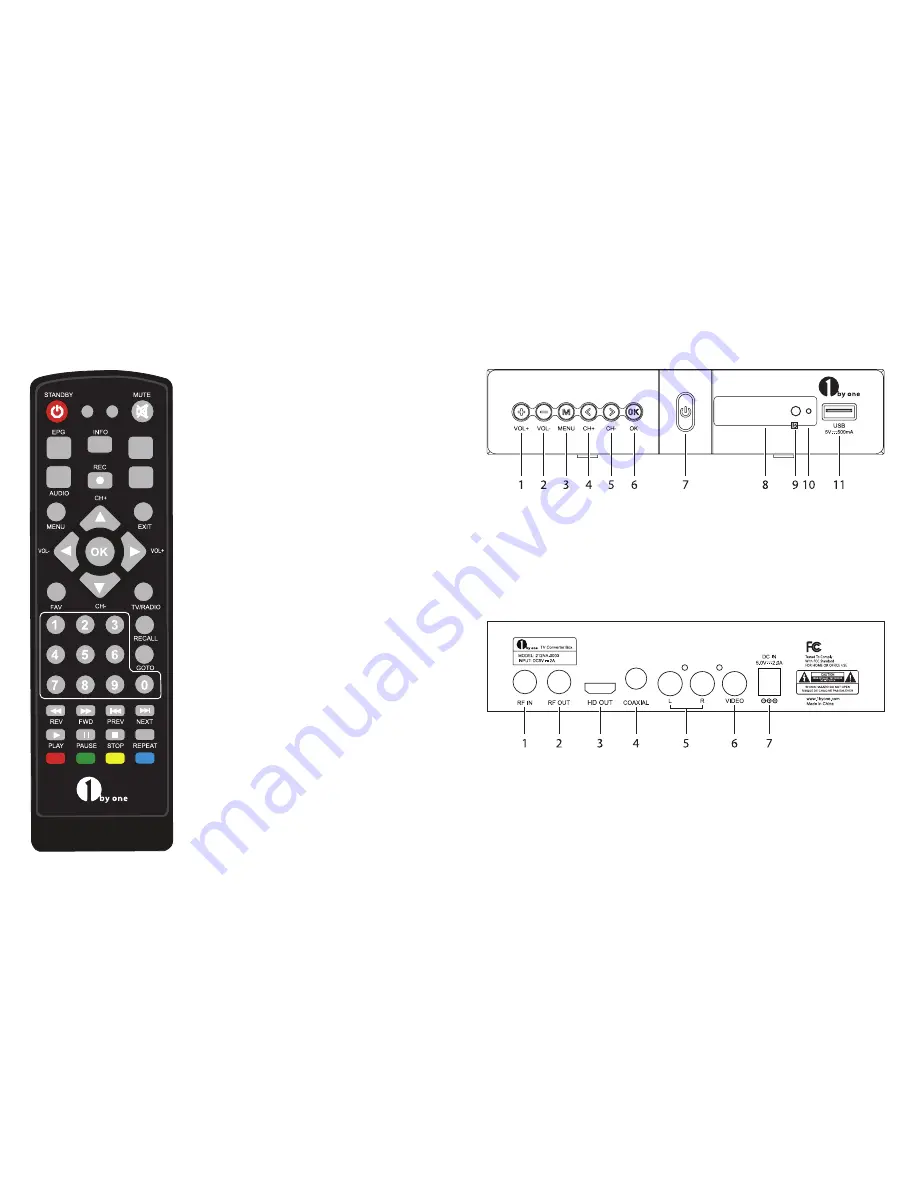
Remote Control
CC
-
PAGE +
PAGE-
1. STANDBY: Switch the digital converter box
between On and Standby
2. CC: Select Subtitles Language
3. MUTE: Turn on/off the volume
4. EPG: Open Electronic Program Guide
5. AUDIO: Select an Audio Language or Audio
Mode
6. INFO: Display current channel information
7. REC: Start recording. Recording requires a
connected USB memory device.
8. PAGE+: Go forward quickly within a menu
9. PAGE-: Go backward quickly within a menu
10. MENU: Show menu on screen and call
command box.
11. EXIT: Quit menu
12. VOL+/VOL-: Volume up and down. CH+/CH-:
Channel up and down; navigate through
menus; move cursor selection up and down
within menus and lists.
13. OK button: Confirm a selection
14. FAV: View or edit the favorite channels list.
15. TV/RADIO: Switch between TV and radio
16. RECALL: Switches back to previous program
17. GOTO: Select the play time of the recorded
program.
18. Numeric Buttons (0-9): Enter numeric
information and select specific channels
19. REV: Fast rewind during media playback
20. FWD: Fast forward during media playback
21. PREV: Return to the previous track during
playback
22. NEXT: Skip to the next track during playback
23. PLAY: Start media playback
24. PAUSE: Pause playback or recording
25. STOP: Stop media playback
26. REPEAT: Turn on/off repeat modes
27. RED/GREEN/YELLOW/BLUE Buttons: For
interactive function/submenu function
Installing/Replacing Batteries
Open the battery compartment on the rear of the remote control and remove the
compartment cover. Insert two 1.5V AAA batteries using the correct polarity.
Front View
1.
2. Volume -
3. Menu Button
4. C
5. Channel -
6. OK Button
7. Power On/Off Button
8. LED Display
9. Remote Sensor
10. Power Indicator
11. USB Port
Rear View
1. Digital Terrestrial TV Broadcast Signal
Input
2. Digital Terrestrial TV Broadcast Signal
Output
3. Digital HDTV Video Out
4. Digital Audio Output
5. Analog Audio Output
6. Composite Video Output
7. Power DC Input 5V 2A


