Zurn PEX Crimp Tools – QCRT2CM, QCRT3CM, QCRTJCM, QCRT4CM
Operating Instructions
ZURN PEX PLUMBING AND RADIANT HEATING SYSTEMS
1801 PITTSBURGH AVENUE, ERIE, PA, U.S.A. 16502 PHONE: 800/872-7277 FAX: 800/209-2148 www.zurn.com
IN CANADA:
ZURN INDUSTRIES LIMITED
3544 NASHUA DRIVE, MISSISSAUGA, ONTARIO L4V 1L2 PHONE: 905/405-8272 FAX: 905/405-1292
Form No. ZPM04140, Rev. 6/07
Operating Instructions
Use the crimp tool to install only manufacturer-approved pipe or
tube used with copper crimp rings and brass, copper, or plastic
fittings manufactured to appropriate ASTM standards for poly-
ethylene and polybutylene pipe installation.
Always refer to the
tube manufacturers’ product assembly instructions when
using the crimp tool.
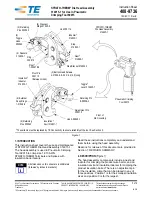
To Crimp with Tube, Fitting, and Ring in Place:
1.
Pull back on the moving handle and open the jaws full.
The crimp tool does not work like pliers. Do not force the
handles apart.
2.
Position jaws squarely around the ring.
3.
Gently open the handles to close jaws on the ring.
4.
Squeeze handles together to complete the crimp.
One crimp per ring only!
5.
Pull back on moving handle to release jaws from
the crimped ring.
6.
Measure the crimped ring with Zurn “Go-No Go” gage. See table
below. Do not measure bumps on ring where jaws meet. If “Go”
on gage does not fit, or if “No Go” does fit, then cut out connec-
tion, replace fitting and ring, adjust and calibrate the tool, and
recrimp.
The following dimensions are the ASTM maximum and minimum
crimped ring diameters for polyethylene (PEX) and polybutylene
(PB) pipe installations.
Std. Tube Size >
3/8"
1/2"
5/8"
3/4"
Min. Diameter
0.580"
0.700"
0.815"
0.945"
Max. Diameter
0.595"
0.715"
0.830"
0.960"
Variation in ring diameter (out-of-round) should not exceed 0.006".
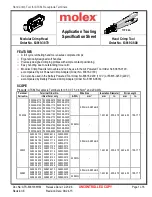
Using the Zurn PEX Crimp Gauge Properly: Crimp Gauge Instructions
GO
NO
GO
NO
GO
GO
GAUGE
3/8
3/4
1/2
Flat
Gauging
Surfaces
(Non-Gauging Area)
GO
NO
GO
NO
GO
GO
GAUGE
3/8
3/4
1/2
Crimped
Ring
GO
NO
GO
NO
GO
GO
GAUGE
3/8
3/4
1/2
Crimped
Ring
1.
The flat portion of the opening is the
gauging area.
2.
The “Go” opening should go freely across
a crimped ring anywhere on its diameter
with the possible exception of the upset
area of the ring surface caused by the
tool jaws closing. Do not force the gauge
across the ring.
3.
The “No Go” opening should not go across
a crimped ring anywhere.
4.
The gauge should always be pushed
across the crimped ring from the side.
Do not
slide the gauge along the tube
up to the crimped ring.
Note:
Fitting and tube are not shown in
illustrations for clarity. The Zurn PEX
Crimp Gauge is to be used only on
crimp rings that have been crimped
onto tube and fittings.
Clearance Circle
Correct
Crimp Tight Enough – GO
Correct
Crimp Too Tight – NO GO
Zurn PEX Crimp Tools – QCRT2CM, QCRT3CM, QCRTJCM, QCRT4CM
Operating Instructions
ZURN PEX PLUMBING AND RADIANT HEATING SYSTEMS
1801 PITTSBURGH AVENUE, ERIE, PA, U.S.A. 16502 PHONE: 800/872-7277 FAX: 800/209-2148 www.zurn.com
IN CANADA:
ZURN INDUSTRIES LIMITED
3544 NASHUA DRIVE, MISSISSAUGA, ONTARIO L4V 1L2 PHONE: 905/405-8272 FAX: 905/405-1292
Form No. ZPM04140, Rev. 6/07
Operating Instructions
Use the crimp tool to install only manufacturer-approved pipe or
tube used with copper crimp rings and brass, copper, or plastic
fittings manufactured to appropriate ASTM standards for poly-
ethylene and polybutylene pipe installation.
Always refer to the
tube manufacturers’ product assembly instructions when
using the crimp tool.
To Crimp with Tube, Fitting, and Ring in Place:
1.
Pull back on the moving handle and open the jaws full.
The crimp tool does not work like pliers. Do not force the
handles apart.
2.
Position jaws squarely around the ring.
3.
Gently open the handles to close jaws on the ring.
4.
Squeeze handles together to complete the crimp.
One crimp per ring only!
5.
Pull back on moving handle to release jaws from
the crimped ring.
6.
Measure the crimped ring with Zurn “Go-No Go” gage. See table
below. Do not measure bumps on ring where jaws meet. If “Go”
on gage does not fit, or if “No Go” does fit, then cut out connec-
tion, replace fitting and ring, adjust and calibrate the tool, and
recrimp.
The following dimensions are the ASTM maximum and minimum
crimped ring diameters for polyethylene (PEX) and polybutylene
(PB) pipe installations.
Std. Tube Size >
3/8"
1/2"
5/8"
3/4"
Min. Diameter
0.580"
0.700"
0.815"
0.945"
Max. Diameter
0.595"
0.715"
0.830"
0.960"
Variation in ring diameter (out-of-round) should not exceed 0.006".
Using the Zurn PEX Crimp Gauge Properly: Crimp Gauge Instructions
GO
NO
GO
NO
GO
GO
GAUGE
3/8
3/4
1/2
Flat
Gauging
Surfaces
(Non-Gauging Area)
GO
NO
GO
NO
GO
GO
GAUGE
3/8
3/4
1/2
Crimped
Ring
GO
NO
GO
NO
GO
GO
GAUGE
3/8
3/4
1/2
Crimped
Ring
1.
The flat portion of the opening is the
gauging area.
2.
The “Go” opening should go freely across
a crimped ring anywhere on its diameter
with the possible exception of the upset
area of the ring surface caused by the
tool jaws closing. Do not force the gauge
across the ring.
3.
The “No Go” opening should not go across
a crimped ring anywhere.
4.
The gauge should always be pushed
across the crimped ring from the side.
Do not
slide the gauge along the tube
up to the crimped ring.
Note:
Fitting and tube are not shown in
illustrations for clarity. The Zurn PEX
Crimp Gauge is to be used only on
crimp rings that have been crimped
onto tube and fittings.
Clearance Circle
Correct
Crimp Tight Enough – GO
Correct
Crimp Too Tight – NO GO
Use the crimp tool to install only
manufacturer-approved pipe or tube
used with copper crimp rings and
brass, copper, or plastic fittings
manufactured to appropriate ASTM
standards for PEX and polybutylene
pipe installation.
Always refer to the tube
manufacturers’ product
assembly instructions when
using the crimp tool.
To Crimp with Tube,
Fitting, and Ring in Place:
1. Pull back on the moving handle and
open the jaws full. The crimp tool
does not work like pliers. Do not
force the handles apart.
2. Position jaws squarely around
the ring.
3. Gently open the handles to close
jaws on the ring.
4. Squeeze handles together to
complete the crimp. One crimp per
ring only!
5. Pull back on moving handle to
release jaws from the crimped ring.
6. Measure the crimped ring with
Zurn “Go-No Go” gage. See table
below. Do not measure bumps on
ring where jaws meet. If “Go” on
gage does not fit, or if “No Go”
does fit, then cut out connection,
replace fitting and ring, adjust and
calibrate the tool, and recrimp.
The following dimensions are the
ASTM maximum and minimum
crimped ring diameters for PEX and
polybutylene (PB) pipe installations.
Variation in ring diameter (out-of-
round) should not exceed 0.006”.
OPERATION INSTRUCTIONS
Zurn PEX Crimp Tools
QCRT2CM, QCRT3CM, QCRTJCM, QCRT4CM
Std. Tube Size > 3/8"
1/2"
5/8"
3/4"
Min. Diameter
0.580"
0.700"
0.815"
0.945"
Max. Diameter
0.595"
0.715"
0.830"
0.960"
Using the Zurn PEX
Crimp Gauge Properly:
Crimp Gauge Instructions
1. The flat portion of the opening is
the gauging area.
2. The “Go” opening should go freely
across a crimped ring anywhere
on its diameter with the possible
exception of the upset area of the
ring surface caused by the tool jaws
closing. Do not force the gauge
across the ring.
3. The “No Go” opening should not go
across a crimped ring anywhere.
4. The gauge should always be
pushed across the crimped ring
from the side. Do not slide the
gauge along the tube up to the
crimped ring.
Note: Fitting and tube are not shown
in illustrations for clarity. The Zurn PEX
Crimp Gauge is to be used only on
crimp rings that have been crimped
onto tube and fittings.
Clearance Circle
Correct
Crimp Tight Enough – GO
Correct
Crimp Not Too Tight – NO GO