ZTE N919D
Quick Start Guide
LEGAL INFORMATION
Copyright © 2014 ZTE CORPORATION.
All rights reserved.
No part of this publication may be quoted, repro-
duced, translated or used in any form or by any
means, electronic or mechanical, including pho-
tocopying and microfilm, without the prior written
permission of ZTE Corporation.
Notice
ZTE Corporation reserves the right to make modi-
fications on print errors or update specifications in
this guide without prior notice.
We offer self-service for our smart terminal device
users. Please visit the ZTE official website (at www.
ztedevice.com) for more information on self-service
and supported product models. Information on the
website takes precedence.
Disclaimer
ZTE Corporation expressly disclaims any liability
for faults and damages caused by unauthorized
modifications of the software.
Images and screenshots used in this guide may
differ from the actual product. Content in this guide
may differ from the actual product or software.
Trademarks
ZTE and the ZTE logos are trademarks of the ZTE
Corporation.
Google and Android are trademarks of Google, Inc.
The
Bluetooth
®
trademark and logos are owned by
the Bluetooth SIG, Inc. and any use of such trade-
marks by ZTE Corporation is under license.
microSDHC™ logo
is a trademark of SD-
3C, LLC.
Other trademarks and trade names are the prop-
erty of their respective owners.
Version No. : R1.0
Edition Time : 201402
Manual No. : 079584506353
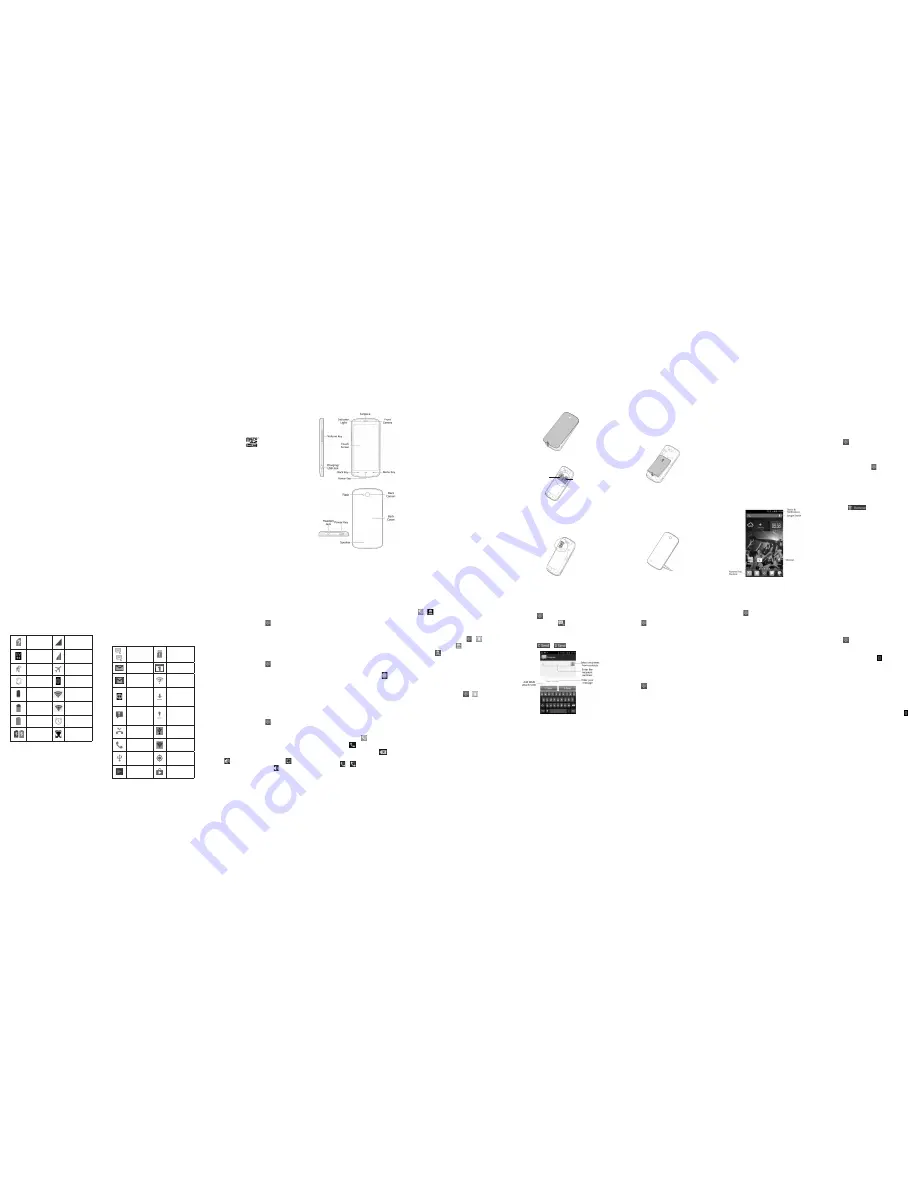
Getting to Know Your Phone
Power Key
• Press and hold to power on, select phone
modes, turn on/off airplane mode, reboot your
phone or power off.
• Press to turn off or on the screen display.
Home Key
• Touch to return to the home screen from any
application or screen.
• Touch and hold to active Google search appli
-
cation.
Menu Key
• Touch to get the options for the current screen.
• Touch and hold to see recently used applica
-
tions.
Back Key
Touch to go to the previous screen.
Volume Up/Volume Down
Press or hold to turn the volume up or down.
Starting Up
Switch off your phone before installing or replacing
the battery or the UIM/SIM card. The microSDHC
card is optional and can be installed and removed
while the phone is turned on. Unmount the microS
-
DHC card before removing it.
1. Place your finger in the slot at the bottom of
the back cover to lift and remove the cover.
2. Hold the UIM/SIM card with its cut corner ori
-
ented as shown and slip it into the card holder.
UIM Card
SIM Card
NOTE:
Your phone support dual SIM cards, you
can touch the
Home Key > Menu Key > System
settings > Dual SIM Settings
to set your cards.
3. Hold your microSDHC card with the metal con
-
tacts facing down and slide it into the microS
-
DHC card slot.
NOTE:
Your phone may come with a pre-installed
microSDHC card. Some applications may not
function normally after you remove the card, pre-
installed or otherwise.
4. Align the connectors on the phone and the
battery and slide the battery into the compart-
ment. Then gently press the battery down until
it is secured.
5. Press the cover gently back into place until you
hear a click.
Charging the Battery
1. Connect the adapter to the charging jack.
Ensure that the adapter is inserted with the
correct orientation. Do not force the connector
into the charging jack.
2. Connect the charger to a standard AC power
outlet.
3. Disconnect the charger when the battery is
fully charged.
Powering On/Off Your Phone
Make sure the battery is charged before powering
on.
• Press and hold the
Power Key
to turn on your
phone.
• To turn it off, press and hold the
Power Key
to open the options menu. Touch
Power off >
OK
.
Getting to Know the Home Screen
The home screen is the starting point for your
phone’s applications, functions, and menus. You
can customize your home screen by adding appli-
cation shortcuts, folders, widgets, and more.
NOTE:
Your home screen extends beyond the
initial screen, providing more space for shortcuts,
widgets, and folders. Simply swipe left or right to
see the extended home screens.
Opening Applications
1. Touch the
Home Key
if the current screen is
not the home screen.
2. Touch .
3. Slide left or right on the screen and touch an
app to open it.
Adding Shortcuts or Widgets
1. Touch the
Home Key >
.
2. If you want to add a widget, touch
WIDGETS
.
3. Touch and hold a widget or an app icon and
drag it to the home screen.
Removing Shortcuts or Widgets
1. Touch and hold a widget or shortcut on the
home screen.
2. Drag it to
to remove it.
Applying New Wallpapers
You can set the wallpaper for the home screen or
lock screen.
1. Touch the
Home Key > Menu Key > Wallpa-
per
.
2. Select a wallpaper source from
Gallery
,
Live
Wallpapers
or
Wallpapers
and touch the im-
age or animation you want to use as the wall
-
paper.
3. For Gallery images, touch
OK
at the top of the
screen. For Live wallpapers or Wallpapers,
touch
Set Wallpaper
.
1
2
3
4
5
6
7
8
9
Checking the Phone Status
The status bar at the top of the screen displays
phone and service status with various icons on the
right side. Below are some of the icons and their
meanings.
No SIM card
installed
No signal
CDMA EVDO
connected
Signal strength
Ringer off
Airplane mode
Vibrate mode
Bluetooth on
Battery low
Connected to a
Wi-Fi network
Battery partially
drained
Wi-Fi in use
Battery full
Alarm set
Battery charg-
ing
Wired headset
connected
Managing Notifications
The status bar at the top of the screen provides no-
tification alerts with different icons on the left side.
Below are some of the icons and their meanings.
The notifications depend on the apps installed and
you can touch and drag the status bar down to see
more information.
/
New SMS
microSDHC
card removed
New Email
Upcoming event
New Gmail
message
New Wi-Fi net
-
work detected
New Hangouts
instant mes-
sage
Downloading
data
Problem with
SMS/MMS
delivery
Sending data
Missed call
USB tethering
is on
Call in progress
Portable Wi-Fi
hotspot
USB con-
nected
GPS on
Song is playing
Updates avail-
able
Setting Ringtone and Sounds
Setting Ringtone or Notification Sound
1. Touch the
Home Key >
> Settings >
Sound
.
2. Touch
Phone ringtone
or
Default notification
for your CDMA or GSM card.
2. Select the ringtone you want to use.
3. Touch
OK
.
Setting System Sounds
1. Touch the
Home Key >
> Settings >
Sound
.
2. Scroll to the
SYSTEM
section and check the
sounds you want to hear or uncheck those you
do not need.
Adjusting Volumes
To adjust call volume, press the
Volume Key
while
on a call. To adjust other volumes, follow the steps
below.
1. Touch the
Home Key >
> Settings >
Sound > Volumes
.
2. Drag the sliders to adjust the volume for music,
video, games, and other media, the ringtone
and notification volume, and the alarm volume.
3. Touch
OK
to save.
TIP:
Press and hold the
Power Key
and then
touch
to enable the silent mode, touch
to
enable the vibration mode, or touch to disable
the silent mode.
Setting a Screen Lock
You can protect your phone by creating a screen
lock. When enabled, you need to touch and hold
an icon, draw a pattern, or enter a numeric PIN or
password to unlock the phone’s screen and keys.
1. Touch the
Home Key > Menu Key > System
settings > Security > Screen lock
.
2. Touch
None
,
Slide
,
Pattern
,
PIN
,
Password
or
Piano Lock
.
u
Touch
None
to disable.
u
Touch
Slide
to enable unlock with a ‘touch
and hold’ gesture. You can unlock the
screen by touching and holding
at the
center of the display.
u
Touch
Pattern
to create a pattern that you
must draw to unlock the screen.
u
Touch
PIN
or
Password
to set a numeric
PIN or a password you must enter to un
-
lock your screen.
u
Touch
Piano Lock
to Play any 3 keys
within 5 seconds to unlock the screen.
Making a call
1. Touch the
Home Key >
.
2. In the dialer tab
, enter the phone number
with the on-screen keypad. Touch
to de-
lete incorrect digits.
3. Touch the
or
icon below the keypad to
place the call.
NOTE:
To call a contact, touch the
Home Key >
>
and touch a contact or a number.
Adding Contacts
Creating a New Contact
1. Touch the
Home Key >
>
and touch
the all contacts tab
.
2. Touch
to create a new contact.
3. If prompted, select an account to synchronize
your new contact.
4. Enter the contact name, phone numbers, email
addresses, and other information, as shown.
Touch
DONE
to save the contact.
Importing Contacts in Batches
1. Touch the
Home Key >
>
.
2. Touch the
Menu Key > Import/export > Im-
port from UIM/SIM card
or
Import from stor-
age
.
3. If prompted, select an account in which to save
the contacts.
4. For importing from the UIM/SIM card, touch
the UIM/SIM contacts you want to import and
touch
OK
.
For importing from the microSDHC card, select
the vCard file(s) on the microSDHC card and
touch
OK
to begin importing.
Sending a Message
1. Touch in the home screen and select
Mes-
saging
, then touch
.
2. Enter the recipient(s) and message text. If you
want to send an MMS, add subject and attach
-
ments.
3. Touch
or
to send the message.
Setting Up Email Accounts
Setting Up Gmail
1. Touch in the home screen and select
Gmail
.
NOTE:
If another Gmail account is already set
up, touch the
Menu Key > Settings > ADD
ACCOUNT
.
2. Touch
Existing
to sign in to your existing
Google Account. If you have no Google Ac-
counts, touch
New
to create one.
3. Follow the instructions on the screen to set up
the account.
Setting Up Email
1. Touch in the home screen and select
.
NOTE:
If another email account is already set
up, touch the
Menu Key > Settings > ADD
ACCOUNT
.
2. Enter the email address and password.
3. Touch
Next
and follow the onscreen instruc
-
tions.
Setting Up Corporate Exchange Email
1. Touch in the home screen and select
.
NOTE:
If another email account is already set
up, touch the
Menu Key > Settings > Add ac-
count
.
2. Enter the email address and password.
3. Touch
Manual setup > Exchange
.
4. If necessary, edit
Domain\Username
,
Pass-
word
, and
Server
information.
5. Read the onscreen activation disclaimer and, if
prompted, touch
Next
.
6. If prompted, touch
OK
to allow the server to
remotely control some of your phone’s security
features.
7. Configure the settings on the screen, such as
Days to sync
, and then touch
Next
.
8. If prompted, touch
Activate
to activate the
Email app as a device administrator.
9. Identify your new account with a unique name
and then touch
Next
.
Contact your server administrator for more help.
Connecting With a Bluetooth
Headset
1. Turn on the Bluetooth headset and switch it
to pairing mode. Refer to the headset’s user
guide for more information.
2. Touch in the home screen and select
Set-
tings > Bluetooth
.
3. Slide the
ON/OFF
switch if Bluetooth is off.
When Bluetooth is on, the icon appears in
the status bar.
NOTE:
Your phone automatically scans for
and displays the IDs of all available Bluetooth
devices in range. You could touch
SEARCH
FOR DEVICES
if you wanted to scan again.
4. Touch the ID of the headset, or any other de-
vice you want to pair with your phone. Enter a
passcode if prompted.
5. If necessary, touch the ID of the paired head-
set to connect with it. Once connected, the
icon in the status bar turns blue.
TIP:
Touch the ID again to end the connection.
Installing Apps From the Google
Play™ Store
There are tens of thousands of games and applica-
tions in the Google Play Store for you to download
and install. You can send feedback or comments
on an application.
Before you begin, make sure that you have signed
in to your Google account.
10
11
12
13
14
15
16
17
18