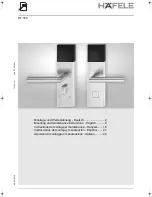
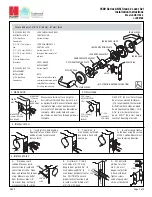
background image

Installation Instruction

Version: 1.0
Date

Nov

., 

2014

PL10D/ML10D

Summary of Contents for ML10D

Page 1: ...Installation Instruction Version 1 0 Date Nov 2014 PL10D ML10D ...

Page 2: ...Before Installation Diagram B A C C D E F I H G K J L M N 1 ...

Page 3: ...64mm 72mm 35mm 40mm 30mm 35mm Mounting Hardware Package Mounting Hardware Package 39 46mm door thickness 47 54mm door thickness A H E L M J H E L M J G F K Packing List B D C I N 2 ...

Page 4: ...cture to adjust the direction of strike plate F and latch D 1 Check door thickness and prepare the mounting hardware package 2 Check door open direction F F F F D D D D 30 38 56 20 10 25 39 46 64 30 10 35 47 54 72 35 10 40 55 60 80 45 10 50 H Spindle Length mm J Screw Length mm M Screw Length mm L Screw Length mm Door Thickness mm Left inward Right inward Left outward Right outward 3 ...

Page 5: ...rim panel by using screw Remove screw from the latch trim panel with a screwdriver and rotate the latch bolt at 180 Hexagon Screw N A How To Use Mechanical Key And Change Handle Direction How To Use Mechanical Key And Change Handle Direction 4 ...

Page 6: ...power on the lock four alkaline AA batteries not included are required Non alkaline and rechargeable batteries ARE NOT RECOMMENDED 4 Please avoid strong light direct to the fingerprint holder otherwise the infrared sensor might be disturbed 5 The operation of setting lock has a stand by time limit of 10 seconds Without any activity lock will shut off after 10 seconds 6 Keep your fingers clean when...

Page 7: ...ter line of the latch D at the desired handle height and tape it to the door Note2 Mark the holes first then start drilling 1 Drilling holes on the door 2 Install the latch D E E D center line of the handle desired handle height Installation 70mm 6 ...

Page 8: ...Correct Position The small triangle must be vertically upward This position is Wrong 3 Install outdoor unit B with gasket C and spindle H on the door B H C 7 ...

Page 9: ...4 Install mounting plate I with gasket C on the door J 5 Install indoor unit K M Note Push cable into the hole L B C I I C J 8 ...

Page 10: ...h is in idle position the front handle will be turned However the door will remain locked 2 At home turn the handle upward to lock the deadbolt for more security When you go out verify your fingerprint first then turn the handle up to lock the door for the safety of your property 28 5mm 1 1 8 4 19 64 21mm 53 64 18mm 45 64 18mm 45 64 22mm 55 64 3 5mm 9 64 13mm 33 64 109mm 9 ...

Reviews: