Yamaha EF5200D, Owner'S Manual
The Yamaha EF5200D Owner's Manual is an essential guide for operating and maintaining your generator. With our user-friendly website, you can easily download this manual for free. Equip yourself with the knowledge to ensure optimal performance and longevity of your Yamaha EF5200D from manualshive.com.
Share
Download


Reviews:
No comments
Related manuals for EF5200D

140
Brand: I MUST SCREAM Pages: 15
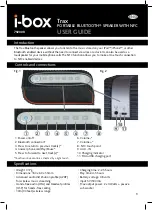
Trax
Brand: i-box Pages: 4

SP2000
Brand: Saint Productions Pages: 16

PG-I 8 SR
Brand: unicraft Pages: 66

ZI-STE7500DSH
Brand: ZIPPER MASCHINEN Pages: 61

22-4 HD PVMV-N
Brand: Fischer Panda Pages: 154

BN 2255/02
Brand: Acterna Pages: 40

DVP9018SW
Brand: Salora Pages: 37

Digital plus LV200
Brand: Lenz Pages: 12

41207320
Brand: Whisper Power Pages: 46

PD101
Brand: SONIQ Pages: 12

RP-59
Brand: Sanyo Pages: 2
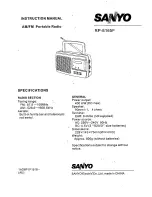
RP-6165F
Brand: Sanyo Pages: 4

RP-5200
Brand: Sanyo Pages: 12

RP-DAB100
Brand: Sanyo Pages: 28

GV-2015
Brand: Icel Manaus Pages: 15
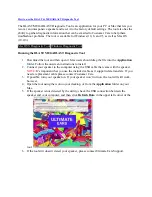
BLAST
Brand: Ultimate Ears Pages: 5

MN3100PR
Brand: New Holland Pages: 64


