
Keyboard Stand DDKU-L7 Owner's Manual
Keyboard Stand Assembly
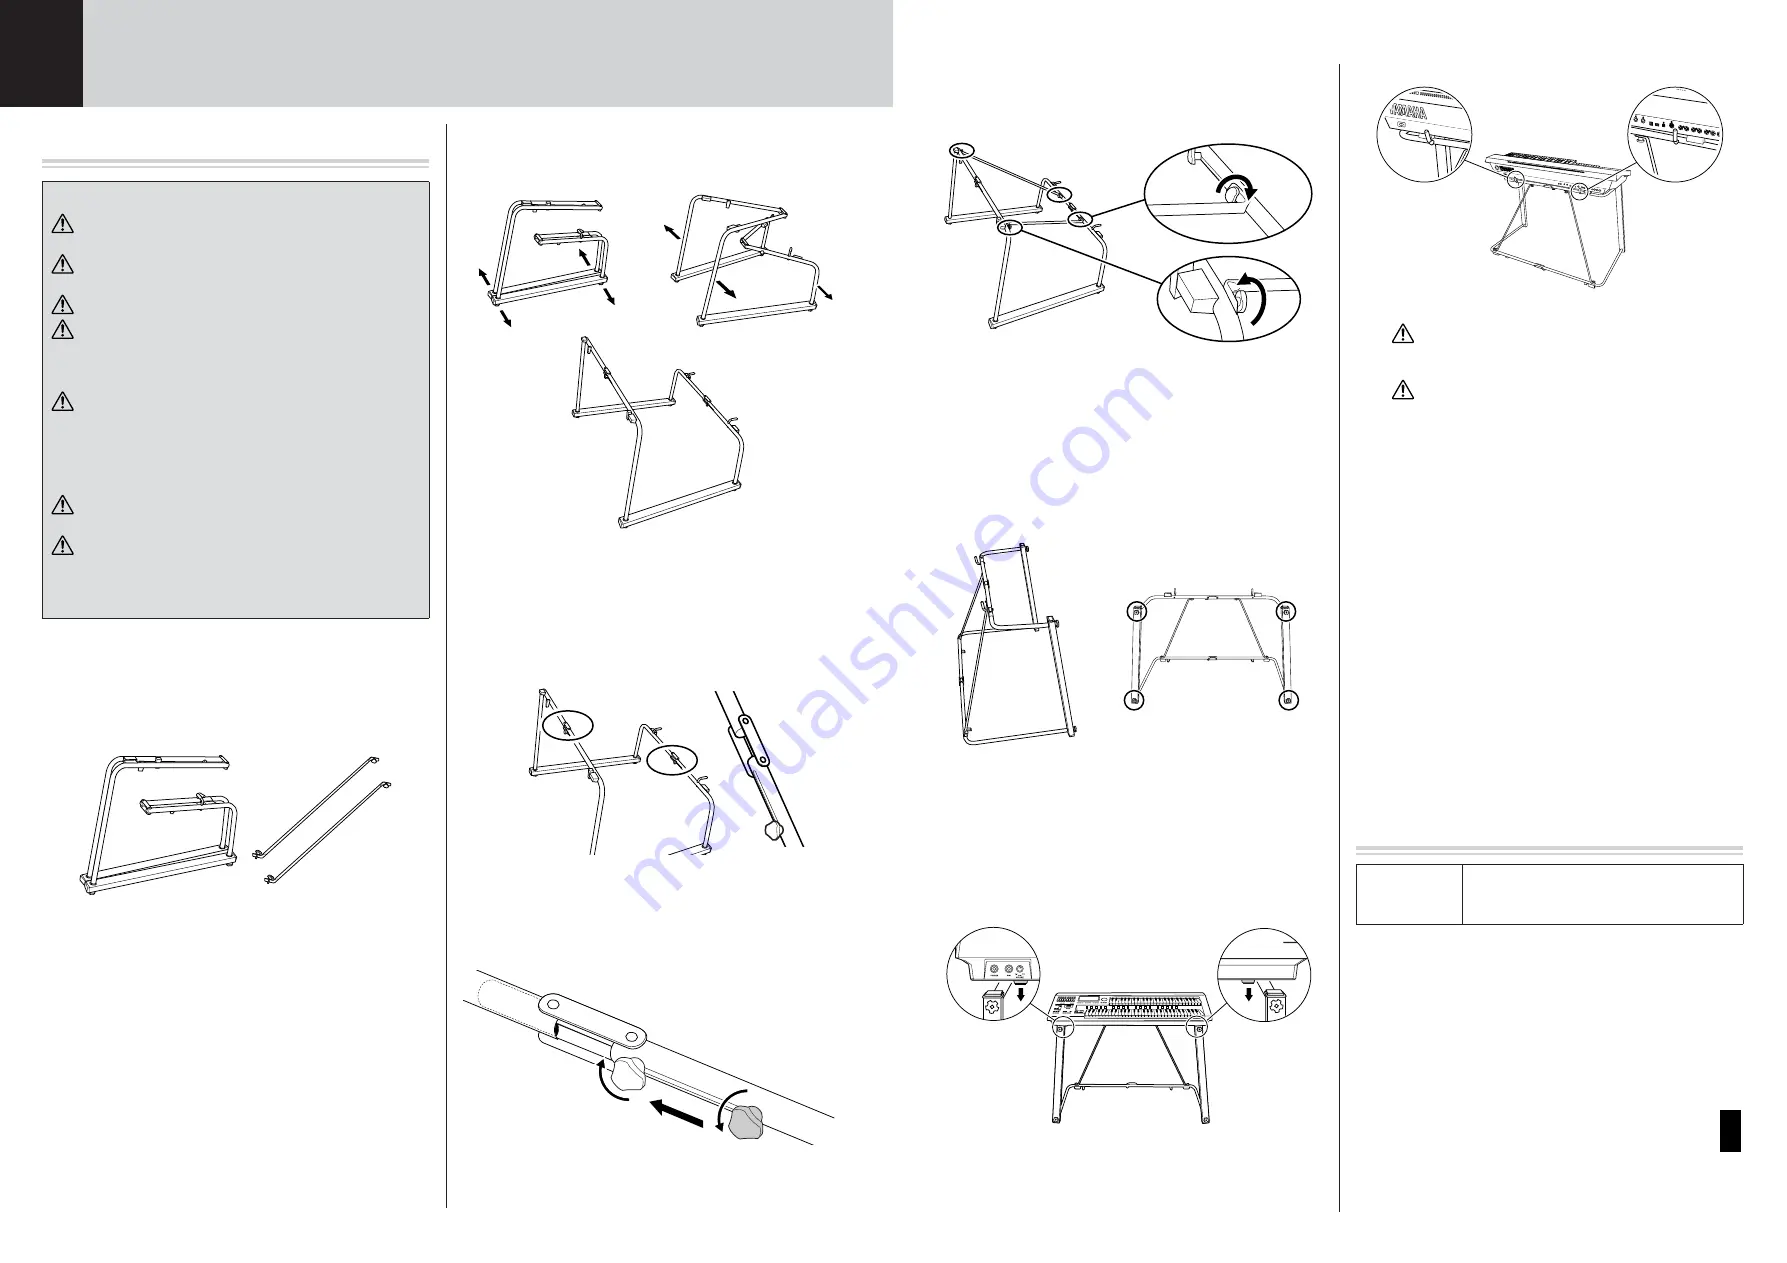
Please con
fi
rm that all parts shown in the
illustration are provided.
Unfold the folded keyboard stand.
Unfold the keyboard stand as shown
Straighten the frame.
3-1
Fix the joints so that the frame is unfolded and
straightened properly.
3-2
Loosen the fixation bolts and slide them into position,
then tighten the screws with your hand.
Precautions
Be sure to install the Keyboard Stand with two or more
people.
Take care not to drop the Keyboard or to pinch your
fi
nger(s).
Assembly should be carried out by at least two persons.
Always place the stand on a
fl
at, stable surface. Placing
the stand on uneven surfaces may result in it becoming
unstable or overturn, causing the keyboard to drop and
possibly resulting in injury.
Do not use the stand for anything other than its
designed purpose. The stand is not designed to hold
anything other than the speci
fi
ed keyboard. Placing any
object other than the speci
fi
ed keyboard on the stand
may result in the object dropping or the stand
overturning.
Do not apply excessive force to the keyboard as it may
cause the stand to overturn or the keyboard to drop.
Make sure the stand is sturdy and safe, and all screws
are tight and
fi
rm before use. If not, the stand may
overturn, the keyboard may drop, or may result in injury
to the user.
1
Keyboard stand
Braces
2
1
2
3
3
1
2
3
Install the braces with your hand.
Stretch out the frames and install the braces using the bolts as
shown.
n
When removing the braces at disassembly, the screws of
the braces may hard to loosen. In this case, loosen the
screws while moving the braces lightly to the front, back,
left and right.
Raise the assembled stand as shown, then
con
fi
rm that all screws shown in the illustration
are tight and
fi
rm.
Mount the keyboard.
Hold the keyboard horizontally (with two people), and place
it on the keyboard stand, aligning the rear panel with the
stoppers on the keyboard stand. Make sure that the
protrusion on the bottom of the keyboard fits inside of the
stand frames.
Be careful not to drop the keyboard or to get your
fi
ngers caught between the keyboard and the stand
parts.
Do not hold the keys. since this may damage or
result in a malfunction.
To uninstall the Keyboard Stand, reverse the procedure in Step #4
above.
Post-assembly checklist
Once you’ve assembled the stand, check the following points:
• Are there any parts left over?
If so, read the assembly instructions again and correct any
mistakes you might have made.
• Is the instrument clear of doors and other movable
fi
xtures?
If not, move the instrument to an appropriate location.
• Does the instrument make a rattling noise when you
play it or move it?
If so, properly tighten all screws.
Also, if the keyboard makes a creaking noise or seems unsteady
when you play it, refer carefully to the assembly instructions and
diagrams and retighten all screws.
Speci
fi
cations
4
5
6
Dimensions
(WxDxH),
Weight
1185 x 652 x 750mm, 6kg
U.R.G., Pro Audio & Digital Musical Instrument Division, Yamaha Corporation
© 2006 Yamaha Corporation
WH88580 ???MWCP?.?-01A0
Printed in Japan
JA
EN


