background image

YAAHKIEH Version 202106

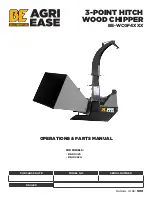
Semi Commercial Wood Chipper

User’s Manual

MC100 series (PTO)

Please read through this owner’s manual carefully before using the product, to ensure the

safety of yourself and others.

*Due to continuing improvements, actual product may differ slightly from the product described

herein.

Summary of Contents for PTO MC100 Series

Page 1: ...r User s Manual MC100 series PTO Please read through this owner s manual carefully before using the product to ensure the safety of yourself and others Due to continuing improvements actual product ma...

Page 2: ...ng hopper assembly 11 3 3 2 Attaching the conveyor assembly 11 3 4 Attaching chipper and tractor 11 3 4 1 Connecting the chipper and tractor 12 3 4 2 Calculating length of PTO Shaft needed 13 3 4 3 Mo...

Page 3: ...ipping Dimensions 1100 x 750 x 1100 mm Shipping Weight 210kg Serial Number A Serial Number is used to identify your machine The number is located on the Serial Number Label on your machine For your co...

Page 4: ...ered machine with moving parts operating with high energy at high speeds You must use proper clothing and safety gear when operating this machine to prevent or minimize the risk of severe injury This...

Page 5: ...es 2 2 Safety for Yourself and Those Around You This is a high powered machine with moving parts operating with high energy at high speeds You must operate the machine safely Unsafe operation can crea...

Page 6: ...e operation to use your machine Never place your hands feet or any part of your body in the chipper hopper discharge opening or near or under any moving part while the machine is running Keep area of...

Page 7: ...injuries and property damage and will void your warranty 2 3 Safety for Children and Pets Tragic accidents can occur if the operator is not alert to the presence of children and pets Children are oft...

Page 8: ...rself or others or can cause damage to the machine which is not covered under warranty Keep in mind that the operator or user is responsible for accidents or hazards occurring to other people their pr...

Page 9: ...en hazards or traffic Never carry passengers on your machine Never overload or attempt to chip material beyond the manufacturer s recommendation see chapter 4 personal injury or damage to the machine...

Page 10: ...d federal regulations when transporting the machine on public roads and highways Allow for added length in driving situations e g when turning parking and Crossing intersections Adjust your transporta...

Page 11: ...ine before you use it It may be helpful to familiarize yourself with the controls and features of your PTO CHIPPER as shown in before beginning these procedures 3 1 Controls and Features 3 2 Unpacking...

Page 12: ...and put it aside by two people 3 Remove the carton board 4 Take off the stretching plastic 5 Cut plastic banding with wire cutter Step B 1 Put carton board under banding aside on a flat area 2 Remove...

Page 13: ...opper down and bolt it tightly 3 3 2 Attaching the conveyor assembly 1 First remove the two bolts pre mounted with wrench 2 Connect the hitch pin and hitch holder 3 Bolt the conveyor tightly All the p...

Page 14: ...reverse the direction of rotation The length of the PTO Drive shaft that is included with your new machine may need to be modified See the procedure for checking the PTO Shaft length needed and modif...

Page 15: ...t length to determine if modifications are needed Without the PTO Shaft installed use the table below to record the dimensions as outlined in the following steps SHAFT TO SHAFT MEASUREMENTS ON GROUND...

Page 16: ...Shaft Do not proceed with installation until you have a longer PTO Shaft 4 Take the shortest recorded measurement you wrote in the table and add 2 5 Take that number and subtract it from 27 overall co...

Page 17: ...both Guards the required amount see the right ref picture NOTE If you put the Guards in a vise to hold them be careful not to clamp it too tight because it could crack the plastic 4 Measure and cut ea...

Page 18: ...t in the Tractor PTO Spline 3 Secure the PTO Shaft Safety Chains to stationary parts of the Chipper Frame and Tractor to stop the Guard from turning see the right ref picture 4 Operating This chapter...

Page 19: ...Guards are in place and properly secured before using 2 Remove any debris buildup from the machine before every use of the Chipper 3 Set Tractor throttle at IDLE before engaging PTO with Chipper atta...

Page 20: ...r than hardwood 6 Your operator experience will teach you how different types of wood will chip and how fast you can process them 7 Use caution with small diameter green saplings and branches less tha...

Page 21: ...urned to full speed 4 3 To Free a Jammed Rotor Disassemble 1 Disconnect the PTO Shaft 2 Remove any material left in the Chipper Hopper 3 Remove the two Bolts and Locknuts that secure the Conveyor to t...

Page 22: ...for all moving parts to come to a complete stop disconnect the PTO shaft from the tractor then wait 5 minutes before performing any maintenance procedure or inspection on the chipper 5 1 Regular Maint...

Page 23: ...Inspect or replace Drive Belt 5 2 Grease Fittings Your PTO CHIPPER was greased at the Factory The operator needs to periodically lubricate the four Bearings of the Chipper Assembly and the PTO Shaft O...

Page 24: ...e cover holder Checking the Belt Tension 1 Push down two belts together check the measurement of its movement up and down 2 Check if the distance in between is 8 MM Make necessary adjustment according...

Page 25: ...ong distance will decrease performance and cause excessive vibration that will cause damage to the PTO chipper Disengage PTO shut down the tractor engine remove the key wait for all moving parts to co...

Page 26: ...lete stop disconnect the PTO shaft from the tractor then wait 5 minutes before performing any maintenance procedure or inspection on the chipper when not in use your PTO chipper should be stored out o...

Page 27: ...tor won t turn The Rotor may be jammed Immediately disengage the PTO and stop the tractor engine Remove any built up debris from the Chipper Hopper Inlet and Conveyor Check the Drive Pulley alignment...

Page 28: ...agram No Item 1 Belt cover 2 Belts 3 Pulley 35 4 Cover holder 5 Frame 6 Lock washer 7 Key 8 Shaft bush 9 Bearing 10 Shaft plate 11 Shaft 12 Hinge holder 13 Pin 14 Clevis pin 15 Side cover 16 Rotor hou...

Page 29: ...27 No Item 1 Housing cover 2 Bolt blade 3 Blade 4 Drum rotor 5 Bearing 6 Clip 7 Bearing cover 8 Cover holder 9 Rotor housing 10 Bolt anvil 11 Anvil 12 Rotor protector 13 Pulley rotor 14 Lock washer...

Page 30: ...28 No Name 1 Hopper 2 Washer rubber flap 3 Rubber flap 4 Bolt M6 x 20 5 Washer M6 6 Nut M6...

Page 31: ...29 No Name 1 Output 2 Bolt M6 16 3 Washer M6 4 Lock nut M6 5 Deflector 8 Knob M6...

Page 32: ...30...

Reviews: