background image

User Manual For xTool D1

xTool D1
User Manual

Statement

Thank you for choosing the xTool products!

If you use the product for the first time, read carefully all the accompanying materials of the

product to improve your experience with it. If you do not use the product according to the

instructions and requirements of the Manual, or mis-operate the product due to

misunderstanding, etc., Makeblock Co., Ltd. shall bear no responsibility for any loss resulting

therefrom, except for losses caused due to improper installation or operation by Makeblock

professional maintenance personnel.

Makeblock Co., Ltd. has collated the contents of the Manual rigorously and carefully, but

errors or omissions may remain.

Makeblock Co., Ltd. is committed to continuously improving product functions and service

quality, and therefore reserves the right to change any product or software described in the

Manual and the contents of the Manual at any time without prior notice.

The Manual is intended to help you use the product properly and does not include any

description of hardware and software configuration. For product configuration, refer to the

related contract (if any) and packing list, or consult your distributor. Images in the Manual are

for reference only and the actual product may vary.

Protected by copyright laws and regulations, the Manual shall not be reproduced or

transcribed in any way, or be transmitted on any wired or wireless network in any manner, or

be translated into any language without the prior written authorization of Makeblock Co., Ltd..
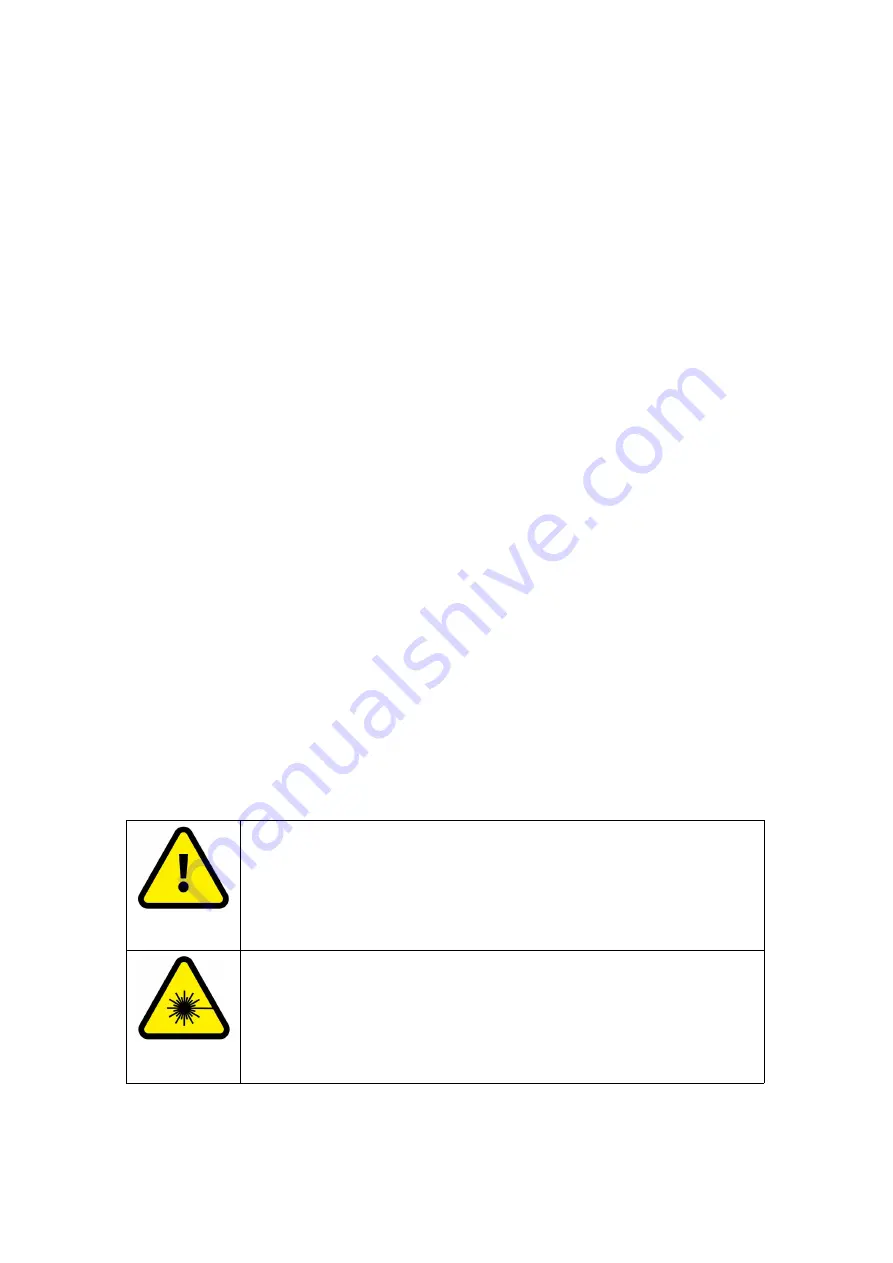
Warning

Physical injuries or damage to the machine may be caused if you do not

follow the instructions or principles.

Warning

Physical injuries or damage to the machine may be caused by laser light if

you do not follow the instructions or principles.

DECLARATION OF CONFORMITY

Summary of Contents for D1

Page 1: ... reserves the right to change any product or software described in the Manual and the contents of the Manual at any time without prior notice The Manual is intended to help you use the product properly and does not include any description of hardware and software configuration For product configuration refer to the related contract if any and packing list or consult your distributor Images in the ...

Page 2: ...d in accordance with the instructions may cause harmful interference to radio communications However there is no guarantee that interference will not occur in a particular installation If this equipment does cause harmful interference to radio or television reception which can be determined by turning the equipment off and on the user is encouraged to try to correct the interference by one or more...

Page 3: ...es and chippings accumulated during cutting and engraving are dangerous and may cause fire Clean the machine regularly The machine works properly at the temperature of 0 C to 35 C and can be stored properly at the temperature of 0 C to 45 C Do not operate it at a temperature lower than 0 C 2 Laser safety xTool D1 has no protective cover Do not touch the laser when operating the machine Follow the ...

Page 4: ... to perform vector cutting on acrylic in particular is most likely to produce an open flame Read the following warnings and suggestions carefully Ensure that the workspace is well ventilated so that the smoke can be discharged properly Do not stack materials especially organic ones such as paper around the machine They may cause the spread of flames and increase the risk of material ignition Do no...

Page 5: ...nds or other tools when the machine is connected to a power supply 5 Warning and instruction signs On xTool D1 the warning and instruction signs are labelled where physical injuries or damage to the machine may be caused before and or during operation If a sign is damaged or lost replace it immediately You can use the following template to print the sign you need Packing list ...

Page 6: ...side plates together on a desk or flat ground 3 Tighten screws at each joint of the plates to fix them together Note Align a screw with the screw hole before tightening it Before you tighten the screws press each joint of the plates to make sure that no support hangs in the air ...

Page 7: ... longest screws are used to set the tightness of the timing belts Do not fully tighten them Otherwise the timing belts may be damaged Make sure that you set the timing belts on the left and right plates with the same tightness Otherwise materials can t be engraved properly 5 Fit the middle plate ...

Page 8: ...elt on the middle plate Note The longest screw is used to set the tightness of the timing belt Do not fully tighten it Otherwise the timing belt may be damaged 7 Install the optical shaft components 1 Drag the middle plate to make it close to the rear plate ...

Page 9: ...g belt and then tighten the screws on the coupling 1 Because the bearing is shallow please check whether it is inserted steadily to avoid the possibility of displacement collapse during the work 2 Check whether the coupling screws are tightened ...

Page 10: ...8 Use the motor cable to connect the motor on the left plate to the main control board Note Press the connectors of the motor cable into place to prevent poor contact ...

Page 11: ...Note Use cable ties to fit the cable on the plate so that the cable doesn t interfere with the operation of xTool D1 9 Insert the motor laser cables into the ports on the main control board ...

Page 12: ...10 Connect the motor on the middle plate to the main control board 11 Use cable ties to fix the cables on the plate ...

Page 13: ...ort 13 Fit the laser head Insert the laser head along the guide rail and then lock it in a required position by using the thumb screw on the side 14 Use cable ties to fix the cables on the middle plate Note Before using the cable ties reserve a sufficient length of the cable to allow the laser head to slide between the left and right plates ...

Page 14: ...15 Insert the TF card into the card slot Meet your xTool D1 ...

Page 15: ...ideo Tutorials Power on xTool D1 1 Connect xTool D1 to a power supply 2 Turn on the power switch and wait till the annular indicator is normally on in white Connect xTool D1 to the software on your PC 1 Visit our website to download the software on your PC https support xtool com hc en us articles 4408889202199 Software for xTool D1 2 Connect xTool D1 to the software USB connection mode 1 Use the ...

Page 16: ...the USB cable to connect xTool D1 to your PC 2 Open the software click the Not Connected drop down list box select Configure and add device select your device in the dialog box that appears and then set the Wi Fi name and password ...

Page 17: ...Note Make sure that xTool D1 and your PC work on the same LAN After xTool D1 is ...

Page 18: ... Search for laserbox in an app store to download the laserbox app 2 Use the USB cable to connect xTool D1 to your PC 3 Open the software on your PC click the Not Connected drop down list box and select Configure and add device Select your device in the dialog box that appears and then set the Wi Fi name and password ...

Page 19: ......

Page 20: ...4 Connect your mobile device to the same Wi Fi network as your PC 5 Open the app on your mobile device and tap the device icon in the upper right corner 6 Wait till the app discovers your device ...

Page 21: ...7 After the Wi Fi network is set tap OK ...

Page 22: ...8 After xTool D1 is successfully connected the device icon in the upper right corner turns into green ...

Page 23: ...Engraving for the first time ...

Page 24: ...r point of the cross shaped light beams is the start point for framing You can move the laser head to place the center point in the position where you want to start engraving 3 Click the start button in the upper right corner and then click Framing to preview the position where the pattern is to be engraved on the material You can adjust the position of the material to make sure that the pattern i...

Page 25: ...4 Click Start The engraving starts You are advised to wear the safety goggles to protect your eyes ...

Page 26: ...ter sales services Scope Name Warranty period Main parts PCB motor laser head guide rail 12 months Wearing parts Power adapter conveyor belt 3 months Consumables and accessories Power cord USB cable consumable parts user guide card package etc Not covered in the warranty Note 1 Warranty period in the preceding table is defined from the date of purchase on the receipt The invoice date will be used ...

Reviews: