background image

Getting started with xCORE VocalFusion Speaker

I N T H I S D O C U M E N T

·

Requirements

·

xCORE VocalFusion

Features

·

Install xTIMEcomposer Tools

·

Download the Firmware

·

Build the Firmware

·

Run the Firmware

·

Evaluation Procedure

This document describes how to get started with the

xCORE VocalFusion Speaker

evaluation system and firmware. You will be guided through setting up the system,
downloading the firmware and programming the board. It is assumed that you are
familiar with the XMOS xTIMEcomposer programming tools. Additional information
and documents are available at

http://www.xmos.com/vfspeaker

.

1

Requirements

To evaluate

xCORE VocalFusion

Speaker, the following hardware/software is re-

quired:

·

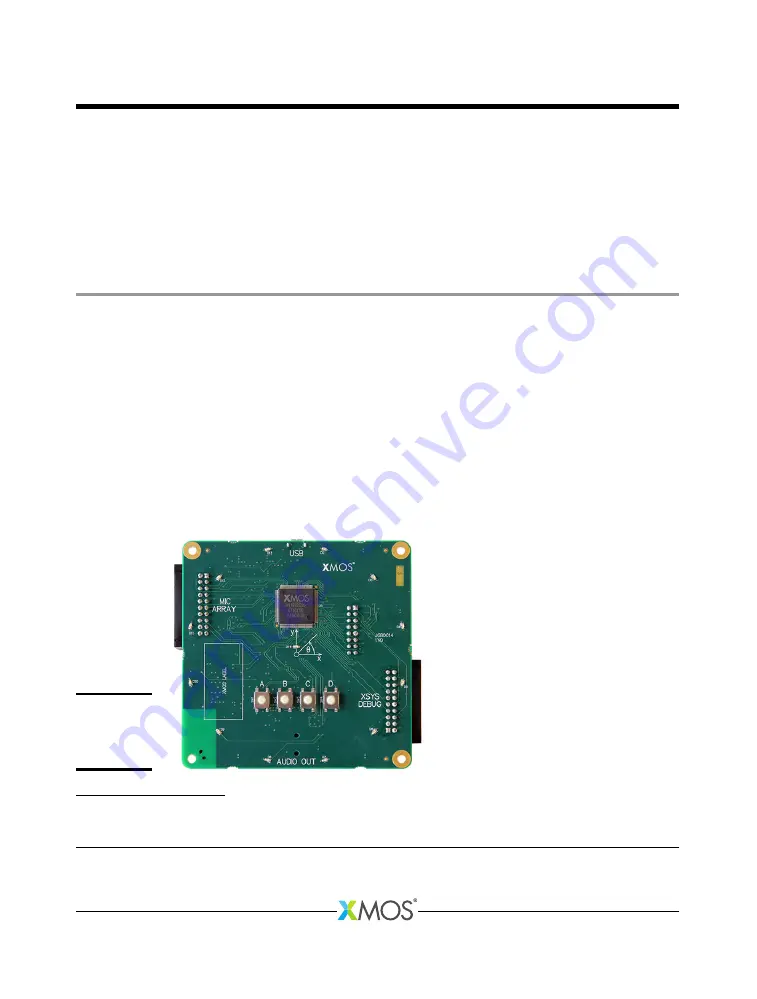
xCORE VocalFusion Speaker baseboard

version 1.1

1

Figure 1:

xCORE

VocalFusion

baseboard

1

Version 1.0 of the baseboard may be used for USB evaluation however the I

2

S hardware setup is different from the

instructions provided in this guide as J6 is not present

Publication Date: 2017/12/2

Document Number: XM011320A

XMOS © 2017, All Rights Reserved

Summary of Contents for xCORE VocalFusion

Page 1: ...he board It is assumed that you are familiar with the XMOS xTIMEcomposer programming tools Additional information and documents are available at http www xmos com vfspeaker 1 Requirements To evaluate...

Page 2: ...other connects the xTAG debug adapter to a host computer xTIMEcomposer the development tools provide everything you need to program debug and simulate your applications download free from http www xm...

Page 3: ...EC performance Internet connection required to register the tools before you can use them and to access firmware repositories from within xTIMEcomposer Parameter control will also require a host syste...

Page 4: ...sing I2 S for reference far end input and USB for processed mic output The processed output can be optimized for human communications i e Internet calls or Automatic Speech Recognition ASR engines The...

Page 5: ...d Linux platforms from https www xmos com support tools xCORE VocalFusion requires version 14 3 2 with a Java Runtime Environment JRE version 1 6 or later installed See the xTIMEcomposer download page...

Page 6: ...specify the location of your workspace This is where your Eclipse workspace files will be kept and where the firmware will be imported to Once the workspace location has been set you will be prompted...

Page 7: ...Getting started with xCORE VocalFusion Speaker 7 22 Figure 6 Firmware import 2 Select General Existing Projects into Workspace then click Next Figure 7 XM011320A...

Page 8: ...ules and applications will be seen They should all already be selected so just click OK to import xCORE VocalFusion if needed and all of its modules and libraries Figure 8 4 Click Finish to complete t...

Page 9: ...w Figure 9 5 1 3 Build the Firmware To build the firmware you need to select the desired build configuration for example 1i1o2_cir43 and set it as the current project configure the build options for m...

Page 10: ...rmware import selection Figure 10 Selecting The Active Build Configura tion With the desired configuration selected in the menu click to set it as the active build configuration Right click on the pro...

Page 11: ...lorer 5 2 Build from Command Line First open an xTIMEcomposer command prompt This will automatically setup the required environment and paths to allow the compiler to run Next navigate to the followin...

Page 12: ...Getting started with xCORE VocalFusion Speaker 12 22 using both arrangement and spacing XM011320A...

Page 13: ...p a Run Configuration for the xCORE Vocal Fusion project Click Run Run Configurations in the top menu bar Figure 12 Figure 12 Selecting Run Configura tions In the Run Configurations window double clic...

Page 14: ...lug and plug the xTAG adapter and use the Refresh list button again Click Apply to save the configuration Click Run to download the application to the xCORE VocalFusion board and run it The board will...

Page 15: ...ication Now select the application s XN file for C C Application click Browse and navigate to app_vf_spk_base src core vfspk_base_usb xn Switch to XFlash Options tab Figure 15 and enter the following...

Page 16: ...etting started with xCORE VocalFusion Speaker 16 22 Click Run to execute the erase Console output will indicate terminated once erasing is done Figure 15 Flash configuration for erase page 2 XM011320A...

Page 17: ...the relevant binary is run for the connected microphone configuration i e circular vs linear and spacing If the board is reset or power cycled it will boot into any firmware programmed in its flash If...

Page 18: ...microphone signal s to the host and playback the AEC reference far end signal from the host to the on board DAC This evaluation will be using the following build 1i2o2_lin33_48khz 1i2o2_cir43_48khz 2...

Page 19: ...Once successfully enumerated the device will appear as a USB Audio Device named XMOS VocalFusion Spk UAC1 0 Select the new sound card as your computers default audio device On a Mac use Audio MIDI Set...

Page 20: ...luation kit fresh instances of the UAC1 driver will then be correctly installed 7 2 Full I2S Configuration The device can optionally receive the AEC reference far end signal via I2 S slave master and...

Page 21: ...erence far end signal The USB interface is disabled in this build configuration so the device will not show in the host computers device manager The USB port is simply acting as a power supply 7 2 2 E...

Page 22: ...nnel as provided via I2 S Playback via USB is disabled in build configurations with I2 S sourced AEC reference far end Due to the possible signal integrity issues resulting from the use of unbuffered...

Reviews: