Summary of Contents for PSO1
Page 16: ......
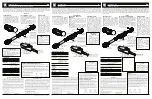
The XEPA PSO1 is a sleek and modern outdoor solar LED light. For detailed instructions on how to set up and use your light effectively, download the free User Manual from our website. Ensure you have all the information needed to make the most out of your XEPA PSO1.
Page 16: ......