background image

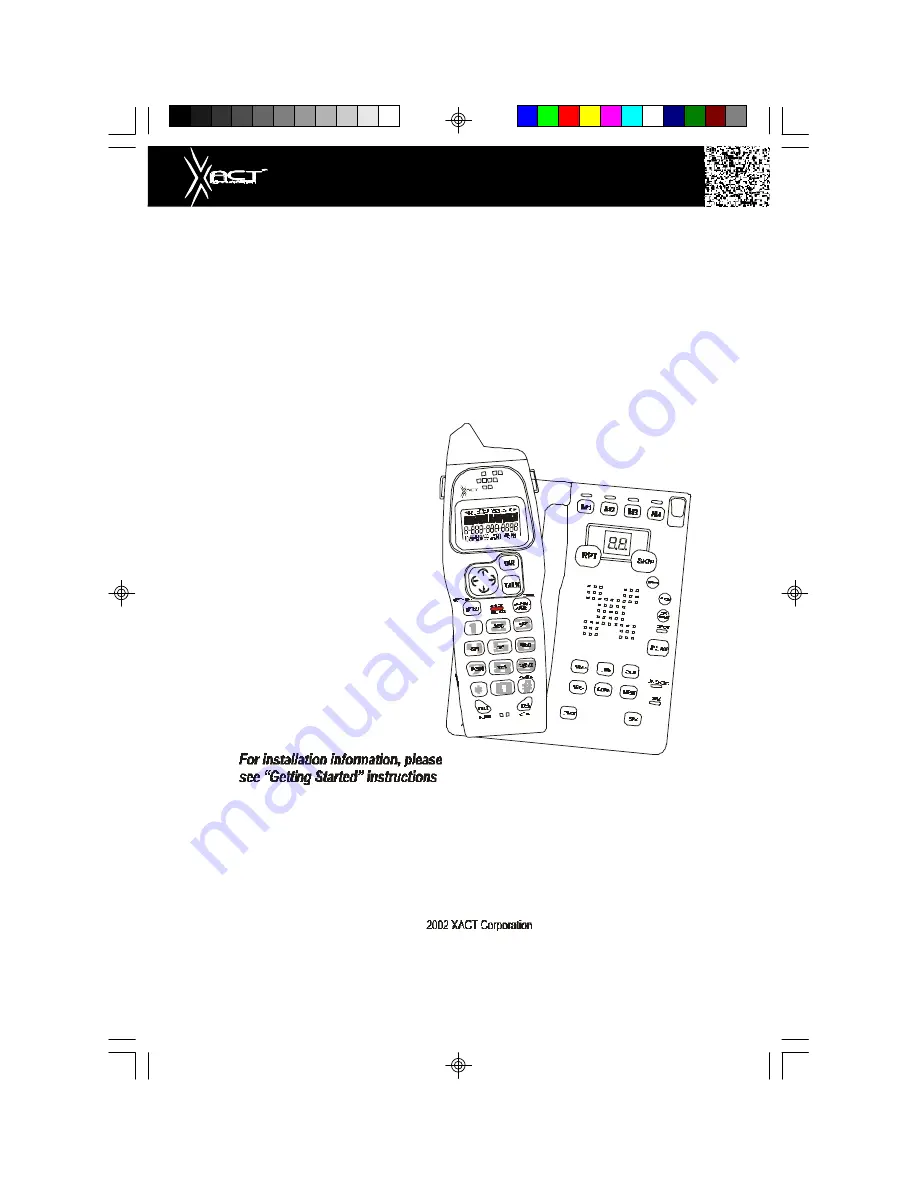
2.4 GHz CORDLESS ALL DIGITAL
ANSWERING SYSTEM WITH
CALLER ID/CALL WAITING

50 CHANNEL AUTOSCAN WITH 4 INDIVIDUAL MAILBOXES

Model XG2400

OWNER'S MANUAL

INSTALLATION AND

OPERATING

INSTRUCTIONS

PLEASE READ THIS
MANUAL CAREFULLY
BEFORE USE.
KEEP FOR YOUR
REFERENCE.

on page 7 or your separate
Quick Start guide.

Visit Us on the Web:

www.uselectronics.info

Summary of Contents for XG2400

Page 1: ...G 50 CHANNEL AUTOSCAN WITH 4 INDIVIDUAL MAILBOXES Model XG2400 OWNER S MANUAL INSTALLATION AND OPERATING INSTRUCTIONS PLEASE READ THIS MANUAL CAREFULLY BEFORE USE KEEP FOR YOUR REFERENCE on page 7 or your separate Quick Start guide Visit Us on the Web www uselectronics info ...

Page 2: ... built in security code with 65 536 combinations prevents use of your telephone line by another nearby cordless telephone Dependable Battery Recharge your BATTERY PACK many times with the built in charger The battery low warning tone tells you when the BATTERY PACK needs recharging See page 37 Special Services Use the button to access special services such as Call Waiting supplied by your telephon...

Page 3: ...es you that the origin of the incoming call does not support the Caller ID system Call Waiting Service Displays the name and number of the second caller if you have subscribed for Call Waiting service from your local telephone company see page 15 Voice Mail Indicates message waiting signal if you subscribed to Voice Mail message service and requested Visual Message Indication from your local telep...

Page 4: ...s and DIRECTORY PHONE BOOK items large LCD Screen 1 LARGE LCD SCREEN 10 DIR DIRECTORY BUTTON Pg 16 21 16 DEL DELETE CHAN CHANNEL BUTTON Pg 17 18 20 21 36 39 41 13 SAVE REDIAL PAUSE BUTTON Pg 12 17 20 22 27 14 VOLUME CONTROL HI MID LOW SWITCH 9 BATT BATTERY LOW INDICATOR Pg 37 5 HEADSET JACK Pg 13 4 MENU VOICE MAIL BUTTON Pg 15 22 27 6 TELEPHONE KEYPAD Pg 18 20 22 27 8 FLASH BUTTON Pg 15 18 20 22 2...

Page 5: ... LOW INDICATOR Appears on the LCD Screen when the battery charge is low See page 37 for detail 11 DIRECTORY PHONE BOOK Button Press to access names and numbers stored in the DIRECTORY PHONE BOOK See pages 16 to 21 for details 12 PAUSE Button SAVE Press and hold down to save the changes on the listed items REDIAL Press to redial the last number you dialed PAUSE Press to insert a pause while dialing...

Page 6: ...OUTGOING MESSAGE BUTTON Pg 29 30 15 ANNOUNCE ONLY INCOMING MESSAGE SWITCH Pg 30 40 2 MAILBOX 2 BUTTON 3 MAILBOX 3 BUTTON 4 MAILBOX 4 BUTTON 1 MAILBOX 1 BUTTON 5 MAILBOX LED INDICATORS Pg 29 33 7 TIME BUTTON Pg 29 33 6 REPEAT BUTTON Pg 29 33 19 LED MESSAGE DISPLAY Pg 33 18 BASE UNIT ANTENNA 20 SKIP BUTTON 14 MESSAGE ALERT SWITCH Pg 31 16 RINGER ON OFF SWITCH 17 RING SELECT SWITCH Pg 31 32 POWER IN ...

Page 7: ...th a damp cloth 12 Button Press and hold down to set the 3 digit Remote Access Code for remote operation 13 TONE PULSESELECTSWITCH 14 MESSAGE ALERT Set switch to ON to generate a beep sound every 12 seconds when a new message has been received 15 ANNOUNCEONLY INCOMINGMESSAGESwitch ICM System records the incoming messages ANNC System plays your announcement and then hangs up without recording messa...

Page 8: ...urned ON 25 Button Press to play messages 26 OUTGOING MESSAGE Button PressandholddowntorecordOGMmessages 27 IN USE CHARGE LED Indicator Lights up to indicate that theHANDSET is in TALK mode or the HANDSET is place on the BASE UNIT for charging 28 SPEAKERPHONE LED INDICATOR Lights up to indicate that the speaker is in use 29 SPEAKERPHONE Button Press to answer a call using theBASEUNIT 30 Button Pre...

Page 9: ...5 One TouchVoiceMailDialing 15 Caller List 16 Viewing the Caller List 16 Placing a Call from the Caller List 16 StoringCallerIDRecords intotheDIRECTORY PHONEBOOK 17 Deleting a Single Record 17 Deleting all Records 17 Name and Telephone Number DIRECTORY PHONEBOOK 18 Viewing the DIRECTORY PHONEBOOK 18 Storing Phone Numbers 18 Telephone Keypad Characters 19 Placing Calls from the DIRECTORY PHONEBOOK ...

Page 10: ...7 K SettingtheAreaCode 27 Answering System Operation 28 Setting the Day Time Stamp 28 Recording your Outgoing Messages 28 Turning the Answering System ON OFF 30 Setting to Answer Calls 30 Setting to Announce Only 30 MessageAlert 31 Setting Ring Select 31 Recording a Memo 31 Playing of Messages Memos 32 Saving Mesages 33 Erasing Messages 33 When the Memory is Full 33 Two Way Recording 33 Remote Ope...

Page 11: ...Security 36 RechargingtheBATTERYPACK 37 Changing the BATTERY PACK 38 Problem Solving 39 Technical Information 41 FCC Requirements 42 WarrantyInformation 44 Wall Mount Template 48 Contents 3 ...

Page 12: ...lls 10 Do not cover the slots and openings on this telephone This telephone should never be placed near or over a radiator or heat register This telephone should not be placed in a built in installation unless proper ventilation is provided 11 Do not place anything on the power cord Install the telephone where no one will step or trip on the cord 12 Do not overload wall outlets or extension cords ...

Page 13: ...of BATTERY PACK Cordless Telephone BATTERY PACK 3 6V 600mAh U S Electronics Inc Ni MH BATTERY PACK model B655 See page 37 for ordering information 2 Do not dispose of the BATTERY PACK in a fire The BATTERY PACK may explode Check with local codes for possible special disposal instructions 3 Do not open or mutilate the BATTERY PACK Released electrolyte from a BATTERY PACK is corrosive and may cause ...

Page 14: ...rgeable BATTERY PACK The BATTERY PACK is recyclable At the end of its useful life under various state and local laws it may be illegal to dispose of this BATTERY PACK into the municipal waste stream Check with your local solid waste officials for details in your area for recycling options or proper disposal 6 ...

Page 15: ...ECORD SHORTTELEPHONELINECORD BELT CLIP and Owner s Manual 7 3 Insert the small plug on the end of the AC ADAPTOR into the POWER IN CONNECTION JACK at the back of theBASEUNIT 4 Plug the AC ADAPTOR into a 120V AC wall outlet USE ONLY WITH CLASS 2 POWER SOURCE 9V DC 500mA 5 Insert one plug of the TELEPHONE LINE CORD into the house TELEPHONE JACK and the other end into the TELEPHONE LINE CONNECTION JA...

Page 16: ...e a rotary dialing system set the TONE PULSE Select Switch to the PULSE position C If you are not sure which system you have set the TONE PULSE Select Switch to the TONE position Press the button on the HANDSET to get a dial tone and press any button on the TELEPHONE KEYPAD except the zero If the dial tone continues it means that you do not have TONE dialing service Press the button on the HANDSET...

Page 17: ...NDSET See page 24 for details 13 Set the date and time on the BASE UNIT See page 28 for details You are now ready to use your new BellSouth Cordless Telephone Belt Clip Installation With the back of the HANDSET facing up insert one side of the BELT CLIP HOOK into the matching slot at the top side of the HANDSET Press down on the opposite side of the BELT CLIP until the other hook locks into the sl...

Page 18: ... the MOUNTING BRACKET into the matching slots on the back of the BASE UNIT as shown in FIGURE 2 4 Push the MOUNTING BRACKET upward until the LOCKING HOOKS snaps into the inner slots of theBASEUNIT 5 Plug the free end of the SHORT TELEPHONE LINE CORD into the MODULAR WALL JACK 6 Align the upper keyhole of the MOUNTING BRACKET with the upper stud of the wall plate so that the opening end of the MOUN...

Page 19: ...while it is working as you may experience interference Thisisanormaloccurrencewith2 4GHzphonesand shouldnotbeinterpretedasadefectintheproduct Preparing for Use Before you can use your cordless telephone you must charge the HANDSET for 12 hours Failure to do so will require recharging of the BATTERY PACK more often 1 Place the HANDSET on theBASEUNIT for 12 hours 2 After 12 hours remove theHANDSET f...

Page 20: ...heBASE UNIT to hang up 2 Later press the button again 3 Listen for a dial tone 4 Press the RE PA button This will automatically redial the last telephone number you called 5 When you have finished with your call press the button again or place the HANDSET on theBASEUNIT NOTE If you are too far away from the BASE UNIT the HANDSET emits beep sounds to warn you that the background noise level is too ...

Page 21: ... receive and place a call NOTE When you plug the headset plug into the HEADSET JACK it automatically mutes the MICROPHONE and SPEAKER of the HANDSET Unplug the headset to return the HANDSET to normal use Headsets are available at most retail outlets that sell telephone equipment The HEADSET JACK is compatible with 2 5 mm headset plugs only Cordless Telephone Operation 13 IMPORTANT Placing your BAS...

Page 22: ...FT RIGHT button to view a name of more than 11 characters OR Caller s telephone number will appear if the caller s name is not available OR UNAVAILABLE will appear when Caller ID information is not available The origin of the call does not support the Caller ID system including international calls OR DATA ERROR will appear when the Caller ID information was received incorrectly or only part of the...

Page 23: ...ce and if you have requested Visual Message Indication from your local telephone company MSG WAITING will appear on the LCD Screen in STANDBY mode To remove the MSG WAITING indicator see page 27 for detail Note This function requires voice mail subscription from the local telephone company Furthermore the local phone company must provide a type of voice mail signaling called FSK Frequency Shift Ke...

Page 24: ...ew a name of more than 11 characters If the number has more than 11 digits the last 11 digits will be displayed first Press the SHIFT RIGHT button to view the preceeding numbers 5 Press the button to return to STANDBY mode Placing a Call from the Caller List You can place a call from the Caller List by using the Caller ID CALLBACK feature 1 Press the SCROLL UP or DOWN button to find the Caller ID ...

Page 25: ... a single call record or all of the call records Deleting a Single Record 1 Press the SCROLL UP or DOWN button to find the record you wish to delete 2 Press the button The LCD Screen will display ERASE ITEM 3 To delete the record press the button again The LCD Screen will display ERASED 4 Press the button to exit the Caller ID List Deleting All Records 1 Press the SCROLL UP or DOWN button 2 Press ...

Page 26: ...n 2 Press the button to create a new DIRECTORY PHONE BOOK entry 3 Enter the name you wish to store using the TELEPHONE KEYPAD ABC to WXY buttons to enter the name see page 19 for detail you can store up to 18 letters To move the cursor to the right create a space or to enter a new letter press the SHIFT RIGHT button 4 Press the SCROLL DOWN button and dial the telephone number you wish to store usi...

Page 27: ...entry 3 Press the following TELEPHONE KEYPAD buttons to get the desired letters 4 Press the SCROLL DOWN button to move the cursor to the number icon 5 Press the following TELEPHONE KEYPAD buttons OPER to WXY to get the desired numbers 6 Press and hold the RE PA button to store the data in the DIRECTORY PHONE BOOK memory Keypad 1st 2nd 3rd 4th 5th 6th 7th 8th 9th Buttons Press Press Press Press Pre...

Page 28: ... to dial the displayed number 5 To end the call either press the button or place theHANDSET on the BASE UNIT Editing a Stored Number in the DIRECTORY PHONE BOOK 1 Press the button 2 Press the SCROLL UP or DOWN button to find the record you wish to edit 3 Press the button The entry will display with a flashing prompt over the first character 4 Move the cursor to the letter or number you wish to edi...

Page 29: ... information is received When you are saving the name and number into the DIRECTORY PHONE BOOK add a symbol at the beginning of the name by pressing the button BLOCKED CALLS You can assign stored numbers a BLOCKED CALL status When an incoming call is matched to a stored number designated as blocked the phone will not ring after the Caller ID information is received When you are saving the name and...

Page 30: ... Ring On Off Turns the first ring of the phone OFF so that it does not ring until Caller ID information has been displayed Particularly useful when using the PREFERRED and BLOCKED CALL features or the PRIVATE andUNAVAILABLE ring settings Time Set Changes the time and date Contrast Adjusts the brightness of the LCD Screen for optimum viewing PBX Number Inserts if a PBX Number before an outgoing num...

Page 31: ...ress the SCROLL UP or DOWN buttonto toggle between HI LOW and OFF 4 When the desired setting is displayed press and hold the RE PA button to save the setting A long beep will sound to confirm the setting has been saved 5 Continue with programming or press the MENU button to return to STANDBY mode B Changing the Language 1 Press and hold the MENU button to enter the menu 2 Press the button to go to...

Page 32: ...the button to change the setting The month will begin flashing 4 Press the TELEPHONE KEYPAD to button to enter the month The date will begin flashing 5 Press the TELEPHONE KEYPAD to button to enter the date The hour will begin flashing 6 Press the TELEPHONE KEYPAD to button to enter the hour The minutes will begin flashing 7 Press the TELEPHONE KEYPAD to button to enter the minutes AM and PM will ...

Page 33: ... button to change the setting OFF will begin flashing 4 Press the SCROLL UP or DOWN button to customize the digit to match your PBX system When not connected to a PBX the phone will only function normally when set to OFF 5 When the desired setting is displayed press and hold the RE PA button to save the setting A long beep will sound to confirm the setting has been saved 6 Continue with programmin...

Page 34: ...long beep will sound to confirm the setting has been saved 6 Continue with programming or press the MENU button to return to STANDBY mode I Programming One Touch Voice Mail Dialing 1 Press and hold the MENU button to enter the menu 2 Press the button to go to the VOICE MAIL programming option 3 Press the button to enter the voice mail speed dial number 4 Press the TELEPHONE KEYPAD to buttons to en...

Page 35: ...ode K Setting the Area Code 1 Press and hold the MENU button to enter the menu 2 Press the button to go to the AREA CODE programming option 3 Press the button to change the setting 000 will begin flashing 4 Press the TELEPHONE KEYPAD to buttons to enter the three digit area code for your phone number 5 When the desired setting is displayed press and hold the RE PA button to save the setting A long...

Page 36: ...ILBOX and four individual MAILBOXES 1 2 3 4 which can receive their own Incoming Messages ICM Before using your Answering System it is suggested that you record an Outgoing Message OGM This is the announcement callers will hear when the system answers a call A prerecorded system announcement Please record your message after the beep is available if you choose not to record your own OGM SET 1 Day S...

Page 37: ...ctly into one of the four mailboxesbydialing 110 forMAILBOX1 220 for MAILBOX 2 330 for MAILBOX 3 440 forMAILBOX4 Example of a Primary OGM Hello please leave a message after the tone or if you are using a Touchtone telephone please Dial 110 for Beth Dial 220 for Jenny Dial 330 for Jonathan Dial 440 for Esson NOTE To check your OGM press the button If you did not record an OGM your Answering System ...

Page 38: ...after your announcement ANNC or begin to record your caller s messages ICM After the caller leaves an ICM the time and day will be stamped at the end of each recorded ICM The ICM is stored in the MEMORY and the LED Message Display shows the total number of ICMs currently stored NOTE ICMs are limited to a maximum of 2 minutes If the ICM is more than 2 minutes the system beeps and hangs up or if the...

Page 39: ...mo in the PRIMARY MAILBOX 1 Press and hold down the button to record your Memo 2 Begin speaking immediately after you hear Please record your message after the beep Continue to depress the button One second after completing your Memo release the button and you will hear End of recording Day and time are automatically stamped at the end of the message NOTE The Answering System advances the message ...

Page 40: ...pt a message 1 Press the button to end the playing of a message The Answering System will announce End of messages D To repeat a message memo 1 Press the button while playing a message The Answering System repeats the current message in its entirety E To skip a message memo 1 Press the button once The Answering System stops playing moves to the next message memo and resumes playback The system adv...

Page 41: ...d message is playing press the button The Answering System announces erasure of the selected message memo After the erasure is complete the numeric order of the remaining messages will be rearranged When the Memory is Full When there is no memory available for additional messages the Answering System will announce Memory full but will not save messages Two Way Recording Two way recording allows yo...

Page 42: ... for MAILBOX 1 2 3 or 4 For the PRIMARY MAILBOX follow steps 2 to 6 2 Press and hold down the button until you hear the announcement Your password is XXX please enter new password 3 Press and release the button the corresponding number will be displayed and announced Press and release the button repeatedly until the desired first digit of the code is displayed and mentioned 4 Press and release the...

Page 43: ...lowing is the Remote Instruction Code Help Menu Instruction Codes To playback message press 2 To repeat message press 1 To skip message press 3 To stop press 4 To playback announcement press 5 To record a memo press 6 To record announcement press 7 To turn answering machine ON or OFF press 8 To erase message press 9 Press 1 for MAILBOX 1 press 2 for MAILBOX 2 press 3 for MAILBOX 3 and press 4 for ...

Page 44: ... internal security code with 65 536 possible combinations Resetting Security Code and Channel Information Communication between the HANDSET and theBASE UNIT may not be possible in any of the following situations 1 After a power failure 2 After relocating theBASE UNIT by disconnecting the AC ADAPTOR 3 After replacing theHANDSET BATTERY PACK To reset place theHANDSET on theBASE UNIT for 2 to 5 secon...

Page 45: ...PACK needs to be recharged Charge the BATTERY PACK at least once every 90 days of non use to avoid battery failure When the BATTERY PACK can no longer be charged replacement of the BATTERY PACK will be necessary The BATTERY PACK used in your telephone may develop a condition known as MEMORY Once subjected to a regular short discharging routine the BATTERY PACK assumes the discharging pattern it wa...

Page 46: ...new BATTERY PACK for 12 hours Changing the BATTERY PACK ATTENTION The telephone that you have purchased contains a rechargeable BATTERY PACK The BATTERY PACK is recyclable At the end of its useful life under various state and local laws it may be illegal to dispose of this BATTERY PACK into the municipal waste stream Check with your local solid waste officials for details in your area for recyclin...

Page 47: ...theHANDSET is fully charged 2 HANDSET is not too far from theBASEUNIT Interference on reception check the following 1 Noise may be picked up from electrical products in the home or electrical storms Generally this noise is a minor annoyance and should not be interpreted as a defect in your system See Technical Information on page 41 2 Choose an alternate channel using the button on the HANDSET 3 D...

Page 48: ...Correct Remote Access Code is entered 2 A TONE telephone is being used Messages are incomplete ensure the following 1 Message Memory is not full 2 Caller may be hesitating and pausing for more than 7 seconds Answers calls but does not record messages check the following 1 ANNC ICM switch is set toICM 2 Memory is not full 3 Extension telephone was not picked up NOTE If none of the telephones in the...

Page 49: ... circuits activate a relay to connect the cordless telephone to your telephone line These electronic circuits operate in the radio frequency spectrum While several protection circuits are used to prevent unwanted signals there may be periods when these unwanted signals enter the BASE UNIT You may hear clicks or hear the relay activate while you are not using theHANDSET If the interference occurs f...

Page 50: ...ay be required However when advanced written notice is not possible the telephone company may temporarily discontinue service without notice if such action is necessary under the circumstances The telephone company may make changes in its communication facilities equipment operations or procedures where such action is reasonably required in the operation of its business and is not inconsistent wit...

Page 51: ...dance with the instructions may cause harmful interference to radio communications However there is no guarantee that interference will occur in a particular installation If this equipment does cause harmful interference to radio or television reception which can be determined by turning the equipment off and on the user is encouraged to try to correct the interference by one or more of the follow...

Page 52: ...ssumes no responsibility for any special incidental or consequential damages This warranty gives you specific legal rights and you may have other rights which vary from state to state Some states do not allow the exclusion or limitations of special incidental or consequential damages or limitations on how long a warranty lasts so the above exclusion and limitation may not apply to you Warranty Ser...

Page 53: ...ot made for BellSouth Products or which is not defective as determined by our test procedures will not be repaired and will be returned C O D freight To Obtain Warranty Service Provide proof of the date of purchase within the package Prepay all shipping costs to the authorized service center Include a return shipping address within the package Please retain your sales receipt the carton the packin...

Page 54: ...Notes 46 ...

Page 55: ...Notes 47 ...

Page 56: ...or attachment of screws to the wall when mounting this telephone on the wall 1 Cut out this page 2 Use this template to determine the distance between screws when mounting this phone on the wall The two cross hairs identify where to attach the screws 48 ...

Page 57: ...ves frequent thunderstorms westronglyrecommendplugging your AC ADAPTOR into a surge protector IMPORTANT In order to get maximum life from the HANDSET BATTERY PACK be sure to charge the HANDSET for 12 hours before initial use IMPORTANT Placing your BASE UNIT near appliances suchastelevisions refrigerators radios or microwave ovens may cause interference IMPORTANT When you hear interference press th...

Reviews: