background image

T187

User Guide (iOS Version)
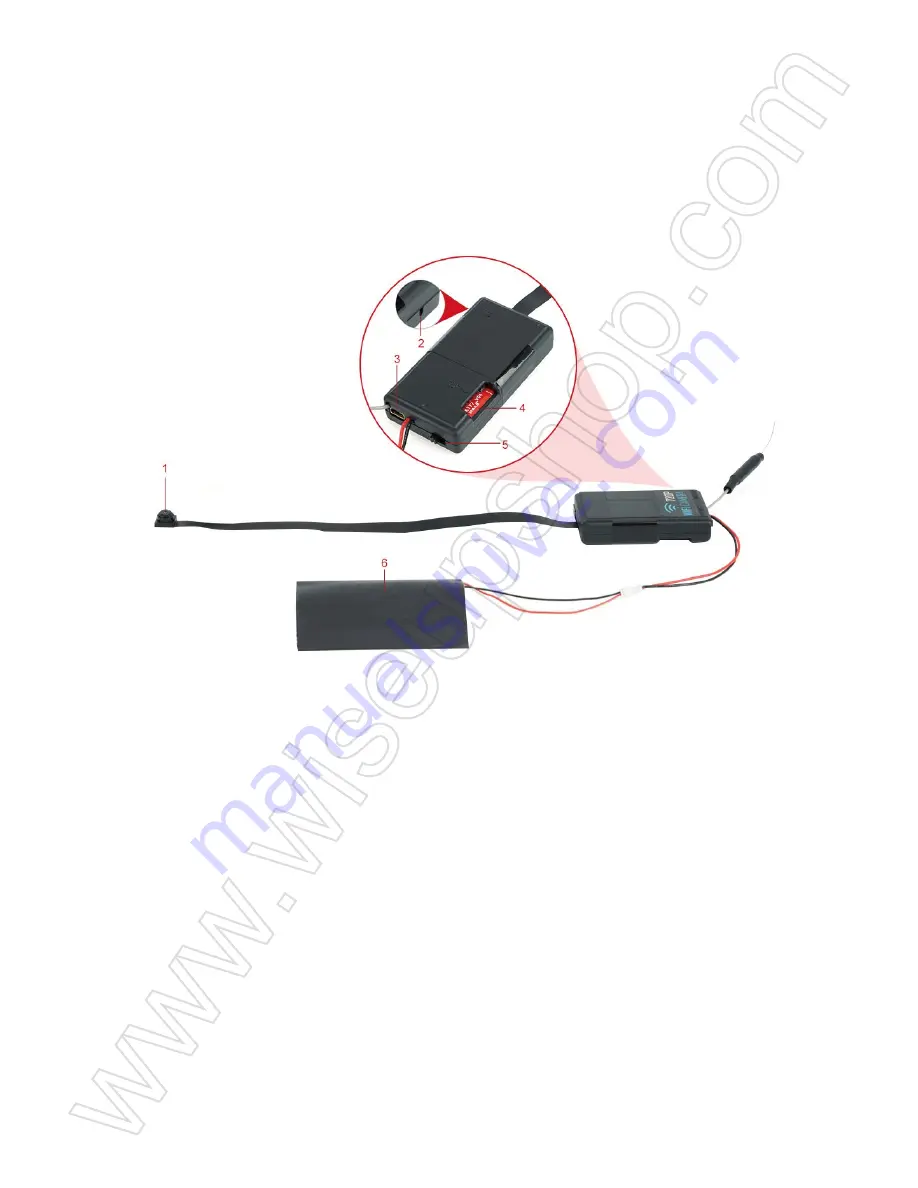
I. Product Overview

1. Camera Lens
2. Microphone
3. USB Port
4. Micro SD Card Slot
5. Power Switch
6. Backup Battery

II. What’s in the Box

-1× P2P Network Drone Camera
-1× USB Cable
-1× AC110-240V to DC5V Power Adapter 

III. Get Camera Ready

3.1. Before using, please make sure the camera is fully charged and the Micro SD card has 
been formatted already and is securely fitted into the camera’s SD card slot, or it will not work. 
We recommend that you use a SDHC Class 10 Micro SD card.
3.2. If you need the camera to work 7/24 hours, connect it to an outlet AC power supply using 
the USB cable and DC 5V power adapter included.

IV. Network Setup

4.1. Install “

Smarp CAM

” APP on your iPhone or iPad

Go to your App store, search for “

SMARP CAM

” and then install it on your iPhone or iPad.


4.2. LAN Mode or P2P Setup
4.2.1. Slide the Power Switch to the ON Position and go to the WIFI or WLAN setting page on 
your iPhone or iPad, connect to the camera’s WIFI signal named “

SMARP-******

”. The WIFI 

signal password is “

12345

”. Wait for the WIFI to be connected.


[Note]:


If the camera’s WIFI signal cannot be found after a long time, please recharge the camera or 

restart it.

4.2.2. Run the “

Smarp Cam

” APP. 

4.2.3. Check the picture below for an explanation of the live video screen:
  

[Note]:

 In this P2P (LAN) mode, you can view or record video locally within 70 meters (about 230ft) 

open range.

V. Recording to Local Micro SD Card Continuously

>> Please make sure the camera is successfully added to the APP and it's online before you start.

5.1. Follow the steps below to set up SD card recording.
Step 1: Launch the “

Smarp Cam

” APP.

Step 2: Tap the gear icon and select “

Record

” on the setting page.

Step 3: Enable the “

Record On

” to start recording video to the Micro SD card continuously. Also, 

you can enable “

Loop On

”, adjust the “

Record volume

”. You can also set your desire video length.


[Note]:

 Video Resolution: 1280x720P                                         Video Format: AVI

5.2. Check the available storage of the Micro SD card
Step 1: Launch the “

Smarp Cam

” APP.

Step 2: Tap the gear icon and select “

SD card

” on the setting page.

Step 3: You can check the available space of the Micro SD card. Also, you can format the SD card 
here.
 

VI. Resetting to Factory Default Settings

6.1. Launch the “

Smarp Cam

” APP.

6.2. Tap the gear icon and select “

Device

” on the setting page.

6.3. Tap “

Reset to default

” to reset the camera to factory default settings.


VII. Charging

7.1. Connect the camera to an outlet AC power supply using the power adapter and USB cable 
included.
7.2. It will take 7 hours to obtain a full charge.

7.3. The camera can record video up to 3 hours on a single charge.

Frequently Asked Questions

Q1: Why Camera WIFI signal is not appearing on my WIFI page?

A1: There are 3 solutions to this question:
1. Keep your phone or mobile device within the camera’s WIFI hotspot range, refreshing the 
WIFI signal page. It may take up to 1 minute for the hotspot to become recognizable on your 
phone or mobile device's WIFI setting page.
2. Shut off your phone or mobile device’s WIFI function for a while, then turn it on to search again.
3. The camera is in low battery, connect it to an outlet AC power supply using the USB cable 
and power adapter included.

Q2: The camera did not record any video?

A2: Make sure the Micro SD card has been fitted well. If not, you need to take out the SD card, 
format it on your PC computer and try it again.

Q3: Why the video footage shows a fuzzy screen during playback on my computer?

A3: Please copy the video footage to your computer before playing them back.

Summary of Contents for T187

Page 1: ... iOS Version I Product Overview 1 Camera Lens 2 Microphone 3 USB Port 4 Micro SD Card Slot 5 Power Switch 6 Backup Battery II What s in the Box 1 P2P Network Drone Camera 1 USB Cable 1 AC110 240V to DC5V Power Adapter ...

Page 2: ...he USB cable and DC 5V power adapter included IV Network Setup 4 1 Install Smarp CAM APP on your iPhone or iPad Go to your App store search for SMARP CAM and then install it on your iPhone or iPad 4 2 LAN Mode or P2P Setup 4 2 1 Slide the Power Switch to the ON Position and go to the WIFI or WLAN setting page on your iPhone or iPad connect to the camera s WIFI signal named SMARP The WIFI signal pa...

Page 3: ...e video screen Icon Function Indicate the camera is recording video Take snapshots manually to the phone Record video manually to the phone Enter into system setting page Download Preview Delete the images and videos View the images and videos Take snapshots manually to the micro SD card ...

Page 4: ...p 2 Tap the gear icon and select Record on the setting page Step 3 Enable the Record On to start recording video to the Micro SD card continuously Also you can enable Loop On adjust the Record volume You can also set your desire video length Note Video Resolution 1280x720P Video Format AVI 5 2 Check the available storage of the Micro SD card Step 1 Launch the Smarp Cam APP Step 2 Tap the gear icon...

Page 5: ... gear icon and select Device on the setting page 6 3 Tap Reset to default to reset the camera to factory default settings VII Charging 7 1 Connect the camera to an outlet AC power supply using the power adapter and USB cable included 7 2 It will take 7 hours to obtain a full charge ...

Page 6: ...r mobile device s WIFI setting page 2 Shut off your phone or mobile device s WIFI function for a while then turn it on to search again 3 The camera is in low battery connect it to an outlet AC power supply using the USB cable and power adapter included Q2 The camera did not record any video A2 Make sure the Micro SD card has been fitted well If not you need to take out the SD card format it on you...

Page 7: ...S Version I Produktübersicht 1 Kameraobjektiv 2 Mikrofon 3 USB Anschluss 4 Mikro Sd Einbauschlitz 5 Netzschalter 6 Sicherungsbatterie II Was ist in der Box 1 P2P Netzwerk Drone Kamera 1 USB Kabel 1 AC110 240V zum DC5V Netzteil ...

Page 8: ... Kabel und DC 5V Netzteil inbegriffen IV Netzwerkeinrichtung 4 1 Installiere Smarp CAM APP auf deinem iPhone oder iPad Gehen Sie zu Ihrem App Store suchen Sie nach SMARP CAM und installieren Sie es dann auf Ihrem iPhone oder iPad 4 2 LAN Modus oder P2P Setup 4 2 1 Schieben Sie den Netzschalter auf ON und gehen Sie auf die WIFI oder WLAN Einstellungsseite auf Ihrem iPhone oder iPad verbinden Sie da...

Page 9: ...nktion Geben Sie an dass die Kamera Video aufnimmt Nehmen Sie Schnappschüsse manuell zum Telefon Video manuell auf das Telefon aufnehmen Gehen Sie in die Systemeinstellungsseite ein Download Vorschau Löschen von Bildern und Videos Sehen Sie sich die Bilder und Videos an Nehmen Sie Schnappschüsse manuell auf die Micro SD Karte ...

Page 10: ...m APP Schritt 2 Tippen Sie auf das Zahnradsymbol und wählen Sie auf der Einstellungsseite Aufnahme Schritt 3 Aktivieren Sie das Record On um die Aufnahme von Video auf die Micro SD Karte kontinuierlich zu starten Außerdem können Sie Loop On aktivieren das Record volume einstellen Sie können auch Ihre Wunschvideolänge einstellen Anmerkung Videoauflösung 1280x720P Videoformat AVI 5 2 Überprüfen Sie ...

Page 11: ...ücksetzen auf Werkseinstellungen 6 1 Starten Sie die Smarp Cam APP 6 2 Tippen Sie auf das Zahnradsymbol und wählen Sie auf der Einstellungsseite Gerät 6 3 Tippen Sie auf Reset to default um die Kamera auf die Werkseinstellungen zurückzusetzen VII Aufladen 7 1 Schließen Sie die Kamera mit einem Netzadapter und einem USB Kabel an eine ...

Page 12: ... erkennbar wird 2 Schalten Sie die WIFI Funktion Ihres Telefons oder des Mobilgeräts für eine Weile aus und schalten Sie es dann wieder ein um erneut zu suchen 3 Die Kamera ist in einer schwachen Batterie schließen Sie sie an eine Steckdose Netzteil mit dem USB Kabel und Netzteil inbegriffen Q2 Die Kamera hat kein Video aufgenommen A2 Stellen Sie sicher dass die Micro SD Karte gut montiert ist Wen...

Page 13: ...oduit 1 Objectif de la Caméra 2 Microphone 3 Port USB 4 Emplacement de la Carte Micro SD 5 Interrupteur d Alimentation 6 Batterie de secours II Qu y a t il dans la boite 1 Caméra Drone Réseau P2P 1 Câble USB 1 Adaptateur Secteur AC110 240V à DC5V ...

Page 14: ...t de l adaptateur secteur DC 5V inclus IV Configuration du réseau 4 1 Installez l application Smarp CAM sur votre iPhone ou votre iPad Accédez à votre App Store recherchez SMARP CAM puis installez le sur votre iPhone ou votre iPad 4 2 Mode LAN ou configuration P2P 4 2 1 Faites glisser le commutateur d alimentation sur la position ON et accédez à la page WIFI ou WLAN sur votre iPhone ou iPad connec...

Page 15: ...Indiquez que la Caméra Enregistre une Vidéo Prenez les Instantanés Manuellement sur le Téléphone Enregistrez la Vidéo Manuellement sur le Téléphone Entrer dans la Page de Configuration du Système Télécharger Aperçu Supprimer les images et les vidéos Voir les Images et les Vidéos Prenez les Instantanés Manuellement sur la Carte Micro SD ...

Page 16: ... de l engrenage et sélectionnez Enregistrer sur la page de réglage Étape 3 Activez le Enregistrement activé pour commencer l enregistrement vidéo sur la carte Micro SD en continu De plus vous pouvez activer En Boucle régler le Enregistrer les Son Vous pouvez également définir votre longueur de vidéo de désir Note Résolution vidéo 1280x720P Format vidéo AVI 5 2 Vérifiez le stockage disponible de la...

Page 17: ...2 Appuyez sur l icône de l engrenage et sélectionnez Périphérique sur la page de réglage 6 3 Appuyez sur Réinitialiser par défaut pour réinitialiser les paramètres par défaut de la caméra VII Charger 7 1 Connectez la caméra à une alimentation secteur de sortie à l aide de l adaptateur secteur et du câble USB inclus ...

Page 18: ... du WIFI de votre téléphone ou de votre appareil mobile 2 Éteignez votre téléphone ou la fonction WIFI de votre appareil mobile pendant un certain temps puis allumez le pour effectuer une nouvelle recherche 3 La caméra est en batterie faible connectez le à une alimentation secteur de sortie à l aide du câble USB et de l adaptateur secteur inclus Q2 La caméra n a t elle pas enregistré de vidéo A2 A...

Page 19: ...del prodotto 1 Obiettivo della fotocamera 2 Microfono 3 Porta USB 4 Slot Micro SD Card 5 Interruttore di alimentazione 6 Batteria di backup II Cosa c è nella scatola 1 P2P Network Drone Camera 1 cavo USB 1 AC110 240V a Adattatore di alimentazione DC5V ...

Page 20: ...B e l adattatore di alimentazione DC 5V incluso IV Configurazione di rete 4 1 Installare Smarp CAM APP sul tuo iPhone o iPad Vai all archivio App cercare SMARP CAM e poi installarlo sul tuo iPhone o iPad 4 2 Modalità LAN o P2P Setup 4 2 1 Spostare l interruttore di alimentazione in posizione ON e passare alla pagina di impostazione WIFI o WLAN sul tuo iPhone o iPad collegarsi al segnale WIFI della...

Page 21: ...Function Indica che la fotocamera sta registrando video Catturi istantanee manualmente sul telefono Registrare video manualmente sul telefono Entra nella pagina di impostazione del sistema Scarica Anteprima Elimina le immagini e i video Visualizza le immagini e i video Scatta manualmente le istantanee sulla scheda micro SD ...

Page 22: ... l APP di Smarp Cam Fase 2 Tocca l icona a forma di ingranaggio e seleziona Record nella pagina di impostazione Fase 3 abilitare Record On per avviare continuamente la registrazione della video alla scheda Micro SD Inoltre è possibile abilitare Loop On regolare il volume Record È anche possibile impostare la lunghezza video desiderata Nota Risoluzione video 1280x720P Formato video AVI 5 2 Controll...

Page 23: ...la scheda SD qui VI Ripristino delle impostazioni predefinite di fabbrica 6 1 Lancia l APP di Smarp Cam 6 2 Toccare l icona a forma di ingranaggio e selezionare Dispositivo nella pagina di impostazione 6 3 Toccare Ripristina su default per ripristinare la fotocamera alle impostazioni predefinite di fabbrica ...

Page 24: ...richiedere fino a un minuto che l hotspot diventi riconoscibile sul tuo telefono o sulla pagina di impostazione WIFI del dispositivo mobile 2 Spegnere la funzione WIFI del telefono cellulare o del dispositivo mobile per un po quindi accenderlo per ricercare nuovamente 3 La fotocamera è in batteria scarica collegandola ad una presa di alimentazione CA utilizzando il cavo USB e l adattatore di alime...

Page 25: ...pción del Producto 1 Lente de la Cámara 2 Micrófono 3 Puerto USB 4 Ranura para Tarjetas Micro SD 5 Interruptor de Encendido 6 Batería de Reserva II Qué hay en la caja 1 P2P Drone Cámara de red 1 Cable USB 1 AC110 240V a DC5V Adaptador de Corriente ...

Page 26: ...e corriente DC 5V incluido IV Configuración de la red 4 1 Instala la aplicación Smarp CAM en tu iPhone o iPad Vaya a su tienda de aplicaciones busque SMARP CAM y luego instálelo en su iPhone o iPad 4 2 Modo LAN o Configuración P2P 4 2 1 Deslice el interruptor de encendido a la posición ON y vaya a la página de configuración WIFI o WLAN de su iPhone o iPad conéctelo a la señal WIFI de la cámara lla...

Page 27: ...o en vivo Icono Función Indica que la cámara graba vídeo Tome instantáneas manualmente en el teléfono Grabar vídeo manualmente en el teléfono Entrar en la página de configuración del sistema Descargar Previsualizar Eliminar las imágenes y videos Ver las imágenes y videos Tome las instantáneas manualmente a la tarjeta micro SD ...

Page 28: ...da dentada y seleccione Grabar en la página de configuración Paso 3 Active el Record On para iniciar la grabación de vídeo en la tarjeta Micro SD continuamente Además puede activar Loop On ajuste el Record volume También puede configurar su longitud de vídeo de deseo Nota Resolución de video 1280x720P Formato de video AVI 5 2 Compruebe el almacenamiento disponible de la tarjeta Micro SD Paso 1 Ini...

Page 29: ... Cam 6 2 Toque el icono de rueda dentada y seleccione Dispositivo en la página de configuración 6 3 Puntee en Restablecer a predeterminado para restablecer la configuración predeterminada de fábrica de la cámara VII Cargando 7 1 Conecte la cámara a una toma de corriente de CA con el adaptador de alimentación y el ...

Page 30: ...guración de WIFI del teléfono o del dispositivo móvil 2 Apague la función WIFI del teléfono o del dispositivo móvil durante un tiempo y luego enciéndala para buscar de nuevo 3 La cámara está en batería baja conéctela a una fuente de alimentación de CA de la salida usando el cable del USB y el adaptador de la energía incluidos P2 La cámara no ha grabado ningún video R2 Asegúrese de que la tarjeta M...

Page 31: ...T187 取扱説明書 iOS版 I 製品の概要 1 カメラのレンズ 2 マイク 3 USBポート 4 マイクロSDカードスロッ ト 5 電源スイッチ 6 バックアップバッテリー II ボックスの内容 1 P2Pネッ トワーク ドローンカメラ 1 USBケーブル 1 AC110 240V DC5V電源アダプタ ...

Page 32: ...タを使用し てコンセントのAC電源に接続します IV ネッ トワーク設定 4 1 iPhoneまたはiPadに Smarp CAM APPをインストールする App Storeに行って SMARP CAM を検索し あなたのiPhoneやiPadにインストールしてください 4 2 LANモードまたはP2P設定 4 2 1 電源スイッチをONの位置にスライドさせ iPhoneまたはiPadのWIFIまたはWLANの設定ペ ージに移動し カメラのWIFI信号 SMARP に接続します WIFI信号のパスワードは 12345 です WIFIが接続されるのを待ちます 注意 長時間カメラのWIFI信号が見つからない場合は カメラを再び充電して再起動してください 4 2 2 Smarp Cam APPを実行します 4 2 3 ライブビデオ画面の説明については 下の画像を確認してください ...

Page 33: ...アイコン 機能 カメラがビデオを録画中であることを示す スナップショッ トを手動で電話機に取り込む ビデオを手動で電話機に録画する システム設定ページに入る 画像や動画のダウンロード プレビュー 削除 画像と動画を見る 手動でスナップショッ トをマイクロSDカードに取り込む ...

Page 34: ... 以下の手順に従ってください ステップ1 Smarp Cam APPを起動します ステップ2 ギアアイコンをタップし 設定ページで 記録 を選択します ステップ3 録画 を有効にして Micro SDカードへのビデオの録画を継続します また 循環録画 を有効にして 録音を調整することもできます あなたはまたあなたの欲望のビデオの長さを設 定することができます 注意 ビデオ解像度 1280x720Pビデオフォーマッ ト AVI 5 2 Micro SDカードの空き容量を確認する ステップ1 Smarp Cam APPを起動します ステップ2 ギアアイコンをタップし 設定ページで SDカード を選択します ステップ3 MicroSDカードの空き容量を確認できます また ここでSDカードをフォーマッ トするこ ...

Page 35: ...ともできます VI 出荷時のデフォルト設定にリセッ トする 6 1 Smarp Cam APPを起動します 6 2 ギアアイコンをタップし 設定ページで デバイス を選択します 6 3 デフォルトにリセッ ト をタップして カメラを工場出荷時のデフォルト設定にリセッ トします VII 充電 7 1 付属の電源アダプタとUSBケーブルを使用して カメラをコンセントのAC電源に接続します ...

Page 36: ...ペー ジをリフレッシュします 携帯電話やモバイルデバイスのWIFI設定ページでホッ トスポッ トが認識 されるまでには最大1分かかることがあります 2 携帯電話やモバイルデバイスのWIFI機能をしばらく シャッ トダウンし 再度オンにしてください 3 カメラの電源が切れている場合は USBケーブルと電源アダプタを使用してコンセントのAC電 源に接続します Q2 カメラはビデオを録画しませんでしたか A2 Micro SDカードが正しく取り付けられていることを確認してください そうでない場合は SDカ ードを取り出してPCのコンピュータでフォーマッ トし もう一度試してください Q3 コンピュータで再生中にビデオフッテージがぼやけて表示されるのはなぜですか A3 ビデオを再生する前に 映像をコンピューターにコピーしてくださ ...

Reviews: