background image

STANDARD 

CLEANING GAS 

RANGE

Use & Care Guide

For questions about features, operation/performance

parts, accessories or service, call: 1-800-253-1301.

or visit our website at...

www.estateappliances.com

ESTUFA DE GAS DE 

LIMPIEZA ESTÁNDAR

Guía de uso y cuidado

Para consultas respecto a caraterísticas, funcionamiento, rendimiento, 

piezas, accesorios o servicio técnico, llame al: 1-800-253-1301

o visite nuestro sitio web en:

www.estateappliances.com

     Table of Contents/Índice ............................. 2

98014380

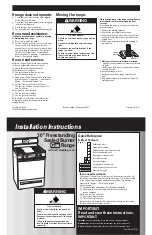
To the installer: Please leave this
instruction book with the unit.

To the consumer: Please read and
keep this book for future reference.

Para el instalador: favor de dejar este
manual de instrucciones con la unidad. 

Para el consumidor: favor de leer y guardar
este manual para futuras referencias.

Summary of Contents for TGP325MQ0

Page 1: ...terísticas funcionamiento rendimiento piezas accesorios o servicio técnico llame al 1 800 253 1301 o visite nuestro sitio web en www estateappliances com Table of Contents Índice 2 98014380 To the installer Please leave this instruction book with the unit To the consumer Please read and keep this book for future reference Para el instalador favor de dejar este manual de instrucciones con la unidad...

Page 2: ... soporte antivuelco 18 PIEZAS Y CARACTERÍSTICAS 19 USO DE LA SUPERFICIE DE COCCIÓN 20 Controles de la superficie de cocción 20 Quemadores exteriores sellados 20 Rotación de los quemadores 21 Enlatado casero 21 Utensilios de cocina 22 CONTROL ELECTRÓNICO DEL HORNO 22 Pantalla 22 Luces indicadoras del horno 22 Start Enter Inicio ingreso 22 Off Cancel Apagado anulado 23 Reloj 23 Temporizador 23 Bloqu...

Page 3: ...y or death Do not store or use gasoline or other flammable vapors and liquids in the vicinity of this or any other appliance WHAT TO DO IF YOU SMELL GAS Do not try to light any appliance Do not touch any electrical switch Do not use any phone in your building Immediately call your gas supplier from a neighbor s phone Follow the gas supplier s instructions If you cannot reach your gas supplier call...

Page 4: ...not store items of interest to children in cabinets above a range or on the backguard of a range children climbing on the range to reach items could be seriously injured Proper Installation The range when installed must be electrically grounded in accordance with local codes or in the absence of local codes with the National Electrical Code ANSI NFPA 70 Be sure the range is properly installed and ...

Page 5: ...r Control Knob 4 Right Rear Burner Control Knob 5 Right Front Burner Control Knob 1 5 4 3 2 1 Oven Vent 2 Center Grate on some models 3 Left Rear Surface Burner and Grate 4 Left Front Surface Burner and Grate 5 Automatic Oven Light Switch 6 Anti Tip Bracket 7 Model and Serial Number Plate behind left side of Broiler Door 8 Broiler Door 9 Manual Oven Light Switch 10 Electronic Oven Control 11 Right...

Page 6: ...over and routinely remove and clean the caps according to the General Cleaning section Gas tube opening Gas must flow freely throughout the gas tube opening for the burner to light properly Keep this area free of soil and do not allow spills food cleaning agents or any other material to enter the gas tube opening Protect it from spillovers by always using a burner cap Burner ports Check burner fla...

Page 7: ...opening and small hole over the igniter See Sealed Surface Burners section for burner parts descriptions Push burner down flush with cooktop 6 Replace burner caps and grates HomeCanning When canning for long periods alternate the use of surface cooking areas elements or surface burners between batches This allows time for the most recently used areas to cool Center the canner on the grate or large...

Page 8: ...nction except the Clock Timer and Control Lock The cooling fan may continue to operate after an oven function has been canceled depending on oven temperature Clock This is a 12 hour clock and does not show a m or p m To Set Before setting make sure the oven and Timer are off 1 Touch CLOCK 2 Touch the up or down arrow pads to set the time of day 3 Touch CLOCK or START Timer The Timer can be set in ...

Page 9: ...T ENTER OVEN USE Odors and smoke are normal when the oven is used the first few times or when it is heavily soiled IMPORTANT The health of some birds is extremely sensitive to the fumes given off Exposure to the fumes may result in death to certain birds Always move birds to another closed and well ventilated room AluminumFoil IMPORTANT Do not line the oven bottom with any type of foil liners or c...

Page 10: ...y to use when a 1 second tone sounds the cycle countdown ends and the set temperature is displayed Preheat temperatures are affected by varying factors such as room temperature and peak energy usage times It is normal for the temperature showing on the display and the actual oven temperature to differ Waiting an additional 10 minutes after the preheat conditioning time ends to put food in the oven...

Page 11: ... the appropriate rack See Positioning Racks and Bakeware section 2 Touch BAKE The Bake indicator light will light up 3 Set the temperature optional Touch the TEMP up or down arrow pads to raise or lower the temperature in 5 F 3 C increments from the default setting of 350 F 177 C 4 Touch COOK TIME The Cook Time indicator light will light up 5 Set the cook time Touch the up or down arrow pads until...

Page 12: ...oft cloth or sponge not directly on panel EXTERIOR PORCELAIN ENAMEL SURFACES on some models Food spills containing acids such as vinegar and tomato should be cleaned as soon as the entire appliance is cool These spills may affect the finish Glass cleaner mild liquid cleaner or nonabrasive scrubbing pad Gently clean around the model and serial number plate because scrubbing may remove numbers PORCE...

Page 13: ... on the inside surface 3 Pull door straight up then toward you Do not remove hinge pins until the door is replaced on the range To Replace 1 Grasp the door on the sides with your fingers on the front of the door and your thumbs on the inside surface 2 Hold oven door so that the top edge of each door slot is horizontal Insert door hinge into the hinge slots 3 Tilt top of door toward range Insert bo...

Page 14: ...ice technician to check the air gas mixture or see the Installation Instructions Is propane gas being used The appliance may have been converted improperly Contact a trained repair specialist Surface burner makes popping noises Is the burner wet Let it dry Cookware not level on cooktop Is the range level Level the range See the Installation Instructions Is the proper cookware being used Use cookwa...

Page 15: ...chnician to replace it Has a household fuse been blown or has the circuit breaker been tripped Replace the fuse or reset the circuit ASSISTANCE OR SERVICE Before calling for assistance or service please check Troubleshooting It may save you the cost of a service call If you still need help follow the instructions below When calling please know the purchase date and the complete model and serial nu...

Page 16: ...rated outside the United States 7 Any labor costs during the limited warranty period WHIRLPOOL CORPORATION SHALL NOT BE LIABLE FOR INCIDENTAL OR CONSEQUENTIAL DAMAGES Some states do not allow the exclusion or limitation of incidental or consequential damages so this exclusion or limitation may not apply to you This warranty gives you specific legal rights and you may also have other rights which m...

Page 17: ...ste u otro aparato electrodoméstico PASOS QUE USTED DEBE SEGUIR SI HUELE A GAS No trate encender ningún aparato electrodoméstico No toque ningún enchufe eléctrico No use ningún teléfono en su casa o edificio Llame inmediatamente a su proveedor de gas desde el teléfono de un vecino Siga las instrucciones de su proveedor de gas Si usted no puede comunicarse con su proveedor de gas llame al departame...

Page 18: ...ños en los armarios que están encima de una estufa de gas o en el respaldo de protección de una estufa de gas al trepar los niñas encima de la estufa para alcanzar algún objeto podrían lastimarse seriamente Instalación Apropiada Instalar la estufa de gas debe hacer la conexión eléctrica a tierra de acuerdo con las normas locales o en ausencia de normas locales con el Código Eléctrico Nacional Nati...

Page 19: ...l quemador derecho trasero 5 Perilla de control del quemador derecho delantero 1 5 4 3 2 1 Ducto de escape del horno 2 Parrilla central en algunos modelos 3 Quemador exterior izquierdo trasero y parrilla 4 Quemador exterior izquierdo delantero y parrilla 5 Interruptor automático de luz del horno 6 Soporte antivuelco 7 Placa del número de modelo y de serie detrás del lado izquierdo de la puerta del...

Page 20: ...emador limpia ayudará a prevenir un encendido inadecuado y una llama desigual Limpie siempre la tapa del quemador después de un derrame y como rutina quite las tapas y límpielas de acuerdo con la sección Limpieza general Abertura del tubo de gas El gas debe fluir con libertad a través de la abertura del tubo de gas para que el quemador se encienda adecuadamente Mantenga esta área libre de suciedad...

Page 21: ...irar 180º para reducir la distancia entre los quemadores delanteros y traseros Esto permite una mejor distribución del calor al usar utensilios rectangulares o planchas Para rotar los quemadores 1 Asegúrese de que los quemadores estén fríos antes de comenzar la rotación 2 Retire las parrillas del lado derecho y las tapas de los quemadores 3 Levante los quemadores de la superficie de cocción tal co...

Page 22: ...s luces indicadoras se encienden o destellan cuando el horno está en uno de los siguientes modos Bake Hornear Broil Asar Clean Limpieza en algunos modelos On Encendido Start Inicio Controls Locked Controles bloqueados Door Locked Puerta bloqueada en algunos modelos Delay Retraso Timer Temporizador Temp Temperatura Cook Time Tiempo de cocción o Start Time Hora de inicio Start Enter Inicio ingreso E...

Page 23: ...do éste está bloqueado Para desbloquear repita el procedimiento y LOC y LOCK D en algunos modelos desaparecerán de la pantalla Controldetemperaturadelhorno IMPORTANTE No use un termómetro para medir la temperatura del horno porque el abrir la puerta del horno y el cambio de ciclos del elemento o quemador puede dar lecturas incorrectas El horno proporciona temperaturas precisas Sin embargo quizás c...

Page 24: ...l 1 ó 2 Roscas Bundt la mayoría de panes rápidos panes de levadura guisados carnes 2 Galletas pastelillos panecillos pasteles y pays 2 ó 3 NÚMERO DE CACEROLA S UBICACIÓN EN LA PARRILLA 1 Centro de la parrilla 2 Lado a lado o ligeramente en zigzag 3 ó 4 En esquinas opuestas en cada parrilla Cerciórese de que ningún utensilio para hornear esté directamente encima del otro UTENSILIO PARA HORNEAR RESU...

Page 25: ... ambiente y en momentos en que hay una alta demanda de electricidad en el hogar Es normal que existan diferencias entre la temperatura indicada en la pantalla y la temperatura real del horno Cuando hornee alimentos con ingredientes a base de levaduras tales como levadura polvo de hornear bicarbonato de sodio y huevos se recomienda esperar 10 minutos después que el tiempo de precalentamiento haya t...

Page 26: ...os botones con flechas hacia arriba o hacia abajo de TEMP para aumentar o disminuir la temperatura en proporciones de 5ºF 3ºC desde el ajuste prefijado de 350ºF 177ºC 4 Presione COOK TIME tiempo de cocción La luz indicadora de COOK TIME se encenderá 5 Fije el tiempo de cocción Presione los botones con flechas hacia arriba o hacia abajo hasta que el tiempo de cocción correcto aparezca en la pantall...

Page 27: ...l horno se haya enfriado por completo El pasar un paño húmedo frío en el vidrio interior de la puerta antes de que se haya enfriado por completo podría ocasionar la ruptura del vidrio A menos que se indique lo contrario se sugiere primero el jabón agua y un paño suave o una esponja CONTROLES DE LA SUPERFICIE DE COCCIÓN No use productos de limpieza abrasivos de fibra metálica o para limpiar hornos ...

Page 28: ...co estándar para electrodomésticos de 40 vatios Se encenderá cuando se abra la puerta del horno Cuando la puerta del horno esté cerrada presione el interruptor manual de la luz del horno que está en la parte de atrás para encender y apagar Antes de cambiarla asegúrese de que el horno y la superficie de cocción estén fríos y que las perillas de control estén apagadas Para reemplazar 1 Desenchufe la...

Page 29: ...nverso SOLUCIÓN DE PROBLEMAS Pruebe primero las soluciones aquí sugeridas para evitar el costo de una visita de servicio técnico innecesaria Nada funciona Se ha cableado y polarizado debidamente el contacto de suministro de energía Pruebe otro contacto para verificar el cableado y la polaridad adecuados Está desenchufado el cable eléctrico Enchúfelo en un contacto de tres terminales con debida con...

Page 30: ...damente el contacto de suministro eléctrico Pruebe otro contacto para verificar si el cableado y la polaridad son los adecuados Es ésta la primera vez que usa el horno Encienda cualquiera de las perillas del quemador exterior para liberar el aire proveniente de la tubería de gas Se ha fijado debidamente el control electrónico del horno Vea la sección Control electrónico del horno Se ha fijado el B...

Page 31: ...Solución de Problemas Esto le podría ahorrar el costo de una visita de servicio técnico Si considera que aún necesita ayuda siga las instrucciones que aparecen a continuación Cuando llame tenga a mano la fecha de compra y el número completo del modelo y de la serie de su electrodoméstico Esta información nos ayudará a atender mejor a su pedido Si necesita piezas de repuesto Si necesita pedir pieza...

Page 32: ...Estados Unidos 7 Cualquier gasto de mano de obra durante las garantía limitada WHIRLPOOL CORPORATION NO SE HARÁ RESPONSABLE POR DAÑOS INCIDENTALES O CONSECUENTES Algunos estados no permiten la exclusión o limitación de daños incidentales o consecuentes de modo que esta exclusión o limitación quizás no le corresponda Esta garantía le otorga derechos legales específicos y es posible que usted tenga ...

Reviews: