

RENEGADE VENTURI SKIMMER INSTRUCTION SHEET
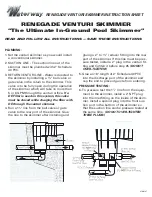
RENEGADE VENTURI SKIMMER
“The Ultimate In-Ground Pool Skimmer”
READ AND FOLLOW ALL INSTRUCTIONS — SAVE THESE INSTRUCTIONS
810-0147
PLUMBING:
1. Set the venturi skimmer as you would install
a conventional skimmer.
2. SUCTION LINE - The suction line out of the
skimmer must be plumbed with 2
″
Schedule
40 PVC.
3. RETURN VENTURI LINE - Water is directed to
the skimmer by installing a 1
1
/
2
″
ball valve or
gate valve in the return to the skimmer. This
valve is to be fully open during the operation
of the skimmer which will take no more than
5 or 6 GPM through the venturi orifice.
If a
DE Filter is used on this system, this valve
must be closed while charging the filter with
DE through the venturi skimmer.
4. Run a 1
1
/
2
″
line from the ball valve or gate
valve to the rear port of the skimmer. Glue
the line to the skimmer after installing and
gluing a 2
″
to 1
1
/
2
″
reducer fitting into the rear
port of the skimmer. If this line must be pres-
sure tested, install a 2
″
plug in the venturi fit-
ting and tighten it before step #5
(DO NOT
OVER-TIGHTEN!)
5. Glue an 18
″
length of 2
″
Schedule 40 PVC
into the discharge port of the skimmer and
cap the end to prevent gunite from entering.
PRESSURE TESTING:
6. To pressure test the 1
1
/
2
″
line from the equip-
ment to the skimmer, install a 2
″
NPT plug
into the inlet fitting on the inside of the skim-
mer. Install a second plug into the front suc-
tion port in the bottom of the skimmer so
that the suction line can be pressure tested at
the same time.
(DO NOT OVER-TIGHTEN
THESE PLUGS!)