Wasp WPL618 Series, User Manual
The Wasp WPL618 Series user manual is available for free download on our website. This comprehensive manual provides step-by-step instructions and troubleshooting tips to optimize the performance of your WPL618 printer. Enhance your printing experience by accessing the user manual today at manualshive.com.
Share
Download


Reviews:
No comments
Related manuals for WPL618 Series

2604
Brand: Baracoda Pages: 9

MINIMAG
Brand: ID Tech Pages: 5

Protege
Brand: ICT Pages: 38

8220
Brand: Jamex Pages: 10

CD-4860
Brand: POSIFLEX Pages: 40

YD-8V14
Brand: Y-E Data Pages: 38

BS-80
Brand: Newland Pages: 172

SCANNDY
Brand: Panmobil Pages: 34

P470/P370
Brand: Symbol Pages: 208

Gryphon DX30
Brand: Datalogic Pages: 199

SecOVID Reader III
Brand: Kobil Pages: 20
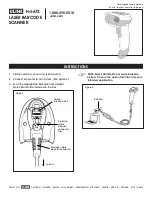
H-6672
Brand: U-Line Pages: 3

SYRD245-1W
Brand: Syris Pages: 7

FlashMover 23-in-1 USB2.0
Brand: Microdia Pages: 2

HB-AC-120
Brand: Sven Pages: 4

EB706
Brand: Sunstech Pages: 75

DC-100
Brand: Scantech Pages: 86

Orbit Reader 20
Brand: Orbit Research Pages: 57


