OPERATOR'S MANUAL
Log Splitter
WXR720 – serial number 1100234 and upWXR740 – serial number 1100217 and up
WXR
700 Series
Part Number: Z97105_En
Rev Mar-2023
Page 1: ...OPERATOR S MANUAL Log Splitter WXR720 serial number 1100234 and up WXR740 serial number 1100217 and up WXR700 Series Part Number Z97105_En Rev Mar 2023...
Page 2: ...gine 22 6 3 Pre operation Checklist 23 6 4 Machine Break In 23 6 5 Check the Engine Oil Level 24 6 6 Add Oil to the Engine 24 6 7 Check the Hydraulic Fluid Level 25 6 8 Check the Fuel Level 25 6 9 Mac...
Page 3: ...and WXR740 Series log splitters The WXR720 features horizontal splitting only The WXR740 features horizontal and vertical splitting Models Covered in this Manual WXR720 WXR720L stop turn signal tail...
Page 4: ...es freely All support stands move freely Machine controls function correctly All fasteners are tightened to the correct torque All grease points are lubricated Purchased accessories are included if ap...
Page 5: ...uct when ordering parts or requesting service or other information The product information plate location is shown in the illustration For future convenience record the product Model and Serial Number...
Page 6: ...als are pictorial with a blue background and generally rectangular with single or multiple symbols This decal informs what Personal Protective Equipment is required for safe operation Informative Deca...
Page 7: ...ines DANGER Indicates an imminently hazardous situation that if not avoided will result in death or serious injury This signal word is to be limited to the most extreme situations typically for machin...
Page 8: ...th all personnel who are operating the machine or performing maintenance Wear appropriate Personal Protective Equipment PPE The suggested equipment includes but is not limited to the following Hearing...
Page 9: ...e serious injury or death If elderly people are assisting with the work their physical limitations need to be recognized and accommodated Learn the controls and how to stop the machine quickly in an e...
Page 10: ...se a piece of wood or cardboard as a backstop instead of hands to isolate and identify a leak If injured by a concentrated high pressure stream of hydraulic fluid seek medical attention immediately Se...
Page 11: ...is that can affect engine speed Examine muffler periodically to be sure it is functioning effectively A worn or leaking muffler should be repaired or replaced as necessary Use fresh gasoline Old fuel...
Page 12: ...ould never use this machine To help document this training the sign off sheet provided below can be used Make periodic reviews of Safety and Operation a standard practice for all operators Review agai...
Page 13: ...quipment are shown in the illustrations that follow Good safety requires that you familiarize yourself with the various safety signs the type of warning and the area or particular function related to...
Page 14: ...aced that have safety signs on them new signs must be applied Safety signs must always be replaced if they become damaged are removed or become illegible Safety signs are included in the product decal...
Page 15: ...tter can provide many years of trouble free service IMPORTANT Make sure all operators understand how to put the log splitter in a Safe Condition before working with this machine See Safe Condition on...
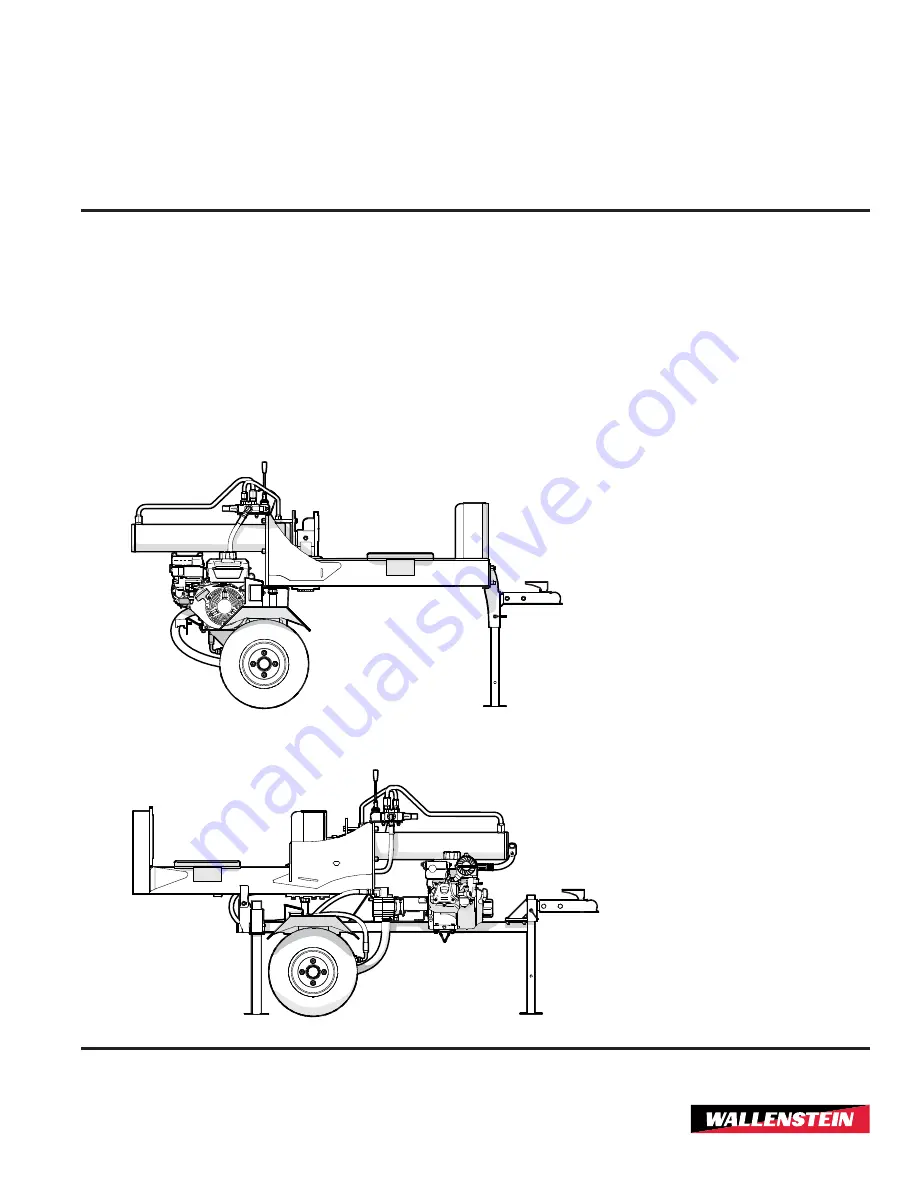
Page 16: ...nents 1 Hydraulic cylinder 2 Splitter control lever 3 Sliding push block 4 Non tilting splitter bed 5 Splitting wedge 6 Trailer tongue 7 Safety chains 8 Front jack stand 9 Operator s Manual storage tu...
Page 17: ...s 1 Tilting splitter bed 2 Sliding splitting wedge 3 Splitter control lever 4 Splitter bed spring latch 5 Hydraulic cylinder 6 Engine 7 Operator s Manual storage tube 8 Trailer tongue 9 Safety chains...
Page 18: ...ge 10 IMPORTANT For complete information about the engine controls see the engine manufacturer s manual 5 1 1 Throttle Control and Fuel Shutoff The throttle control and fuel shutoff lever has the foll...
Page 19: ...your hand and arm toward the engine faster than you can let go of the handle Serious bodily harm for example bruises sprains fractures and broken bones can result When starting the engine pull the st...
Page 20: ...o push the wedge or push block through the wood Releasing the lever returns it to the stop position High Speed Position Pushing the lever forward to the high speed position provides a higher cylinder...
Page 21: ...t 3 Shut off the engine Make sure the splitter control lever is in the stop position 4 Loosen the hex set screw on the rod adjusting collar and move the rod up to the splitting wedge or push block thi...
Page 22: ...e lethal Make sure all guards deflectors and shields are in place before starting and operating Keep hands out of splitting area Do not rest hands on the log being split Do not step over or straddle s...
Page 23: ...spect tires wheels and hubs Check and tighten all fasteners Make sure the equipment is in good condition Check that appropriate equipment for personal protection is being used and in good condition Ch...
Page 24: ...oil level is correct continue with step 7 If the oil level is low add oil until the oil level is at the full upper mark For instructions see Add Oil to the Engine 7 Insert and secure the oil level di...
Page 25: ...move it 2 Use a clean funnel and add oil until the level is at the full mark on the dipstick 3 Install filler cap securely Wipe up any spilled oil 6 8 Check the Fuel Level Check the fuel level daily S...
Page 26: ...the log splitter 1 2 Figure 15 WXR720 WXR720L setup 1 Snap lock pin 2 Jack stand 6 9 2 WXR740 WXR740L The WXR740 Series splitters are designed with a pivoting main frame that allows horizontal or full...
Page 27: ...ll the starter cord out slowly until you feel resistance and then pull it rapidly 8 When the engine warms up move the choke control to the Open position 6 11 Stop the Machine IMPORTANT Do not choke th...
Page 28: ...uld damage the engine 1 Place wood or log on the splitter 2 Move control lever to the High speed position until push block or wedge starts to split the wood 3 If the wedge slows push control lever for...
Page 29: ...ounter clockwise lower the stabilizer and tighten the turn handle 2 While standing beside the controls release the splitter beam by pulling the spring loaded frame latch outward 3 At the same time gra...
Page 30: ...ff the splitter Remove any tools or other loose items Check that all the lights reflectors and other lighting requirements are installed and in good working condition Never allow riders on the machine...
Page 31: ...ace the coupler over the ball on the hitch 5 Flip the latch to lock the coupler around the ball 6 Pull out the jack stand snap lock pin and raise the jack stand to its stowed position Install snap loc...
Page 32: ...gled material Repair or replace damaged parts Remove all entangled material 5 Touch up all paint nicks and scratches to prevent rusting 6 Turn fuel valve OFF Add fuel stabilizer to the fuel tank 7 If...
Page 33: ...connections are properly secured When completing a maintenance or service function make sure all safety shields and devices are installed before placing splitter in service When cleaning any parts do...
Page 34: ...nger than three months replace the fuel with one of the following fuel types An alkylate fuel An engineered fuel that is high octane ethanol free and formulated with power detergent to prevent the bui...
Page 35: ...l See page 24 Check the fuel level See page 25 Clean around the muffler and controls N A Check the hydraulic fluid level See page 25 Inspect the hydraulic fluid quality See page 25 Grease the frame sl...
Page 36: ...cloth before greasing to avoid injecting dirt and grit If fittings do not take grease remove and clean them thoroughly Replace grease fittings as necessary Location Every 40 hours of operation or annu...
Page 37: ...k with clean oil up to the full mark on the dipstick 6 Start the machine up and cycle hydraulic functions to purge air from the system 7 Stop the engine and recheck the oil level Top up to the full ma...
Page 38: ...sen them 2 Remove the cover 3 Remove the air filter 4 Gently tap the air filter on a hard surface to loosen and remove dust and debris If the air filter is excessively dirty or damaged replace it with...
Page 39: ...er control handle does not go to neutral after the rod is fully retracted The valve detent is set too tight Adjustment required to the detent on the splitter control The hydraulic fluid is cold Allow...
Page 40: ...24 610 mm Splitting force 27 Ton Valve type 4 postion spring loaded to neutral Hydraulic pump type 2 stage Hydraulic pump flow 11 gpm 42 Lpm Bed height 27 68 6 cm Wedge height 10 25 cm Tire size 4 80...
Page 41: ...crease torque values by 5 NOTE Bolt grades are identified by their head markings Imperial Bolt Torque Specifications Bolt Diameter Torque SAE Gr 2 SAE Gr 5 SAE Gr 8 lbf ft N m lbf ft N m lbf ft N m 1...
Page 42: ...o apply and maintain proper wheel mounting torque on your trailer axle Torque wrenches are the best method to assure the proper amount of torque is being applied to a fastener Wheel lugs should be tor...
Page 43: ...ude the original purchase receipt with any claim This warranty does not cover the following 1 Normal maintenance or adjustments 2 Normal replacement of wearable and service parts 3 Consequen al damage...
Page 44: ...Motor Safety 10 Grease Specifications 34 Grease Points 35 H Hydraulic Fluid Specifications 34 Hydraulic Controls High Power Position 1 20 High Speed Position 2 20 Retract Position 20 Stop Position 20...
Page 45: ...ber Location 5 Service and Maintenance 33 Electrical System 37 Grease Points 35 Hydraulic Oil Changing 36 Hydraulic Oil Filter Changing 36 Maintenance Schedule 34 Shutoff engine fuel 18 Sign off form...
Page 46: ...Index WXR720 L WXR740 L Log Splitter 46...
Page 47: ...WXR720 L WXR740 L Log Splitter Index 47...
Page 48: ...WallensteinEquipment com...