

A
QUICK START
1. Install and wire host transformer to 120V service (no fixtures connected).
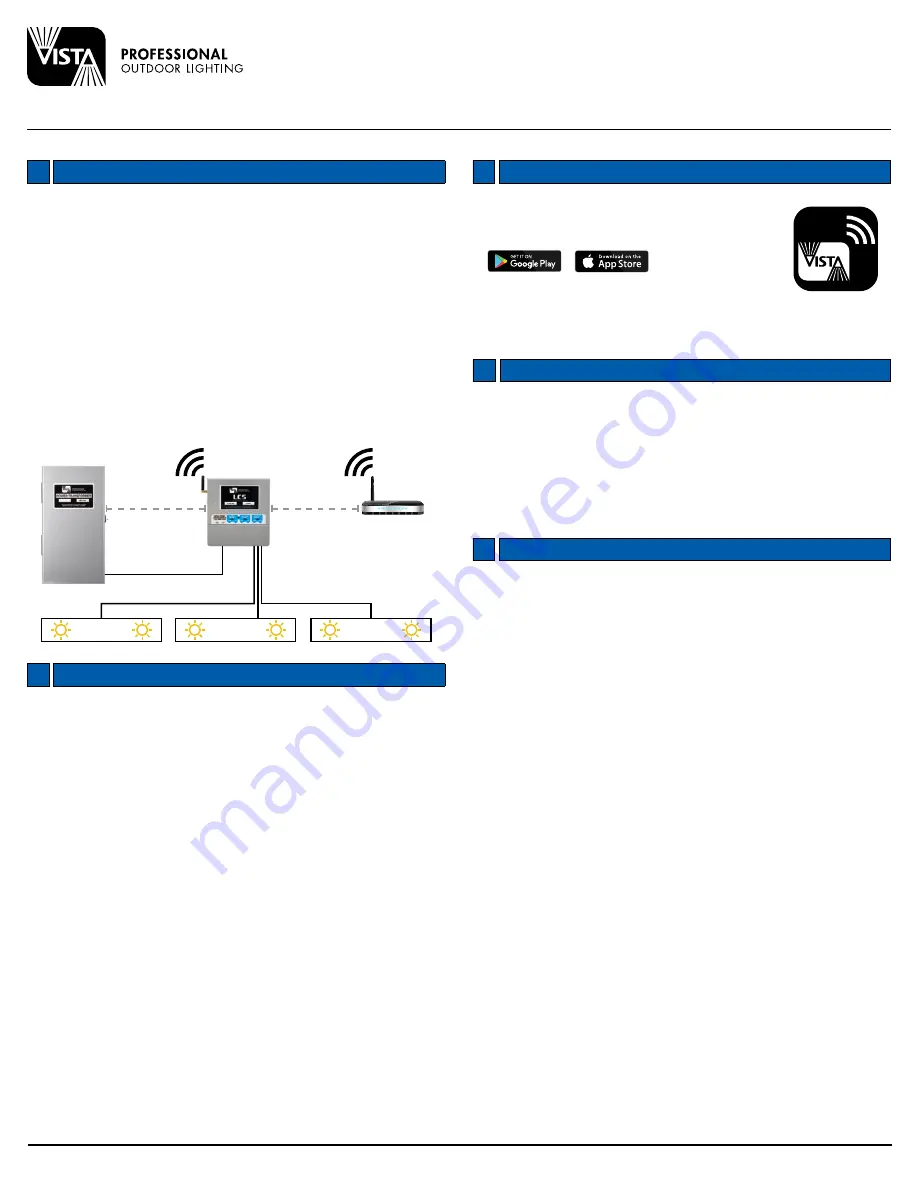
2. Locate and mount LCS controller within 100’ of host transformer and within
100’ of your WiFi network access point.
3. Using 12-15V output from host, connect min. 12-2 low voltage cable to
LCS input terminals.
4. Connect low voltage fixtures to three LCS output zones up to 150W total.
5. Energize host transformer output.
6. Locate LCS control switch - push to “ALL ON”
7. Ensure all field fixtures are on, then push switch to “APP” position.
8. Download
VISTA CLOUD
app to your device and follow on screen
instructions.
B
LCS AND TRANSFORMER CONNECTION DETAIL
1. Confirm host transformer is connected to 120V source, the source is
energized, and its output circuit breaker is on.
2. LCS is a low voltage device. Connect host transformer output to LCS input.
For normal function, LCS input range must be 11-20VAC. CAUTION - Do
not connect line voltage! Controller damage will result and warranty void!
3. Ensure LCS front panel green input power LED is on.
4. With low voltage fixtures disconnected, test LCS output by switching
“ON/OFF/APP” rocker switch to ON. All three LCS green output LED’s
should be on and connected lamps should be on.
5. LCS front panel WiFi LED should be solid green indicating proper
connection to your local WiFi network. Unit will not function without a
strong network connection.
6. Lamps pulsating slowly? Your LCS may be overloaded. In the app, check
above the Zone group for an OVERLOAD indicator in RED. On the LCS
front panel, an amber input power LED will also appear. If either indicator
disappears after setting each Zone to HI or below, reduce load by
removing lamps or reducing their individual wattage.
7. Return switch to APP position for WiFi connected control and operation.
INSTALLATION INSTRUCTIONS
LCS
1625 Surveyor Avenue • Simi Valley, CA 93063 • (805) 527-0987 • (800) 766-Vista (8478) • FAX: (888) 670-Vista (8478) • [email protected] • www.Vistapro.com
Lighting Control System
C
CREATING AN ACCOUNT
1. Using your smartphone or pad device, search and
download the free
VISTA CLOUD
app.
2. First time users must register - follow the steps to
sign up and verify your new account.
3. After establishing a username and password, sign in.
D
ADDING AN LCS CONTROLLER TO YOUR ACCOUNT
In the
VISTA CLOUD
app screen, tap add controller. Add controller and
help link also found in the menu at the top right of the screen. In order to
add an LCS to your account, find it’s unique QR code label (on it’s packaging
and inside the product wiring compartment) and scan using your device as
directed. If unable to scan, it’s 10 character ID may be typed directly from the
QR label into the app.
E
LCS NETWORKING
1. With power on, front panel input power LED will illuminate. Ensure
provided “ON/OFF/APP” rocker switch is in the “app” position. Press
firmly to change switch position beneath it’s protective cover.
2. For new installations “WiFi” LED indicator (front panel center) will blink red
slowly. Continue with the following:
Method one (auto):
1. Tap “add controller” within the app and follow the on-screen instructions.
Method two (in rare cases, manual connection below may be required):
1. Find button marked “WiFi connect switch”. Using pen or similar blunt
object, press in and hold for a full 5 seconds. Watch “WiFi status” LED
change from rapid blinking to solid red.
2. Using your device, navigate to your WiFi network screen in settings. A
device screen pull down (refresh) may be required to bring product
network to the list. Find and connect to the network labeled “LCS”.
3. A network portal screen will appear with three choices – ‘configuration’,
‘information’ or ‘exit portal’. If this screen does not appear, type “WiFi.
Urremote.Com” in your device browser address line while connected to
LCS.
4. Tap ‘configuration’, then tap your local WiFi network name from the list
(should be near the top and have the strongest signal).
5. Enter your SSID and WiFi password (make sure all upper and lower-case
letters and symbols are correct), then tap save.
6. Within 10 seconds, your LCS will reboot, causing the “WiFi” LED to turn
off, then become solid green. Your LCS is now connected to WiFi!
Transformer
LCS
WiFi
Router
100’ max.
100’ max.
12-15V Supply to LCS
ZONE 1
ZONE 3
ZONE 2


