background image


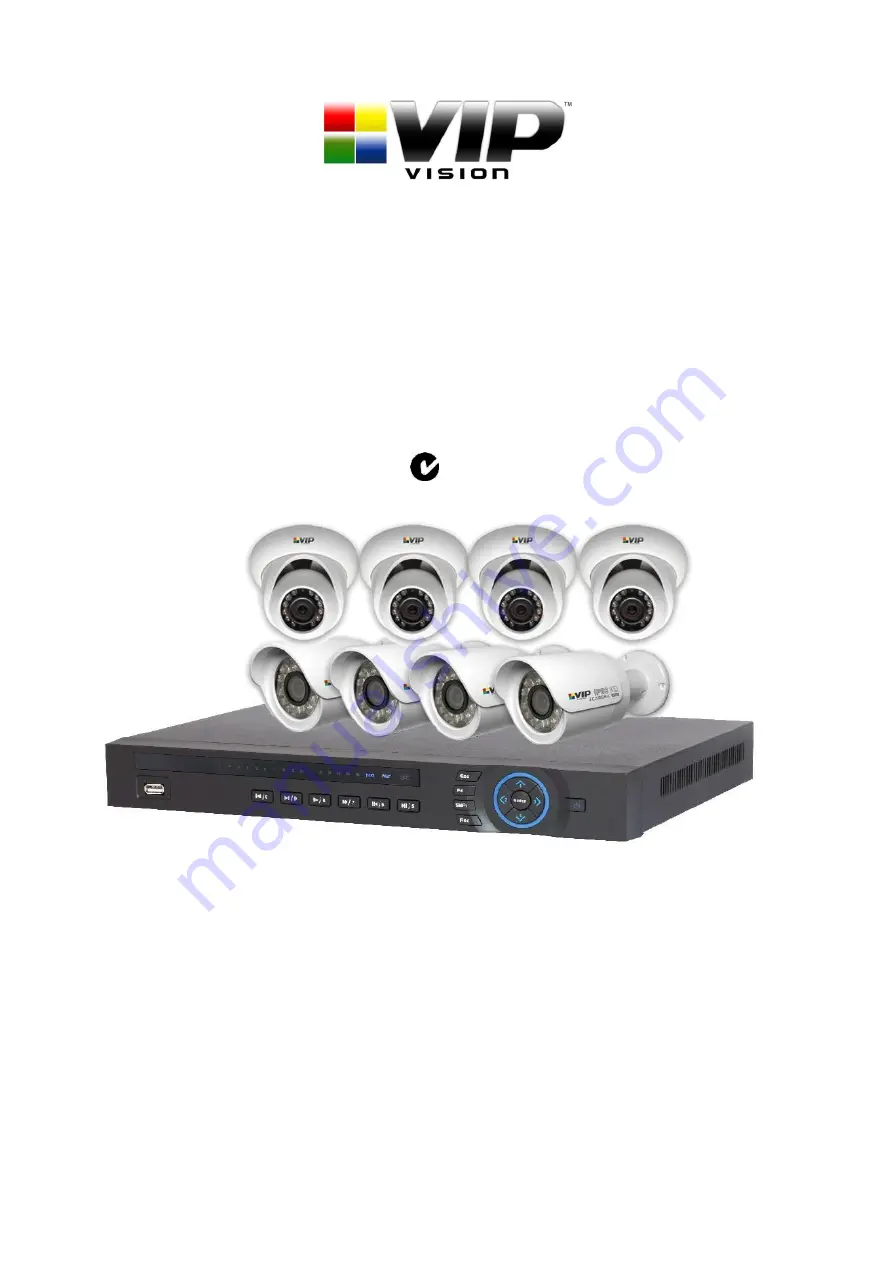
MODEL: NVR8PRO(PACK)2NP 

Professional IP Surveillance Pack 

Network Video Recorder with 8 Security Cameras 

„QUICK INSTALLATION GUIDE‟     


NVR 

8 x IP Day/Night Cameras 

-    Advanced H.264 Video Compression Technology 

- High Quality 1.3MP CMOS Image sensor 

-    Multiplex Operation                       

- IR Night view range of 20 metres 

-    Long Recording Duration 

- 720p Resolution 


-    Intelligent Video Motion Detection Recording 

POE Network Switches 

-    Remote Network Surveillance & Backup Functions 

- Centralise your cameras away from your NVR 

-    Easy to operate with USB Mouse or IR Remote. 

- Power and video over the same cable 

-    System Auto recovery after power loss (blackout) 

View over the internet via Smartphone or PC


N517 

www.vip-vision.com 

V3.5 260614 

Summary of Contents for NVR8PRO(PACK)2NP

Page 1: ...lex Operation IR Night view range of 20 metres Long Recording Duration 720p Resolution Intelligent Video Motion Detection Recording POE Network Switches Remote Network Surveillance Backup Functions Centralise your cameras away from your NVR Easy to operate with USB Mouse or IR Remote Power and video over the same cable System Auto recovery after power loss blackout View over the internet via Smart...

Page 2: ...ficient drives may cause your system to fail and void Warranty NVR Packs come with an approved Hard Drive already installed We strongly recommend using the following Seagate Hard Drives Name Model Part Number Seagate 1TB Video HDD ST1000VM002 HD1TBSN Seagate 2TB NAS HDD ST2000VN000 HD2TBSN Seagate 3TB NAS HDD ST3000VN000 HD3TBSN Seagate 4TB NAS HDD ST4000VN000 HD4TBSN ...

Page 3: ...built POE Network Switch Pack Advanced Switch Mode Technology 4 x Day Night Weatherproof Bullet Cameras with Infrared LEDs 20m Range IR LEDs for Viewing in Total Darkness up to 20m B W Mode 720p Resolution 1 3 Megapixels Ideal for use Indoors and Out Power and video over one cable 4 x Day Night Weatherproof Dome Cameras with Infrared LEDs 20m Range IR LEDs for Viewing in Total Darkness up to 20m B...

Page 4: ... in water and do not spray cleaners of solvents on the unit Unplug units before cleaning When cleaning use a damp lint free cloth only Do not place heavy objects on cords or cover cords with rugs or carpet Service should be handled only by qualified technicians Rear Panel 3 4 5 6 7 8 9 10 11 12 WARNING Please ensure you use the correct power supply for each component Plugging either Power supply i...

Page 5: ...etwork ADSL Modem for remote monitoring Connection Guide 1 Mount the 8 Cameras as required and connect them to the one of the POE Network Switches using the supplied Network Cables 2 Connect one of the POE Network Switches to the LAN port of the NVR 3 Connect the 48V Power Supply labeled POE to each POE Network Switch 4 Connect the 12V Power Supply labeled NVR to the NVR 5 Plug all power adaptors ...

Page 6: ...maximum 3 STATUS LIGHTS Shows device is powered reading HDD connected to network 4 REC Manually start stop recording 5 DIRECTION CONTROLS Used to select and enter options in menus 6 ESC Go to previous menu cancel current operation 7 POWER Hold for three seconds to power on off device 8 SHIFT Switch between text entry modes Numerals English Capitals etc 9 FN Various auxiliary functions 10 USB PORT ...

Page 7: ...eturn to previous menus click on the icon to enter menus Channel View Menu Moving the mouse to the top of each channel in the live view screen will show a menu From left to right Playback Show in live view the past few minutes of footage Search tag Turn on search tag Save Save the currently displayed file to USB device Camera Source Change the IP Device for this feed Close Close the channel view m...

Page 8: ...n screen keypad Then Right click to open the menu and select MAIN MENU Select SETTING Select GENERAL Set System Time Date Format and DST Daylight Saving Time for your region Click Save before clicking OK Important If you change the date or time on your NVR after the recording function is activated the recorded data may be deleted After setting the date and time it s recommended to clear all HDD da...

Page 9: ...e downloaded here http downloads rhinoco com au dvr Free_IP_Scanner zip 1 Open the Free IP Scanner Tool if it asks for registration just press skip as it is free to use 2 Begin the scan by clicking on 3 The Free IP Scanner will automatically detect all IP Addresses on your Computer network and display which ones are in use by listing with a Green tick beside them Those which have a red cross besid...

Page 10: ...elect SETTINGS followed by NETWORK The device comes pre configured to DHCP which means it will automatically receive an IP Address If you wish to manually give it an IP Address un tick DHCP and then enter the IP Address Subnet mask and Gateway In this example we have used 192 168 0 100 ...

Page 11: ...n scanning for all the attached IP Cameras 3 The NVR will find your new IP cameras normally with a default IP Address of 192 168 0 108 You can then click on the IP Cameras Edit button to change its IP Address 4 Change the IP Cameras IP Address Subnet mask and Gateway to the new IP address range Then click Ok to save In this example we have used 192 168 0 101 ...

Page 12: ...s You can then tick the new camera you wish to connect and click Add to have it connect to the NVR 6 The IP Camera will now be shown in the bottom list meaning it has been successfully added to the NVR 7 This process can now be repeated for any additional cameras ...

Page 13: ...EAM MUST be enabled if you wish to remote access the NVR system All cameras Set to H 264 with a CIF resolution 10fps Bit Rate CBR of 320kbps To Begin Recording Once you have successfully set up the cameras exit the Menu by right clicking or pressing the CLOSE button By default the NVR will begin recording when it is properly connected to the cameras and has an installed HDD If it is recording the ...

Page 14: ... REMOTE DEVICE 2 Click IPC CONFIG to open the IP Cameras settings 3 Here you can adjust the IP Cameras Colour Gain BLC WDR and Day Night Please ensure that Day Night is always set to Auto Failing to do so could mean the Cameras are unable to see at night or become stuck in black white during the day ...

Page 15: ...detected before checking for motion again Region Select Select region of feed within which motion detection will occur Click and drag with the mouse to arm disarm areas of the feed Motion detected in red areas will cause recording motion will not be detected in grey areas Press ENTER to save Sensitivity Select from 1 to 6 the sensitivity of the recording 6 being the most sensitive to movement Righ...

Page 16: ... you can select the month and day you wish to playback Any date that is highlighted blue has video available to playback 4 Once you have selected the day you can choose which cameras you wish to playback and the mode in which they will be displayed 1ch 4ch 8ch 16ch at a time 5 Finally you can select the time from the time bar at the bottom of the screen You will notice that the hours are listed fr...

Page 17: ... backup to Choose your device and click BACKUP to continue 4 You will see the NVR Backup screen where you can choose the Camera Channel followed by the Start and End times for the section of video you wish to backup Click ADD to save your selection and repeat process for any addition video footage you wish to back up 5 Once you have selected all the video to be backed up press Start to begin the t...

Page 18: ...an Android smartphone with the gDMSS App Once you have these you can proceed to set up the Remote Access by 1 Connect your NVR to your Modem by a network cable 2 Under Main Menu Settings Network Enable DHCP or enter your local network address information 3 Exit to save 4 Now go to Main Menu Settings Network Network Settings Tick the box for P2P Then double Click P2P to open up the sub menu 5 Ensur...

Page 19: ...Settings Tick the box for P2P Then double Click P2P to open up the sub menu 2 On your Smartphone go to MENU then Device manager and select ADD 3 Set Register Mode to P2P 4 You can now click Scan QR Code and use your phone to scan the code on your NVR 5 Enter in your devices NAME 6 Enter your Username Password and the set Live Preview and Playback to Extra 7 You can now select Start Live Preview to...

Page 20: ...ternet connection or mobile on 3G Test your Remote Access by connecting to the NVR When you are in the same building as the NVR you will be able to connect via WIFI and use the Internal IP address of the NVR However when you are not where the NVR is and wish to connect via the internet or 3G you would use the External static IP address given to you by your Internet Service Provider Port forwarding...

Page 21: ...e and paid services available however a free DDNS service has been built in to these DVRs This tutorial will go over how to set up your DVR to use the free DDNS service How to enable your DDNS In order to set up DDNS on your NVRPRO you will need to enable the DDNS service in the Network settings MENU SETTING NETWORK NETWORK SETTING DDNS double click Set DDNS Type to Private DDNS and Tick ENABLE SE...

Page 22: ...nager and select ADD 2 Set Register Mode to IP DOMAIN 3 Enter in your devices NAME IP Address or DDNS and TCP Port default is 37777 4 Enter your Username Password and the set Live Preview and Playback to Extra 5 Select SAVE in the top right corner or Start Live Preview to save and connect 6 You be returned to your Live View screen where your camera feed will now be displayed 7 In the future you ca...

Page 23: ...y IE10 is not compatible To enable ActiveX controls go to Tools Internet Options Security Custom Level Then once in the Security Settings enable all ActiveX related options Please see the settings below Important Before Setting up remote access for your DVR you will need a good understanding of computer networks If you do not please seek the assistance of a qualified I T professional ...

Page 24: ...nd select ADD 9 Set Register Mode to IP DOMAIN 10 Enter in your devices NAME IP Address or DDNS and TCP Port default is 37777 11 Enter your Username Password and the set Live Preview and Playback to Extra 12 Select SAVE in the top right corner or Start Live Preview to save and connect 13 You be returned to your Live View screen where your camera feed will now be displayed 14 In the future you can ...

Page 25: ... the switch and the 12V 5A is connected to the NVR Turn the NVR off and power on while holding the SHIFT button No video over the network with web browser or mobile Make sure that Extra Stream is enabled for each camera No recorded video Check if the HDD is installed and connected properly NVR keeps rebooting Ensure that the 12V 5A is connected to the NVR HDD detection failed Ensure that the 12V 5...

Page 26: ...s or implied or upon any other basis of liability whatsoever even the loss or damage is caused by its own negligence or fault Seller does not represent that the products it sells may not be compromised or circumvented that the products will prevent any personal injury or property loss by burglary robbery fire or otherwise or that the products will in all cases provide adequate warning or protectio...

Page 27: ...hing possible to ensure that you are happy with your decision and that you have years of satisfaction from your NVR8PROPACK2NP We take extreme care in the research design and development of our products to ensure they meet your needs Additionally we keep in close contact with our dealers Australia wide and should any problem occur we will work closely with your local dealer to see that it is resol...

Reviews: