


Reviews:
No comments
Related manuals for CLIMMA VEGA MK II

B100
Brand: Parker Research Corp Pages: 4

B100
Brand: Eastwood Pages: 20

WiseSpin CF-10
Brand: Daihan Scientific Pages: 43

GMR 18
Brand: Garmin Pages: 2

71095
Brand: Garelick Pages: 4
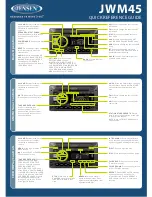
JWM45
Brand: Jensen Pages: 2

EQ231G
Brand: LA Audio Pages: 9

304002
Brand: Parkside Pages: 2

Tudor
Brand: Park House Healthcare Pages: 12

PMII
Brand: QRS Pages: 16

QS Series
Brand: QMAXZ Lighting Pages: 36

SRB-870
Brand: Tar River Pages: 44

PRZ-5500
Brand: Tar River Pages: 61

Smart Plus PHT-35LHS
Brand: Vatech Pages: 190

BS
Brand: Wacker Neuson Pages: 34

DA021
Brand: Calibre Fitness Pages: 11

Cryostat TN60
Brand: TANNER Scientific Pages: 44

Chinook II
Brand: Garmat Pages: 13


