

1 2
3
4 5
6
7 8
READ
ME
FIRST!
56K* Faxmodem
Installation Guide
For Windows
®
95, 98, 2000, and NT
Operating Systems
part number R24.0015.00
Windows 95 and 98 Users
Insert the Installation CD included with your modem into
your CD-ROM drive. It should run automatically. If it does
not, click Windows
Start
and then click
Run
. In the “Run”
dialog box, type
D:\setup.exe
. If your CD-ROM drive uses
a different letter, use that letter in place of “D.”
Follow the on-screen instructions. When you see the
prompt to shut down your computer, refer to Step One of
this Guide to continue the installation process.
Windows NT and 2000 Users
Refer to Step One to begin the installation process.
Before You Begin
1
Pr
Pr
Pr
Pr
Prepar
epar
epar
epar
epare for inst
e for inst
e for inst
e for inst
e for installation.
allation.
allation.
allation.
allation.
NOTE:
Before you begin, we recommend you uninstall any
other modems you have in your system. Refer to your old
modem’s documentation for instructions.
Write the modem’s serial number in the box below. The
serial number is located on the bottom of the modem and
on the modem’s box.
NOTE:
It is very important that you have your serial number
written down for future reference. If you ever need to call
our Technical Support department, you will need this
number to receive assistance.
Make sure that your computer is shut down. Turn off your
computer and all peripheral devices. Unplug your
computer.
2
Conne
Conne
Conne
Conne
Connect the modem to
ct the modem to
ct the modem to
ct the modem to
ct the modem to
the comput
the comput
the comput
the comput
the computer.
er.
er.
er.
er.
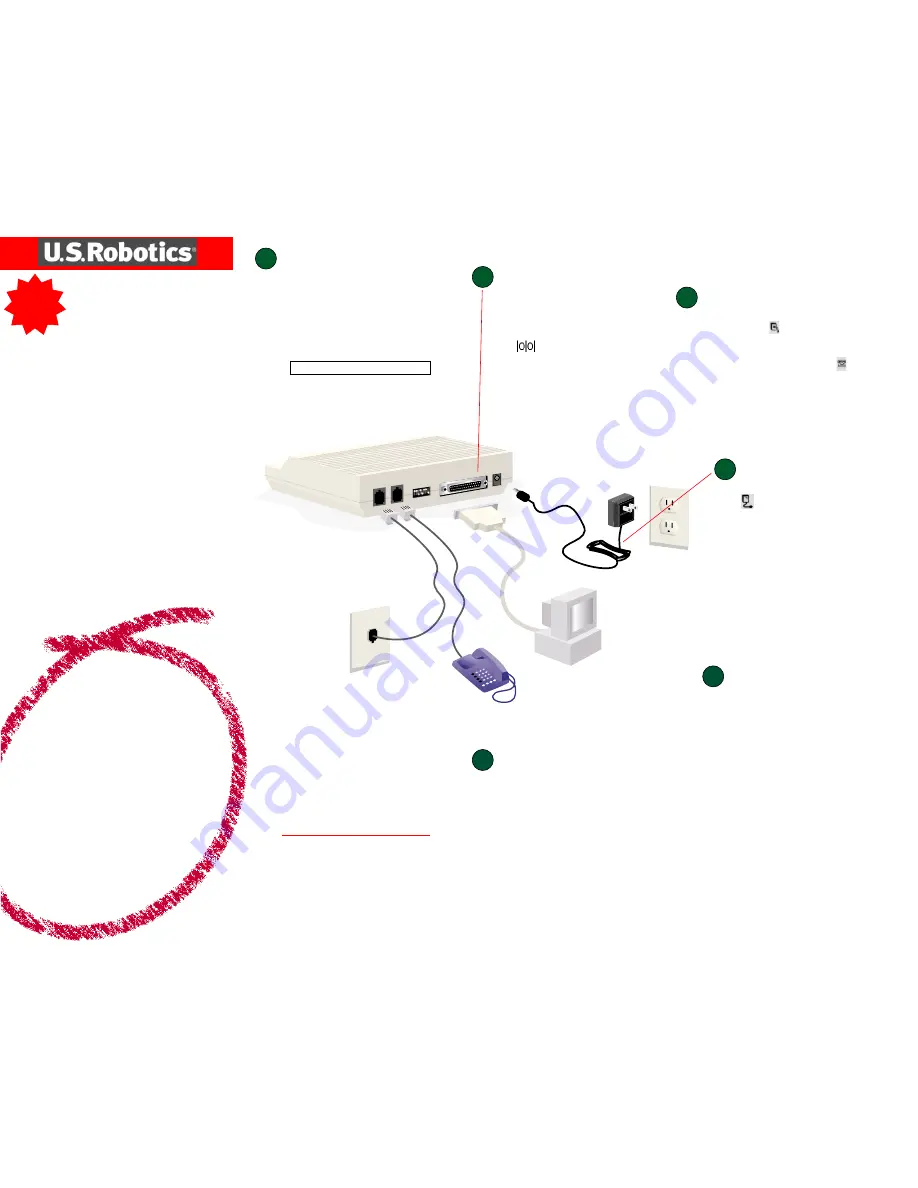
Connect one end of the RS-232 serial cable (not
included) to the modem and the other to your
computer’s serial port.
NOTE:
To find the serial port label on the back
of your computer, look for COM, MODEM, RS-
232,
, or SERIAL. Do not use AUX,
GAME, LPT, or PARALLEL.
3
Conne
Conne
Conne
Conne
Connect the modem to an
ct the modem to an
ct the modem to an
ct the modem to an
ct the modem to an
analog phone line.
analog phone line.
analog phone line.
analog phone line.
analog phone line.
Plug one end of the included phone cord into the TELCO jack
on the modem (labeled
on the modem’s underside) and
plug the other end into an analog phone jack.
When you are not using the modem, you can use a telephone
by plugging the telephone’s cord into the modem’s
jack.
4
Plug in the modem’s power
Plug in the modem’s power
Plug in the modem’s power
Plug in the modem’s power
Plug in the modem’s power
suppl
suppl
suppl
suppl
supply.
y.
y.
y.
y.
Plug the power supply into the modem’s power jack (labeled
on the modem’s underside) and into a surge protector or
electrical outlet. Make sure to use the power supply that came
with your modem, as others may be of different voltages and
could damage your modem. Turn on the modem. The CS light
should illuminate.
NOTE:
NOTE:
NOTE:
NOTE:
NOTE:
If the CS light does not illuminate or other lights illuminate,
make sure that only DIP switches 3, 5, and 8 are in the down
position. (The DIP switches are located next to the phone jacks
on the back of the modem.)
5
Windows inst
Windows inst
Windows inst
Windows inst
Windows installs the drivers
alls the drivers
alls the drivers
alls the drivers
alls the drivers
and the inst
and the inst
and the inst
and the inst
and the installation is verified.
allation is verified.
allation is verified.
allation is verified.
allation is verified.
Turn on the PC.
Windows 95/98 Users
Windows will detect your modem and install its drivers.
Windows 2000 Users
Insert your Installation CD into your CD-ROM drive before you log
in. Double-click the
My Computer
icon. Right-click the
D:\
drive
icon and select
Explore
. If your CD-ROM drive uses a different
letter, use that letter in place of “D.” Double-click the
Win2000
folder
and then double-click the
5686
folder.
A “Digital Signature Not Found” screen may appear.
*
**
**
Click
Yes
.
Windows 2000 will verify that your modem is properly installed.
Windows NT Users
Insert your Installation CD into your CD-ROM drive before you log
in. Double-click the
My Computer
icon. Right-click the
D:\
drive
icon and select
Explore
. If your CD-ROM drive uses a different
letter, use that letter in place of “D.” Double-click the
WinNT4
folder.
Double-click
setup.exe
. This will start the Modem Setup Wizard.
All Users
When the “Modem Setup” screen appears, click
Install
. Follow
the on-screen instructions until the “File Needed” screen appears.
Click
Browse
. Click
Open
. The “Install Complete” message appears.
Click
OK
and restart your computer.
The Installation CD includes the electronic User’s Guide and
Reference for your modem. For further troubleshooting information
and information on contacting technical support, see the other side
of this Guide.
Note:
If at any time during the installation you are
prompted to select the location of your installation drivers,
the following are the correct locations on the Installation
CD (assumes D: is your CD-ROM drive).
Windows 95/98 drivers:
D:\
Windows 2000 drivers:
D:\Win 2000\5686
Windows NT drivers:
D:\NT4\5686
For troubleshooting help or to find out how to
contact technical support, see the other side of this
Guide.
Note:
In accordance with the ITU-T standard for 56K transmissions (V.90), this modem is capable of 56
Kbps downloads. Due to current IC/FCC regulations on power output, maximum download speed is
limited to 53,333 bps. However, the download speeds you experience may be lower due to varying
line conditions and other factors. Uploads from users to server equipment travel at speeds up to 31.2
Kbps. An analog phone line compatible with the V.90 standard, and an Internet provider or corporate
host site compatible with the V.90 standard is necessary for these high-speed downloads.
*
**
**U.S. Robotics has thoroughly tested this driver in conjunction with the supported hardware and has
verified compatibility with Windows 2000. Because U.S. Robotics wants its customers to take full advan-
tage of the modem’s functionality, we made the driver available.
Copyright ©2000 U.S. Robotics Corporation. All rights reserved. U.S. Robotics and the U.S. Robotics
logo are registered trademarks of U.S. Robotics Corporation. 3Com is a registered trademark and
Con-
nections is a trademark of 3Com Corporation. All other company and product names may be trademarks
of their respective companies. All specifications subject to change without notice.
6
Regist
Regist
Regist
Regist
Register your modem and inst
er your modem and inst
er your modem and inst
er your modem and inst
er your modem and install the
all the
all the
all the
all the
Conne
Conne
Conne
Conne
Connections
ctions
ctions
ctions
ctions
TM
TM
TM
TM
TM
CD.
CD.
CD.
CD.
CD.
When your desktop returns, register your modem. At the Installation CD
interface, click the Support link. Follow the onscreen instructions to register
your modem and to view the warranty information. (If the Installation CD
interface does not run automatically, click Windows
Start
and then click
Run
. In the “Run” dialog box, type
D:\setup.exe
. If your CD-ROM drive uses
a different letter, use that letter in place of “D.”)
Remove the Installation CD and insert the
Connections CD. The Connections
CD will start automatically once you have successfully installed your modem.
It will guide you through installing the
Connections program group. The
Connections CD contains a selection of Internet browsers, ISP offers, and
other valuable software. If it does not start automatically, click Windows
Start
and then click
Run
. In the “Run” dialog box, type
D:\setup.exe
. If your
CD-ROM drive uses a different letter, type that letter in place of “D.”


