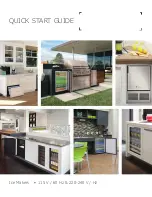
background image

QUICK START GUIDE

Ice Makers  •  115 V / 60 Hz & 220-240 V / Hz

Summary of Contents for BI Series

Page 1: ...QUICK START GUIDE Ice Makers 115 V 60 Hz 220 240 V Hz ...

Page 2: ...ver two decades and is proud to have the opportunity to ship to you PRODUCT INFORMATION Looking for additional information on your product User Guides Spec Sheets CAD Drawings Compliance Documentation and Product Warranty information are all available for reference and download at u line com PROPERTY DAMAGE INJURY CONCERNS In the unlikely event property damage or personal injury is suspected relat...

Page 3: ...harge when you register your product on u line com See complete warranty for details Contents 1 Safety and Warning 2 Environmental Requirements 3 Electrical 4 Water Hookup 7 Door Swing 8 Door Adjustments 13 General Installation 14 Integrated Panel Installation 16 First Use 16 Defrost 16 Ice 18 Warranty D e s i g n e d engineered and assembled in Milwauk e e W I U S A to be removed by end consumer ...

Page 4: ...ng children with reduced physical sensory or mental capabilities or lack of experience or knowledge unless they have been given supervision or instruction concerning use of the appliance by a person responsible for their safety Children should be supervised to ensure that they do not play with this appliance Cleaning and user maintenance shall not be performed by children without supervision DANGE...

Page 5: ...se only genuine U Line replacement parts Imitation parts can damage the unit affect its operation or performance and may void the warranty This appliance is intended to be used in household and similar applications such as Staff kitchen areas in shops office and other working environments Farm houses and by clients in hotels motels and other residential type environments Bed and breakfast type env...

Page 6: ...res and or reduce ice production on applicable models For best performance keep the unit out of direct sunlight and away from heat generating equipment In climates where high humidity and dew points are present condensation may appear on outside surfaces This is considered normal The condensation will evaporate when the humidity drops CAUTION Damages caused by ambient temperatures of 40 F 4 C or b...

Page 7: ...s This unit requires connection to a grounded three prong polarized receptacle that has been placed by a qualified electrician The unit requires a grounded and polarized 230 VAC 50 Hz 8A power supply normal household current An individual properly grounded branch circuit or circuit breaker is recommended A GFCI ground fault circuit interrupter is usually not required for fixed location appliances ...

Page 8: ...looding or void the product warranty Use new hose set Do not reuse old hose set CAUTION Turn off water supply and disconnect electrical supply to unit prior to installation Use caution when handling back panel The edges could be sharp 1 Turn off water supply and disconnect electrical supply to product prior to attempting installation 2 Remove the grille plinth strip base fascia and access panel if...

Page 9: ...Connection When connecting the water supply please note the following Before installing the unit and connecting to the cold water supply review the local plumbing codes The water pressure should be between 20 and 120 psi 138 and 827 kPa The water line MUST have a shut off valve in the supply line The water line should be looped into 2 coils This will allow the unit to be removed for cleaning and s...

Page 10: ... 2 Remove the back panel 3 Locate water valve inlet 4 Break away filler feature in bushing with flat screwdriver 5 Thread water line through back panel hole with bushing 6 Locate water valve inlet and connect to valve 7 Turn on water supply and check for leaks 8 Reinstall back panel 9 Install retaining clip Door Swing 1200 SERIES Units have a zero clearance for the door to open 90 when installed a...

Page 11: ...erly If the door is not sealed the unit may not cool properly or excessive frost may form in the interior Properly aligned the door s gasket should be firmly in contact with the cabinet all the way around the door no gaps Carefully examine the door s gasket to ensure that it is firmly in contact with the cabinet Also make sure the door gasket is not pinched on the hinge side of the door To align a...

Page 12: ...emove three screws from hinge holes on the opposite side using a Torx T 25 screwdriver Reinstall into holes where the hinge was removed Take care not to scratch cabinet Remove bottom hinge 1 Remove bottom hinge from cabinet using 1 4 socket 2 Remove corresponding screws on opposite side of cabinet On some models there may be a nut behind one or both screws on either side Install bottom hinge Insta...

Page 13: ...perly or excessive frost may form in the interior Properly aligned the door s gasket should be firmly in contact with the cabinet all the way around the door no gaps Carefully examine the door s gasket to ensure that it is firmly in contact with the cabinet Also make sure the door gasket is not pinched on the hinge side of the door To align and adjust the door 1 Loosen do not remove top and bottom...

Page 14: ...re use 3 Remove door by tilting forward and lifting door off bottom hinge Retain shoulder washers they will be reused 4 Remove three screws from hinge holes on the opposite side Reinstall into holes where the hinge was removed Take care not to scratch cabinet Remove bottom hinge 1 Remove bottom hinge from cabinet using 1 4 socket 2 Remove corresponding screws on opposite side of cabinet On some mo...

Page 15: ...STMENT Install grille Door Latch MARINE MODELS The door latch assembly included with your unit can be installed to prevent the door from opening when the vehicle is in motion To install perform the following 1 Remove the two outer most screws from the non hinge side 2 Place spacer 2 over mounting holes Place latch 1 on top of spacer 2 NOTE Spacer 2 only required if included with unit 3 Re install ...

Page 16: ...terior packing material and wipe out the inside of the unit with a clean water dampened cloth 1200 SERIES LEVELING INFORMATION 1 Use a level to confirm the unit is level Level should be placed along top edge and side edge as shown 2 If the unit is not level adjust the legs on the corners of the unit as necessary 3 Confirm the unit is level after each adjustment and repeat the previous steps until ...

Page 17: ...sharp 1 Remove top hinge screw pin with Phillips head screwdriver Remove door by tilting forward and lifting off bottom hinge pin 2 Pull door gasket out of groove top edge of door only Start in the middle and pull outward moving toward the edge This may take some force 3 Remove two outside screws holding door handle Slightly separate door handle from door 4 Pull handle up and off 5 Slide custom do...

Page 18: ...r construction or surrounding cabinetry the panel may not sit flush with the top of the door drawer 9 Secure integrated panel to door drawer using clamps A robust tape may also be used U Line recommends the use of bar clamps to secure the panel to the door drawer If using tape be certain the tape will not damage panel finish upon removal 10 Using a 7 64 3 mm drill bit drill 6 pilot holes into the ...

Page 19: ...n system will continue to cool and maintain the ice supply NOTICE Do not place cans or bottles in the ice compartment because they will freeze To turn off ice production Raise the bin arm into an upright and locked position The unit will preserve temperature for ice storage NOTICE If not intending to use the ice maker turn the water supply valve off It is also important to raise the bin arm of the...

Page 20: ... only For parts and service assistance or to find U Line factory authorized service near you contact U Line 8900 N 55th Street Milwaukee WI 53223 u line com onlineservice u line com 1 800 779 2547 17 16 To turn off ice production Raise the bin arm into an upright and locked position The unit will preserve temperature for ice storage NOTICE If not intending to use the ice maker turn the water suppl...

Page 21: ...od or other natural disasters The product must be installed operated and maintained in accordance with your product s User Guide The remedies described above for each warranty are the only ones that U Line will provide either under these warranties or under any warranty arising by operation of law U Line will not be responsible for any consequential or incidental damages arising from the breach of...

Reviews: