U-Line 2275DWRWOL, Use And Care Manual
The U-Line 2275DWRWOL is a versatile and efficient appliance designed to simplify your lifestyle. Ensure proper usage and maintenance with the comprehensive Use And Care Manual. Easily download this essential manual for free from our manualshive.com, empowering you to make the most of your U-Line product.
Share
Download


Reviews:
No comments
Related manuals for 2275DWRWOL
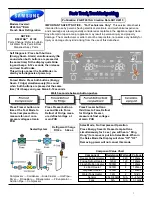
RF267AA SERIES
Brand: Samsung Pages: 6

RF261BEA
Brand: Samsung Pages: 9

Refrigerator
Brand: GE Pages: 11

RF217AB
Brand: Samsung Pages: 68

RB3VTS Series
Brand: Samsung Pages: 56

rb195ab** xaa
Brand: Samsung Pages: 32
RF23J9011SR
Brand: Samsung Pages: 112

AR1112C
Brand: Amica Pages: 100

HCNF-V291XWDF+
Brand: Heinner Pages: 60

K58 series
Brand: NEFF Pages: 86

90.002
Brand: Beper Pages: 36

FQ55FN2PE
Brand: Smeg Pages: 463

U1224RS00B
Brand: U-Line Pages: 52

DPV310
Brand: La Germania Pages: 16

197D4618P003
Brand: GE Pages: 124

SBDE520
Brand: Amana Pages: 14

FX Series FX1-4N1A
Brand: Randell Pages: 2

EVCO1013
Brand: Everglades Pages: 78


