background image

dynadock™ 
User’s Manual

Contents 

Introduction ............................................................................ 7

Features .....................................................................................7

Front panel  .................................................................................8

Back panel ..................................................................................9

Package contents  .....................................................................10

System Requirements  ..............................................................10

Assembly..............................................................................  11

Installation ............................................................................ 12

Installing the Drivers .................................................................12

Connecting the dynadock™ to the Computer  ..........................20

Uninstalling ........................................................................... 22

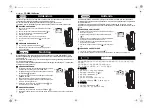
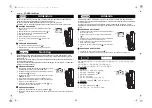
Using the dynadock™  .......................................................... 26

USB 2.0 Ports (Front and Back Panel) .....................................26

Ethernet Port (Back Panel)....................................................... 27

Serial Port (Back Panel)  ...........................................................28

Front Panel Audio Port (Microphone) ....................................... 28

Front Panel Audio Port (Headphones or Speakers) ................. 28

Video Port (VGA or DVI)........................................................... 35

How Standby/Sleep or Hibernate Mode Affects Devices Attached 
to the dynadock™  ....................................................................43

Disconnecting the dynadock™ ............................................. 43

Eject Dock  ................................................................................43

Eject Dock and Sleep  ...............................................................44

Eject by use of command line .................................................. 45

Changing the dynadock Utility Settings ....................................46

Select Audio Device  .................................................................49

Specifications ....................................................................... 50

Summary of Contents for dynadock PA3541

Page 1: ...USB 2 0 Ports Front and Back Panel 26 Ethernet Port Back Panel 27 Serial Port Back Panel 28 Front Panel Audio Port Microphone 28 Front Panel Audio Port Headphones or Speakers 28 Video Port VGA or DVI 35 How Standby Sleep or Hibernate Mode Affects Devices Attached to the dynadock 43 Disconnecting the dynadock 43 Eject Dock 43 Eject Dock and Sleep 44 Eject by use of command line 45 Changing the dyna...

Page 2: ...radio or television reception which can be determined by turning the equipment off and on the user is encouraged to try to correct the interference by one or more of the following measures Reorient or relocate the receiving antenna Increase the separation between the equipment and receiver Connect the equipment into an outlet on a circuit different from that to which the receiver is connected Cons...

Page 3: ...not dispose of this product as household waste or commercial waste Waste electrical and electronic equipment should be appropriately collected and recycled as required by practices established for your country For information on recycling of this product please contact your local authorities your household waste disposal service or the shop where you purchased the product Address TOSHIBA America I...

Page 4: ...ding to the User s Manual Copyright Statement No part of this publication may be reproduced in any form by any means without the prior written permission Other trademarks or brand names mentioned herein are trademarks or registered trademarks of their respective companies Disclaimer Information in this document is subject to change without notice The manufacturer does not make any representations ...

Page 5: ...User s Guide for your TOSHIBA computer only controls the internal video controller of your computer The TOSHIBA dynadock utilizes an advanced video graphics controller to display the video on the external monitor connected to it However due to USB 2 0 transfer speed limitations some or all portions of DVD playback may appear slow or choppy This is not a malfunction of the dynadock Move the video p...

Page 6: ...play it without connecting the dynadock The Fn F5 functionality detailed in the electronic User s Guide for your TOSHIBA computer may not work occasionally The Windows Transient Multi Monitor Manager will be disabled when the dynadock is connected Software application programs that utilize certain directdraw commands such as some kinds of 2D Games the fullscreen display on the external monitor con...

Page 7: ... Microsoft Windows Vista operating systems Please pay attention to and follow the instructions for the dynadock version you have and the operating system on your computer Features Single USB cable connection to your computer Upright slim design saves desktop space Easily accessible ports located on the front Supports VGA resolution up to 1280 x 1040 and DVI resolution up to 1600 x 1200 16 32 bit c...

Page 8: ...powered on USB Hub LED Glows green when any of the six USB 2 USB 2 0 powered ports For connection to USB 3 5 mm mono microphone input port For connection to ports are connected to a USB device and the computer an external mono microphone for recording 3 5 mm stereo audio output port For connection to stereo headphones or speakers peripherals is turned on ...

Page 9: ...o control 10 100 Mbps Ethernet port For connection to the Ethernet Cable holder holes Allows you to manage keep cables organized USB upsteam port For connection between the dynadock and DVI video output port For connection to a DVI monitor DC IN For connection to the provided AC power adaptor network via a network cable not provided once all of your devices are attached VGA video output port For c...

Page 10: ...I version only System Requirements 1 2GHz or higher processor Intel Pentium Celeron family or AMD K6 AMD Athlon AMD Duron family or compatible processor recommended Intel Core 2 Duo 2 0 GB or higher processor recommended for optimal video performance 512 MB memory or higher 1 GB memory or higher recommended USB 2 0 port 30 MB of available disk space Microsoft Windows 2000 Microsoft Windows XP with...

Page 11: ...e the base and dynadock from the packaging You will need to assemble the two pieces Sample Illustration The dynadock and base before assembly Slide the dynadock onto the base as shown below Sample Illustration Assembling the dynadock and base ...

Page 12: ... differences between the two operating systems so please follow the steps for your operating system where indicated 1 Insert the provided Installation CD into your optical disc drive It will run automatically and the dialog box will appear If the auto run function is disabled on your system the program will fail to load automatically Please open the disk in Windows Explorer and double click AutoRu...

Page 13: ...s necessary for the dynadock device Follow the on screen directions to finish the utility installation Step 1 When the welcome screen appears click Next Sample Image Welcome screen During the installation there will be various screens opening and closing and the display may flicker during this time This is normal This process may take several minutes to complete NOTE ...

Page 14: ...Select I Agree then click Next Sample Image License Agreement screen Step 3 Choose the destination folder Sample Image Choose Destination Location screen Step 4 Click Next to start the installation Sample Image Ready to Install screen ...

Page 15: ...llow the steps for your operating system Windows Vista Operations 3 After the utility installation is completed the Video driver will be installed automatically Step 1 Select the language of End User License Agreement and click I Accept During the installation there will be various screens opening and closing and the display may flicker during this time This is normal This process may take several...

Page 16: ...and click Retry to proceed For detailed information on how to connect the dynadock please refer to Connecting the dynadock to the Computer on page 21 of this manual Sample Image Not detected the dynadock screen If you click Cancel the program will exit the installation of the driver 5 After finishing the installation the program will request that you restart the computer Choose Yes and click OK to...

Page 17: ...is is normal A dialog box may prompt to restart the computer Please do not restart at this time in order to install additional drivers Step 2 When the dialog box shown below appears connect the dynadock to your computer For detailed information on how to connect the dynadock please refer to Connecting the dynadock to your computer section of this manual Click OK to continue the installation proces...

Page 18: ...t connected to the computer 5 Install audio drivers Follow the on screen directions to finish the audio driver installation Step 1 When the welcome screen appears click Next Sample Image Setting selection screen Step 2 Choose a destination location for the installation or just use the default location Then click Next Sample Image Choose Destination Location screen NOTE ...

Page 19: ...to restart my computer now and click Finish to finish the setup All devices will take effect after restarting Sample Image Restart computer screen This completes the installation for computers with Microsoft Windows XP operating system A prompt will show up after you reboot your system to inform you the support and user registation informations Background Utility Program After the dynadock utility...

Page 20: ...ot turn it off Connecting the dynadock to the Computer 1 Plug the AC adaptor cord cable into the DC IN on the back of the dynadock Sample Illustration Connecting the AC adaptor cord to the dynadock 2 Connect the AC Power Adaptor with the AC power cord cable and then connect the AC power cord cable to a live electrical outlet The power indicator on the front panel glows blue when the dynadock is po...

Page 21: ...e into an available USB 2 0 port on your computer Sample Illustration Connecting the USB cable to your computer Be sure to remember which USB port is used during the driver installation and always plug the dynadock into the same USB port otherwise the Windows operating system will treat the dynadock as a new device and ask to install the drivers again Only one dynadock can be operated on one compu...

Page 22: ... Disconnect the dynadock from the computer Any devices connected to the dynadock will be disabled Close all other programs and applications You may be prompted to reboot your computer twice before uninstalling is completed Uninstalling Windows Vista Operations Uninstalling the Utility 1 To remove the dynadock utility from your computer click Start Control Panel and then Uninstall a program Choose ...

Page 23: ...he uninstall other windows will open You will be prompted to reboot your computer to continue the uninstall process Do not reboot until the DisplayLink Core Software Please wait window Windows Uninstall or change a program window and the Restart prompt are the only windows open when you choose Yes to restart Sample Image Uninstall TOSHIBA Video Dock window 2 Follow the on screen directions to fini...

Page 24: ... and click the Uninstall Change button Sample Image Uninstall TOSHIBA USB Audio window 2 Follow the on screen directions to finish uninstalling Uninstalling Windows XP Operations Uninstalling the Utility 1 To remove the dynadock utility from your computer click Start Control Panel and then Add Remove Programs Choose dynadock Utility from the list and click the Remove button ...

Page 25: ...tions to finish uninstalling Uninstalling the Video Driver 1 To remove the Video driver please click Start Control Panel and then Add Remove Programs Choose TOSHIBA Video Dock from the list and click the Change Remove button During the uninstall other windows will open Sample Image Remove TOSHIBA Video Dock window 2 Follow the on screen directions to finish uninstalling NOTE NOTE ...

Page 26: ...mputer recognizes the new device USB 2 0 Ports Front and Back Panel Connect any USB device to one of the dynadock s six USB ports When no device is connected to the port the indicator light is off If a device is connected to the port and the connection works properly the indicator light glows green on If your USB device such as a printer or optical drive etc came with its own AC adaptor make sure ...

Page 27: ...select Start Settings Network Connections In the Network Connections folder double click the connection icon for the dynadock s Ethernet adapter which is indicated by ASIX AX88772 USB2 0 to Fast Ethernet Adapter Sample Image Network Connection icon This will open the Local Area Connection Properties window for you to configure the network settings as required according to your network environment ...

Page 28: ...rdware Device Manager 2 Under the Ports COM LPT group you should be able to find Prolific USB to Serial Comm Port The com port number will appear next to the string Sample Image Locating the Serial Comm Port Front Panel Audio Port Microphone To connect a microphone plug the 3 5 mm mono microphone jack into the microphone input port Your operating system may prompt you to continue Front Panel Audio...

Page 29: ...ts to suit your personal preferences Using Virtual 7 1CH Function on 2CH Speakers headphones The audio output port on the front panel is used to connect stereo speakers or headphones Although 2CH speakers may be connected a virtual 7 1CH surround sound experience is possible using the software s virtual multi channel function To enable the virtual 7 1CH audio function on 2CH speakers or headphones...

Page 30: ...ing allows you to enter the SHIFTER control window Sample Image DSP button Click on the Virtual Speaker Shifter button to open the Shifter controls See page 32 for the SHIFTER Control window sample image Windows XP Operations 1 In the Analog Output section select headphone icon Sample Image Select headphone ...

Page 31: ... will turn blue when selected Sample Image 7 1 Virtual SPEAKER SHIFTER button 3 The button next to DSP Mode string allows you to switch between the SHIFTER control and basic control window Sample Image DSP button Click on the Virtual Speaker Shifter button to open the Shifter controls See page 32 for the SHIFTER Control window sample image ...

Page 32: ...counterclockwise 4 Manually rotate all the virtual speakers 5 Manual shifting function You can drag a specific virtual speaker to the preferred position to enhance an individual channel output For example a low volume center for dialog can be enhanced by being dragged closer to you 6 Reset the speakers to default settings Sample Image Shifter Controls 2 1 3 4 5 6 ...

Page 33: ...3 Stops the audio test Sample Image Basic controls screen This can only be seen in Windows XP Digital S PDIF Output Windows XP only Back panel Using the S PDIF output function you can directly output the digital sound source from the computer to your home theater equipment without loss of sound quality To experience true digital sound quality 1 Make sure your DVD content supports Dolby Digital or ...

Page 34: ... click the button next to the S PDIF Output string and select Digital Audio 48KHz from the drop down menu Sample Image S PDIF selection 4 Configure the Audio Output setting of your DVD playback software to use S PDIF Access the software s setup or configuration panel to locate the Audio Out item In order to use the S PDIF function in Windows Vista select Start Control Panel Hardware and Sound Soun...

Page 35: ...dock should be connected to a USB 2 0 port for optimal video performance The dynadock will work connected to a USB1 1 port however video performance will be compromised The USB connector may be plugged and unplugged while the dynadock is on You can customize the video settings of the dynodock See Adjusting Video Settings for more information Viewable screens The dynadock video drivers give you the...

Page 36: ...dynadock uses video output in Mirror Mode Extended Mode Extended Mode lets you split your display across multiple monitors This provides a number of advantages to increase productivity View your large spreadsheets across two or three screens with display continuity Multitask more effectively without overlapping windows Compare two documents simultaneously across two three screens View videos TV on...

Page 37: ...the Display Settings screen Set up the dynadock for Extended Mode Windows XP Operations 1 Position the mouse anywhere on your computer Desktop right click and select Properties The Display Properties screen will pop up 2 On the Display Properties screen click the Settings tab In the Display pull down menu select the option containing TOSHIBA Video Dock 3 Check the Extend my windows desktop onto th...

Page 38: ...er to use three monitors together in extended mode Switching from Extended Mode to Mirror Mode Follow these steps to change the video output to Mirror Mode Windows Vista Operations 1 Position the mouse anywhere on your computer Desktop right click and select Personalize The Personalize appearance and sounds screen will pop up NOTE ...

Page 39: ...aining TOSHIBA Video Dock 4 Uncheck the Extend the desktop onto this monitor box 5 Click OK to close the Display Settings screen Windows XP Operations 1 Position the mouse anywhere on your computer desktop right click and select Properties The Display Properties screen will pop up 2 On the Display Properties screen click the Settings tab In the Display pull down menu select the option containing T...

Page 40: ...tally and vertically Color Depth This defines the number of different colors that can be shown on the screen at the same time Refresh rate Measures the speed that the entire screen is rescanned Higher frequencies reduce flicker Below is a list of refresh rates supported at various resolutions and color depths for the VGA and DVI component Resolution Color Depth 640x480 800x600 1024x768 1280x768 12...

Page 41: ... match the default resolution of the dynadock monitor For more information on supported modes be sure to check the documentation supplied with your monitor Initial Use When the VGA or DVI component first starts it will extend the primary monitor Changes to the screen mode and VGA or DVI component operation mode can be made under the Windows display properties If no output is seen on the monitor co...

Page 42: ...ws XP Operations 1 Position the mouse anywhere on your computer desktop right click and select Properties The Display Properties screen will pop up 2 On the Display Properties screen click the Settings tab 3 To change the screen resolution or color quality select those options on the screen Be sure to select one of the supported resolutions and color quality numbers in the table above For an exter...

Page 43: ...ndary monitor once the computer returns to an active state Also if the external monitor is in Extended Mode and the computer requires a login after Standby Sleep or Hibernate Mode the login screen appears on the primary computer monitor not the external monitor Other Devices If another device is connected to a port on the dynadock and the computer goes into Standby Sleep or Hibernate Mode that dev...

Page 44: ... USB cable from your computer s USB port Sample Image Prompt message It is important that you correctly disconnect the dynadock by following the steps above Failure to do so may cause data loss and or damage to your computer and devices connected through the dynadock Eject Dock and Sleep When the dynadock is connected to your computer the TOSHIBA dynadock Utility can remove all devices and let the...

Page 45: ...e from your computer s USB port 5 After that the system will go into sleep mode It is important that you correctly disconnect the dynadock by following the steps above Failure to do so may cause data loss and or damage to your computer and devices connected through the dynadock Eject by use of command line You can run dynadock Utility by command line please follow the steps below 1 Click Run on St...

Page 46: ... same function as you click Eject and sleep please refer to Eject Dock and Sleep Changing the dynadock Utility Settings The TOSHIBA dynadock Utility setting program allows users to change the Eject Dock setting Opening the Setting Dialog box 1 Click Start and then click Control Panel 2 Double click the TOSHIBA dynadock Utility icon The method of opening the control panel is the same in different v...

Page 47: ... undocking the dynadock Check the Eject Dock and Sleep PC Service box to enable sleep mode when undocking Users can also select the type of sleep mode depending upon the operating system Windows Vista Sleep and Hibernation or Windows XP Standby and Hibernation Sample Image Undock service screen Windows Vista Windows XP ...

Page 48: ...s are checked TOSHIBA recommends that you do not uncheck these boxes If the boxes are unchecked there will be no warning messages if the dynadock is improperly ejected disconnected Sample Image Notify message service screen The following warning message appears when the dynadock is improperly ejected disconnected Sample Image Warning message NOTE ...

Page 49: ...eakers To re enable sound through your notebook please follow these steps 1 Right click the icon in the system tray 2 Select Select Audio Device from the menu Sample Image Select Audio Device screen 3 Change the Sound playback default device to other than C Media CM106 Like Sound Device Sample Image Change Audio Device screen Windows XP Windows Vista ...

Page 50: ...n summarizes the dynadock s technical specifications Physical Dimensions Environmental Requirements Power Requirements Weight 507g 17 8 ounces including the Base Size 45 w x78 d x210 h mm 1 8 w x3 1 d x8 27 h not including the parts that extend beyond the main body 114 w x130 d x223 h mm 4 5 w x5 2 d x8 8 h including the Base Conditions Ambient temperature Relative humidity Operating 5 C to 35 C 4...

Page 51: ...x 1 Analog D SUB 15pin Female Connector OR DVI I x 1 Digital 24 pin Analog5 pin Female Connector 1 x microphone 3 5 mm mono audio in 1 x headphones or speakers 3 5 mm stereo audio out 1 x USB 2 0 Port Type B female Connector 1 x DC in plug 1 x Cable Lock Slot Supported Video Display Modes Depending on operating system Windows XP Mirror Desktop Extended Desktop Primary Display Windows Vista Mirror ...

Reviews: