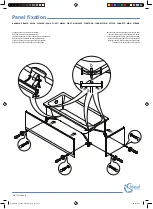
background image

Installation Guide

Ideal Workstations

®

, Work&WashStations

Workstations/WashStations

 with DryDock

,

BarStations

®

 and WashStations

Summary of Contents for BarStation

Page 1: ...Installation Guide Ideal Workstations Work WashStations Workstations WashStations with DryDock BarStations and WashStations ...

Page 2: ......

Page 3: ...tional guidance on Tap and Tap Accessory placements Side view applies to all Workstations IWS 2C IWA 2C IBS 2C IWS 30S IWA 30S IWS 3S IWA 3S IWS 4S IWA 4S IWS 5S IWS 6S IWS 7S O D 22 559 mm I D 20 1 2 521 mm I D 17 432 mm C O 21 533 mm 10 1 2 10 1 2 O D 27 1 2 698 5 mm I D 26 660 mm I D 17 432 mm C O 26 1 2 673 mm 13 1 4 13 1 4 O D 33 1 2 851 mm I D 32 813 mm I D 17 432 mm C O 32 1 2 826 mm 16 1 4...

Page 4: ...WW 7D 11 3 16 248 mm 17 3 16 437 mm 34 1 8 867 mm 34 1 8 867 mm 11 3 16 248 mm 23 3 16 589 mm 11 3 16 248 mm 29 3 16 741 mm 40 1 8 1019 mm 8 15 16 227 mm 10 15 16 278 mm 8 15 16 227 mm 10 15 16 278 mm 8 15 16 227 mm 10 15 16 278 mm 10 15 16 278 mm 10 15 16 278 mm Work WashStations SUGGESTED GALLEY TAP AND TAP ACCESSORIES PLACEMENT GUIDE Suggested maximum inside corner radius of countertop cutout 3...

Page 5: ...2 1130 mm 22 1 4 565 mm 22 1 4 565 mm 10 15 16 278 mm 10 15 16 278 mm O D 45 1 2 1156 mm I D 44 1118 mm I D 17 432 mm C O 44 1 2 1130 mm 22 1 4 565 mm 22 1 4 565 mm C O 18 457 mm O D 19 1 2 495 mm 8 203 mm 8 203 mm C O 18 457 mm O D 19 1 2 495 mm 8 203 mm 8 203 mm SUGGESTED GALLEY TAP AND TAP ACCESSORIES PLACEMENT GUIDE Suggested maximum inside corner radius of countertop cutout 3 8 Galley Tap 1 3...

Page 6: ...2 1308 mm I D 32 813 mm I D 18 457 mm C O 18 457 mm O D 19 1 2 495 mm C O 50 1 2 1283 mm 16 1 4 413 mm 34 1 4 870 mm 8 203 mm 8 203 mm I D 17 432 mm O D 63 1 2 1613 mm I D 44 1118 mm I D 18 457 mm C O 18 457 mm O D 19 1 2 495 mm C O 62 1 2 1587 5 mm 22 1 4 565 mm 40 1 4 1022 mm 8 203 mm 8 203 mm I D 17 432 mm I D 44 1118 mm I D 12 305 mm C O 18 457 mm O D 19 1 2 495 mm 22 1 4 565 mm 34 1 4 870 mm ...

Page 7: ...Basin s tiers until the countertop has been installed and silicone has cured for a minimum of one hour 3 The Workstation and Tap require a minimum of 22 1 2 inside the cabinet For 24 deep inset cabinets installed against a wall the cabinet must be pulled 1 away from the wall 4 For countertops with a laminated or built up decorative front edge construct the wood support frame to finish 1 16 below t...

Page 8: ...e is the minimum 3 plumbing space from the back of the frame to the cabinet wall needed The support frame must be installed 1 16 lower than the top of the cabinet NOTE Use a level to ensure that the support frame is installed level in the cabinet Once installed the top of the Basin Flanges will be flush with the top of the cabinet Attach the support frame to the interior walls of the cabinet 2 ATT...

Page 9: ...RTANT Be sure that it does not extend more than 1 2 onto the front and back flanges as shown d Apply tape to the marked area covering exactly 1 2 closest to the inside of the Basin Ensure that the tape covers the entire length of the flanges and that it extends exactly 1 4 onto the left and right flanges IMPORTANT Be sure that it does not extend more than 1 4 onto the left and right flanges as sho...

Page 10: ...warranty is null and void if the Product has been repaired altered or modified other than by Seller or under Seller s supervision The Seller is not responsible for labor charges installation or other incidental or consequential costs In no event shall the liability of Seller exceed the purchase price of the product If the product is installed outside of North America Seller warrants product to be ...

Page 11: ......

Page 12: ...Corporate Headquarters The Galley LLC 12626 South Memorial Drive Bixby OK 74008 800 375 4255 thegalley com ...

Reviews: