Installation
Knuckle Mount
— To prevent personal injury or product damage, only licensed electricians should install.
— To avoid electric shock or component damage, disconnect power before attempting installation or servicing.
— Proper grounding is required for safety.
— This product must be installed in accordance with the national electric code (NEC) and all applicable federal, state and local electric codes and safety standards.
— Disconnect product and allow cooling prior to servicing.
— Do not exceed the input rating of the luminaire.
— Any alteration or modification of this product is expressly forbidden as it may cause serious personal injury, death, property damage and/or product malfunction.
— No user serviceable parts inside.
— To prevent wiring damage or abrasion, do not expose wiring to edges of sheet metal or other sharp objects.
— Suitable for Wet Locations, IP65
PLEASE READ ALL INSTRUCTIONS BEFORE ATTEMPTING INSTALLATION
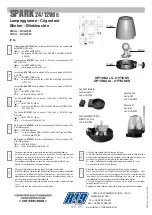
1. Seal knuckle mount thread using teflon tape or silicone sealant.
2. Secure the Impakt™ to a 1/2” NPS hole in a junction box or landscape post.
3. Plug all unsued holes and seal threads with silicone.
4. The knuckle mount on the Impakt™ allows for 180° vertical aiming adjustment
depending on mounting location
Slipfitter
To adjust the angle of the fixture using the trunnion:
1. Loosen the Pivot Bolts & angle locking screw.
2. Adjust fixture to desired angle.
3. Tighten Pivot Bolts & angle locking screw.
Trunnion [U-Bracket]
WARNING
www.trulygreensolutions.com
Impakt™
Architectural Floodlight
Installation Instructions
CAUTION: UL and C-UL listed or CSA certified liquid tight cord grip suitable for use with three
conductor type STW flexible cord shall be used for connection to a wet location outlet box which is
not provided.
Cover
Set Screws
Tenon
Set Screws
Locking Bolt
Wire
Fig.1
Fig.2
Fig.3
Pivot Bolts
1. The slipfitter mounting fits a 2 3/8” O.D. Tenon. Place the slipfitter over the Tenon and secure
the fixture with the Set Screws on the side of the slipfitter.
2. Remove the Round Cover Plate and adjust the angle of the fixture.
3. Loosen the Locking Bolt and swivel fixture to desired angle.
4. Tighten the Locking Bolt and re-attach Round Cover Plate.