

Axon Flex 2 Quick Start Guide
English
Recording
The Axon Flex 2 system has 2 operating modes. The default mode, or
BUFFERING mode, provides pre-event buffering to capture activities that
occur before you activate the EVENT (recording) mode.
1
Turn the system on. Move the ON/OFF switch to the ON position.
•
The camera takes a few seconds to boot up and be ready to record
(the red area under the switch will be exposed with the switch moved
to the ON position).
•
The operation LED will be solid red and then transition to blinking
green when the system goes into BUFFERING mode.
•
The system will go into BUFFERING mode after the boot up sequence.
With default settings, the BUFFERING mode holds the previous 30
seconds of video [NO AUDIO] leading up to the beginning of a re
-
cording.
Solid red
Boot up mode
Blinking green
BUFFERING mode
2
To record, quickly double-press the EVENT button.
•
The system now records audio as well as video.
•
The system will beep twice to let you know that recording started.
The 2 beeps will repeat every 2 minutes (if the system is muted, there
will be no audio notifications).
•
The operation LED will blink red.
3
To stop recording and return to BUFFERING mode, press and hold the
EVENT button for at least 3 seconds until there is a long, audible beep.
Because the system does not capture audio in BUFFERING mode, the
first 30 seconds of a recorded event will be video-only (depending on
your agency’s settings). BUFFERING mode starts only after the cam-
era boots up. The system does not record when the Axon Flex 2 con-
troller is turned off.
EVENT button
Blinking red – recording mode
Controller Operation LED
The controller’s operation LED displays the system’s current operating
mode.
Operating Mode
Controller LED
EVENT
Blinking red
BUFFERING
Blinking green
Recovering interrupted video*
Blinking red
Booting up/powering down
Solid red
Error state**
Solid red
Cable disconnect
Blinking yellow
* When the function LED also is blinking red. If little video was interrupted,
the function LED will blink only briefly.
** When the Function LED also is solid red.
Controller Battery LED
The controller’s battery LED displays the battery’s remaining capacity,
when the device is being used or when charging.
Battery Capacity
Battery LED
Battery capacity is 41–100
percent
Green
Battery capacity is 20–40 percent
Yellow
Battery capacity is less than 20
percent
Red
Hardware
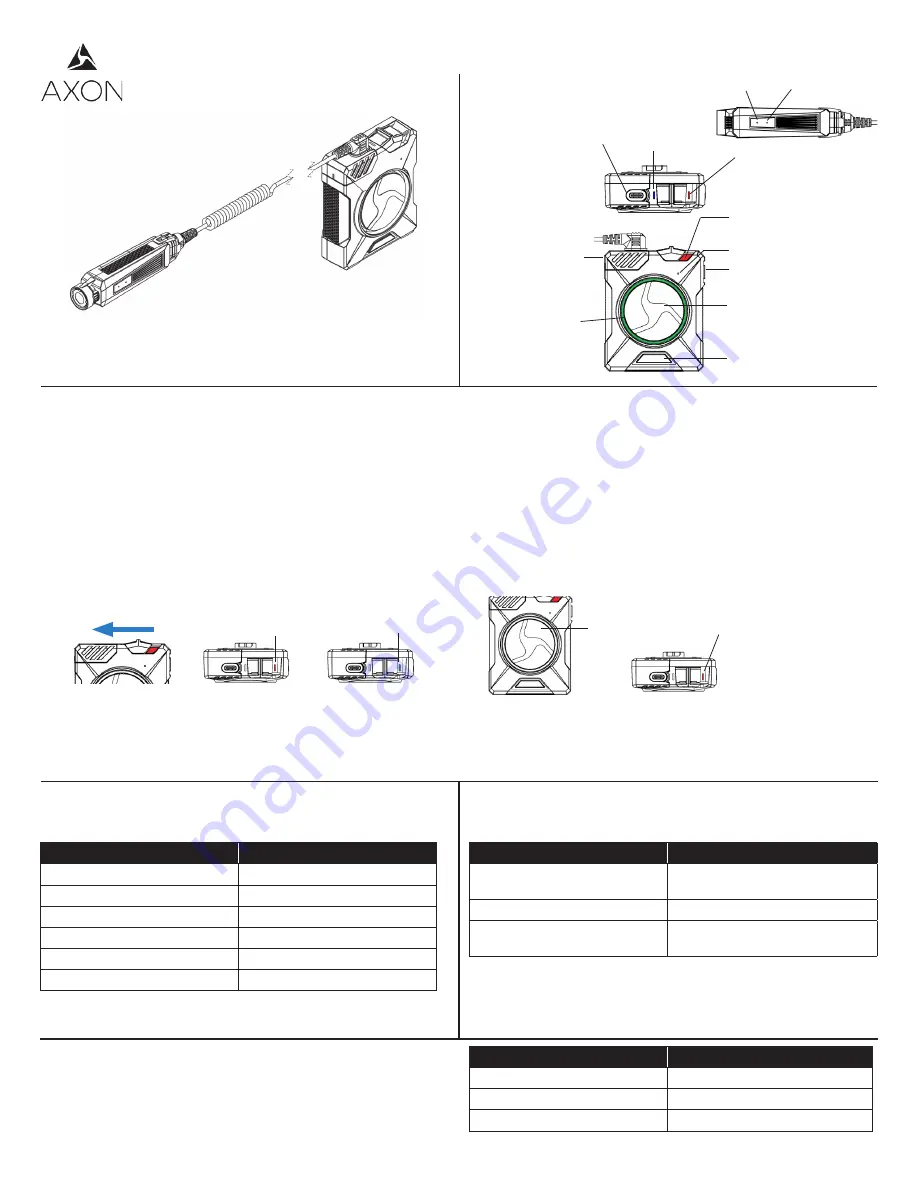
Axon Flex 2 camera
Axon Flex 2 controller
Camera cable
Also available:
USB C to A Sync cable
Quick Reference
Operation LED
Function LED
Cable Connection Port
Also for data transfer and re-
charge with PC or Axon Dock
Battery LED
Green = 41–100%
Yellow = 20–40%
Red = Less than 20%
Power Switch
Red = On/Buffering
EVENT Button
Double-press = Start record
Hold 3 seconds = Stop record
Battery Status Button
Push to show status of battery
Function Button
Mute or add marker
Speaker
Slide Lock
Holds cable to controller
Speaker
Microphone
Controller Function LED
The Axon Flex 2 controller’s function LED displays when certain functions
are enabled.
Function Enabled
Function LED
Mute
Blinking blue
Camera error***
Solid red
Bluetooth feature is booting up
Solid blue
*** Use the power switch to turn the camera off and on.
Read, understand, and follow all current instructions, warnings, and relevant TASER training materials before using any Axon system. The
most up-to-date warnings and instructions are available at www.taser.com.
Before using an Axon Flex 2 system, ensure it is fully charged, and connect it to Evidence.com via the Axon Dock or Evidence Sync software to
ensure it is properly configured. See
Controller Battery LED
and
Recharging the Battery and Uploading Data
for more information. If the battery’s
charge is ever depleted, recharge and reconnect the connect the system again.


