background image

Targa DPV-5200x

User's guide and service information

TARGA GmbH
Lange Wende 41
D-59494 Soest
www.targa-online.com

Ready f

or you:

www.tar

ga.de

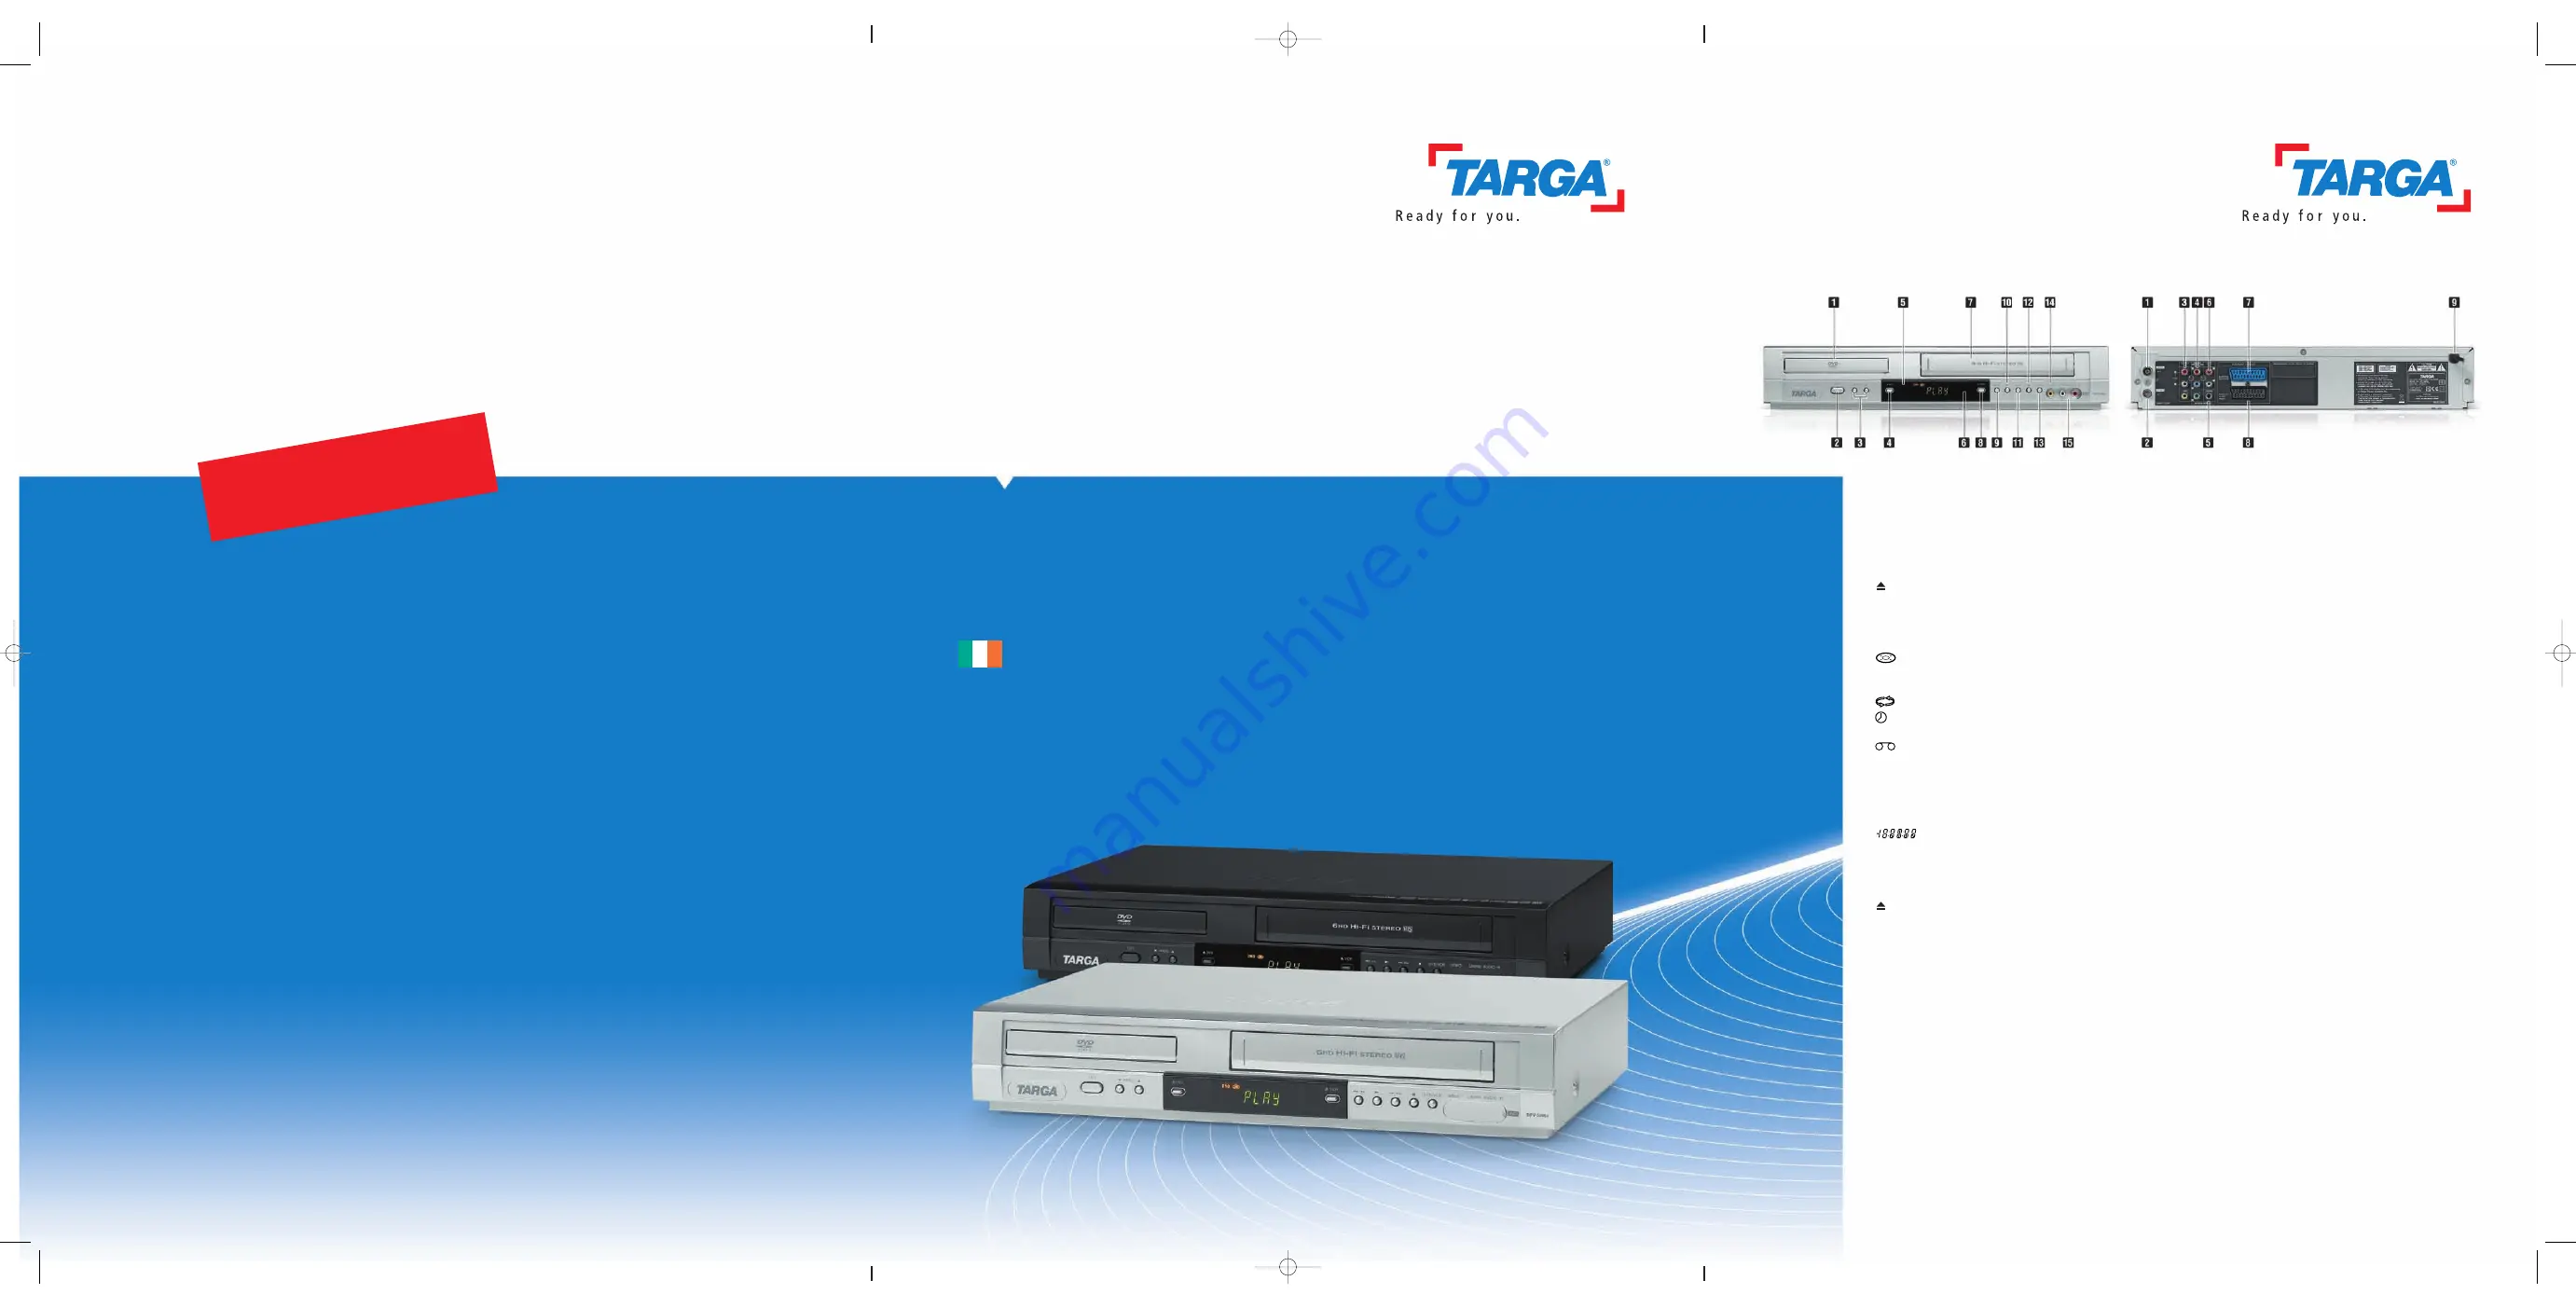
Front panel connections

1. Disc Tray

Insert a disc here.

2.

1/

I

Switches the unit to ON or OFF.

3. PROG. (

V

/

v

)

Channel Programme Selectors.

4.

DVD 

Opens or closes the disc tray.

5. Display window

Shows the current status of the unit.

DVD:

DVD deck is selected.

:

A disc is loaded in the DVD deck.

[P]:

Indicates the Progressive Scan is set to On
mode.

:

Indicates repeat mode.

:

DVD+VCR is in timer recording or a timer
recording is programmed.

:

A Cassette is in the VCR deck.

VCR:

VCR deck is selected.

REC:

VCR recording is engaged.

DVD to VHS copy is in progress.

TV:

Indicates TV mode. 
(See Notes on page 22.)

Indicates total playing time/elapsed 
time/current time.

6. Remote Sensor

Point the remote control here.

7.

Tape Compartment

8.

VCR 

Tape Eject

9.

.

./

/m

m

Go to beginning of current chapter/track or to 
PREVIOUS chapter/track.
Press and hold for two seconds for a fast reverse
search. Rewinds the tape.

10.

N

N

Starts playback.

11.

M

M/

/>

>

Go to NEXT chapter/track.
Press and hold for two seconds for a fast 
forward search. Winds the tape forwards.

12.

x

x  

Stops playback.

13. DVD/VCR 

DVD/VCR Selector

14.

Video IN Jack

15.

Audio IN (L/R) Jacks

Rear Panel

1. AERIAL

Connect the aerial using this jack.

2. RF.OUT

Connect to your TV using this jack.

3. VIDEO/AUDIO OUT(Left/Right) (DVD/VCR OUT)

Connect to a TV with video and audio inputs.

4. COMPONENT/PROGRESSIVE SCAN VIDEO OUT (Y Pb Pr)

(DVD EXCLUSIVE OUT)

Connect to a TV with Y Pb Pr inputs.

5. COAXIAL (Digital audio out jack) (DVD EXCLUSIVE OUT)

Connect to digital (coaxial) audio equipment.

6. AUDIO OUT (Left/Right) (DVD EXCLUSIVE OUT)

Connect to an amplifier, receiver or stereo system.

7. EURO AV2 DECODER 

AV2/Decoder connector to connect an external device 
or to connect a decoder to watch encrypted broadcasting channels.

8. EURO AV1 AUDIO/VIDEO (VCR IN+OUT / DVD OUT) 

Connect to your TV set or another video recorder.

9. AC Power Cord

Connect to a power source.

DPV-5200X_manualcover_ENG  8/17/06  5:00 PM  Page 1

Summary of Contents for DPV-5200 Series

Page 1: ...EVIOUS chapter track Press and hold for two seconds for a fast reverse search Rewinds the tape 10 N N Starts playback 11 M M Go to NEXT chapter track Press and hold for two seconds for a fast forward...

Page 2: ...ove program menu CLEAR Clear a track number on the program menu or a mark on the MARKER SEARCH menu Reset tape counter to zero AUDIO Select an audio language DVD SUBTITLE Select a subtitle language AN...

Page 3: ...let must be easily accessible 21 The switch on the device does not completely disconnect the device from the power source The device still consumes power in stand by mode To completely disconnect the...

Page 4: ...uld record requested information here and retain this guide as a permanent record of your purchase Model No ___________________________________ Serial No ___________________________________ Disposal o...

Page 5: ...ntrol 19 Rating 19 Password Security Code 19 Area Code 20 OTHERS 20 PBC 20 Auto Play 20 DivX R VOD 20 Operation Operation with tape 21 24 Playing a tape 21 CM Commercial Message Skip 21 OPR Optimum Pi...

Page 6: ...e the disc in its case Do not expose the disc to direct sunlight or sources of heat and never leave it in a parked car exposed to direct sunlight Cleaning Discs Fingerprints and dust on the disc can c...

Page 7: ...one or more num bers in it clearly visible on the cover This number must match your unit s regional code or the disc can not play If you try to play a DVD with a different regional code from your play...

Page 8: ...ecording is engaged DVD to VHS copy is in progress TV Indicates TV mode See Notes on page 22 Indicates total playing time elapsed time current time 6 Remote Sensor Point the remote control here 7 Tape...

Page 9: ...s you the current time or counter F G D E left right up down Select an item in the menu PR TRK D E Select channel programme of VCR To adjust tracking To control vertical tremble during picture still D...

Page 10: ...this jack COAXIAL Digital audio out jack DVD EXCLUSIVE OUT Connect to digital coaxial audio equipment RF OUT Connect to your TV using this jack EURO AV1 AUDIO VIDEO VCR IN OUT DVD OUT Connect to your...

Page 11: ...t R DVD exclusive out connection Component Video connection 1 Connect the COMPONENT PROGRESSIVE SCAN VIDEO OUT jacks on the DVD Player to the corresponding in jacks on the TV using the Y Pb Pr cable C...

Page 12: ...t sound quality For this you need a multi channel Audio Video receiver that supports one or more of the audio formats supported by your unit MPEG 2 Dolby Digital and DTS Check the receiver manual and...

Page 13: ...ess and hold PROG v v or V V on the DVD VCR for more than 4 seconds RF 36 will appear in the display The following picture will be displayed on the TV screen If the picture is snowy move to step 5 If...

Page 14: ...H and YEAR Please note your DVD VCR uses a 24 hour clock e g 1pm will be displayed as 13 00 The day of the week will appear automatically when you enter the year 3 If you make a mistake press b b or B...

Page 15: ...roadcast signal is weak your DVD VCR may not detect the necessary information and will not be able to store them correctly To overcome this problem please turn to the MANUAL TUNING section on page 15...

Page 16: ...to select MFT Control the fine tuning of the station by using 3 or 4 6 Press 2 to select STATION so that you may name your TV station Press ENTER OK 7 Use 3 or 4 to select letters and numbers for the...

Page 17: ...in menu will appear on the TV screen Use 1 or 2 to select the PR SET Press ENTER OK 2 Press i 3 Press 3 or 4 to select the programme number you want to delete for example PR 01 4 Press 1 After a short...

Page 18: ...picture and sound You can also set a language for the subtitles and the Setup menu among other things For details on each Setup menu item see pages 17 to 20 To display and exit the Menu Press SETUP t...

Page 19: ...scan Connect component out of this unit to the input of your monitor television set your television or monitor to Component Input 1 Select Progressive Scan on the DISPLAY menu then press B 2 Select On...

Page 20: ...t losing clarity of sound Set DRC to On for this effect Vocal Set to On only when a multi channel karaoke DVD is playing The karaoke channels on the disc mix into nor mal stereo sound LOCK Parental Co...

Page 21: ...Auto Play mode is set to On this DVD player will search for title that has the longest playback time and then play back the title automatically Note The Auto Play function may not work for some DVDs...

Page 22: ...n to return to playback at normal speed Picture search During playing back press either BACKWARD or FORWARD to this will enable you to rapidly wind the tape see where you are on the tape Logic search...

Page 23: ...AV 1 for recording from EURO AV1 SCART jacks on the rear of your unit AV 2 for recording from EURO AV2 DECODER jacks on the rear of your unit AV 3 for recording from VIDEO IN and AUDIO IN Left Right...

Page 24: ...SP to LP if necessary to complete recording the program IP mode is not selected when VPS is ON Check that the timer event details are correct If you wish to record from AUDIO IN and VIDEO IN on the fr...

Page 25: ...the following automated recording features Press 1 or 2 to select then press ENTER OK to confirm DLY To record every day except Saturday and Sunday at the same time SU SA To record at the same time e...

Page 26: ...Use v or V to select the event that you wish to delete or change Press b to delete the event or Press ENTER OK to change then press b or B to select Station Date Start and End times and recording spee...

Page 27: ...o MONO On Screen Display F OSD You may easily display the current time or tape counter amount of tape left day month year day of week programme channel tape speed and operational mode of your DVD VCR...

Page 28: ...cally plays back Wide Screen programmes as Wide Screen and Normal programmes as normal 4 3 Only for playing back and recording Normal format recordings 4 3 16 9 Only for playing back and recording Wid...

Page 29: ...you will not be able to record it using this unit See Copyright on page 6 for more details To record for a fixed length of time see Instant Timer Recording Copying from DVD to VCR You can copy the con...

Page 30: ...again to define the ending point of a replay Press A B a third time to cancel the replay ZOOM During playback or pause mode press ZOOM to enlarge the video image 4 steps You can move through the zoom...

Page 31: ...numerical buttons to input the required start time in hours minutes and seconds from left to right If you enter the wrong numbers press CLEAR to remove the numbers you entered Then input the correct...

Page 32: ...st and then press PLAY Repeat Programmed Tracks Press REPEAT to select a desired repeat mode Track repeats the current track All repeats all the tracks on the Program list Off No display does not play...

Page 33: ...File Press or or cursor b or B once while view ing a picture to advance to the next or previous file Zoom During watching pictures press ZOOM to enlarge the video image 4 steps You can move through th...

Page 34: ...t another language code until the subtitle is displayed properly List Movie Folder 1 Movie Folder 2 Movie Folder 3 Movie Folder 4 Movie Folder 5 Movie Folder 6 Movie Folder 7 Movie Folder 8 MOVIE 0 00...

Page 35: ...Unfinalized DVD R RW discs cannot be played in this player Some DVD VR disc are made with CPRM data by DVD RECORDER Player does not support these kinds of discs What is CPRM CPRM is a copy protection...

Page 36: ...ce they leave marks on the surface Cleaning the unit To clean the player use a soft dry cloth If the surfaces are extremely dirty use a soft cloth lightly moistened with a mild detergent solution Do n...

Page 37: ...ots Gaelic 7168 Serbian 8382 Serbo Croatian 8372 Shona 8378 Sindhi 8368 Language Code Singhalese 8373 Slovak 8375 Slovenian 8376 Somali 8379 Spanish 6983 Sudanese 8385 Swahili 8387 Swedish 8386 Tagalo...

Page 38: ...he path of the remote control and this unit The batteries in the remote control are exhausted Is the cassette compartment empty Audio mode is not set properly NICAM mode is not set properly Correction...

Page 39: ...8 Dynamic range More than 100 dB DVD More than 95 dB CD Inputs VCR Audio 6 0dBm more than 10 kohms SCART 6 0dBm more than 47 kohms RCA Video 1 0 Vp p 75 ohms unbalanced SCART RCA Outputs DVD VIDEO OUT...

Reviews: