Summary of Contents for 180-View 180NT-P-CM

Page 1: ...取扱説明書 設定編 Owner s Manual Setup ...

Page 2: ...有難うございます ご使用になる前に取扱説明書の内容をよくお読み頂き 正 しく安全にお使いください お読みになった後は いつでも見られるところに 必ず大切に保管してください l 取扱説明書について 本機の取扱説明書は 本書と 取扱説明書 設置編 の 部構成になっています 本書では 本機の設定と映像設定について説明しています 本機の設置については 取扱説明書 設置編 をご覧ください PDF ファイルをお読みになるには アドビシステムズ社の Adobe Reader が 必要です 取扱説明書 設定編 ...

Page 3: ...11 カメラと映像の設定をする 1 1 Mode Setting 出力画面選択 1 2 Manual PTZ Control 手動パン チルト ズーム調整 1 3 Preset Sequence Program プリセットシーケンス 1 4 Motion Detection Tour Program 動体検知 1 5 Picture adjust 画質調整 1 6 AGC 自動ゲインコントロール 1 7 ND Filter ND フィルター 1 8 White Balance ホワイトバランス 1 9 Block Size 検知ブロックサイズ 1 0 Mirror ミラーモード 1 a BLC Area 逆行補正 1 ...

Page 4: ... ポートのゴムキャップは 強く引っ張ると抜けるのでご注意願い ます また 防水性 防塵性を維持するため 使用後や不使用時は必ず ゴムキャップを取り付け 本体より凸なく平らに収まっていることを確 認してください 動作環境 ご使用になるパソコンが以下の使用条件に合うかご確認ください 項目 動作環境 OS WindowsXP Professional Version 00 SP SP Windows Vista メモリ MB 以上 ハードディスク空き容量 1GB 以上 動体検知アラーム 動きのある被写体を検知したとき ON になります アラーム出力は NPN オープンコレクタ出力相当となります ドライブ能力は最大 0mA 以下 DC 1 V 以下で使用してください ...

Page 5: ...に入れる CD ROM 内の以下のファイルを ご使用になるパソコンの任意の フォルダーへコピーする 1 0NT P CM Parameter Setting Ver1 0 exe カメラ制御ソフトウェア CP 10x_VCP_Win_XP_S K _Vista_ exe USB RS C変換ソフトウェア CP 10x_VCP_Win_XP_S K _Vista_ exe をダブルクリックする Install a new instance of this application を選択して Next をク リックする ...

Page 6: ...設定の前に Next をクリックする I accept the terms of the license agreement を選択して Next をクリックする ...

Page 7: ...設定の前に Next をクリックする Install をクリックする インストールが始まります ...

Page 8: ...設定の前に Launch the CP 10x VCP Driver Installer にチェックマークがつい ていることを確認して Finish をクリックする ドライバのインストール画面が表示されます 10 Install をクリックする インストール終了画面が表示されます ...

Page 9: ...の前に 11 OK をクリックする 1 CD ROM を CD ROM ドライブから取り出す アンインストールする WindowsXP の場合 スタート コントロールパネル プログラムの追加と削除 から本ソフ トウェアをクリックし プログラムを削除します WindowsVista の場合 スタート コントロールパネル プログラムのアンインストール から 本ソフトウェアをクリックし プログラムを削除します ...

Page 10: ...ボタンをクリックする COM ポート を選択 クリック ON にするとカメラに保 存されている最新の設定値 で表示されます 初回は 初期設定値になります 現在の設定内容をカメラの EEPROM へ保存します メイン設定画面が表示されます 使用する COM ポートを確認する 1 マイ コンピュータ をマウスで右クリックして プロパティ を選ぶ 2 システムのプロパティ 画面で ハードウェア デバイス マネージャ を選ぶ 3 デバイス マネージャ 画面で ポート COM と LPT の Silicon Labs CP 11x USB to UART Bridge COMxx の表示を確認する comxx が使用できる COM ポートです パソコンと設定のポートを合わせてください 相違があるとカメラのコントロールができません 注意 ...

Page 11: ...ソフトウェアを起動する 10 メニューから Action A Reload R を選ぶ カメラの初期設定値が読み込まれ メイン設定画面上に反映されます 設定を行うには P 1 カメラと映像の設定をする へ進んでください ...

Page 12: ...設定が必要になります COM ポートの設定については 使用 する COM ポートを確認する P をご覧ください メイン設定画面右上の をクリックする Save to EEPROM とメッセージが表示された場合は 設定値がまだ書き込 まれていません はい をクリックします 書き込みが終了すると画面に Successfully Loaded と表示されるので OK をクリックして画面を閉じます 1 0NT P CM Parameter Setting Ver1 0 exe が閉じ 設定を終了します バックアップファイルを作成する 1 メニューから File F Save file S を選ぶ メイン設定画面に表示された設定値が書き出され ファイルに保存されます バックアップファイルを読み込む 1 メニューから File F Open file O を選ぶ 読み込むバックアップファイルを指定し 開く...

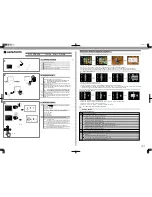
Page 13: ...カメラと映像の設定をする 12 カメラと映像の設定をする 1 2 3 4 5 6 8 9 0 a 7 カメラに関する設定 P 1 P 1 映像に関する設定 P 1 P 1 ...

Page 14: ...0 度または 1 0 度に補正して画像表示し ます Motion Detection Tour 動体検知の巡回機能を有効にします 巡回表示中 選 択したエリア内で動きのあるものを検知したとき そ のエリアを自動で表示します エリア設定 Motion Detection Tour Program P 1 Preset Sequence 自動シーケンス機能を ON にします エリア設定 Preset Sequence Program P 1 Preset Top Left 1 Top Top Right Left Midl M Right Bot Left Bottom Bot Right 表示するプリセットエリアを選択します Top Left 1 Top Top Right Left Midl M Right Bot Left Bottom Bot Right Tour speed プリセッ...

Page 15: ...ing の Preset Sequence を ON にした場合の プリセットエリアの指 定を行います 設定値 詳細 設定範囲 No 1 No 1 Mode Setting で Preset Sequence を選択し た場合の プリセットエリア番号を指定します プリセットエリア No 1 10 1 1 10 11 1 1 1 1 1 1 1 0 歪み補正なし 1 補正画像 1 0 補正画像 1 0 メモ 10 1 を指定した場合 デジタルズームで 拡大表示されるため 画像が粗くなります 0 1 Number of Presets 表示するエリア数を設定します 例 に設定した場合 表示順は No 1 No No No No 1 となり エリア表示の順番は入力された設 定 P 1 0 0 となります 1 Dwell time mode 切り替え時の保持時間です 0s 10s Tour spe...

Page 16: ...さ れた設定 P 1 1 1 となります 1 Area Number 最大巡回ユーザーエリアを設定します Dwell Time エリアの切り替え時の所要時間です 数 値が小さいほど速くなります x1 x10 Dwell Time After Detection 動きのある被写体を検知したエリアの切 り替えとそのエリアの画像表示の保持時 間です 1s 10s Detection Sensitivity high 1 low 10 動きを検知する感度を設定します 数値 を少なくすると感度が上がり 多くする と感度が下がります メモ 数値を小さく設定しすぎると 感度が 上がりすぎてしまう場合があります そのため 誤作動が多くなることがあ りますので 適切な数値にするよう注 意してください Level 1 Level 10 Motion Detection Window 動きを検知した際 被写体に...

Page 17: ...インコントロール オートゲインコントロールの設定を行います 設定値 詳細 設定範囲 EV 露出値を設定します Gain AGC dB ゲインの最大値を dB まで増幅して表 示します ー AGC 0dB ゲインの最大値を 0dB まで増幅して表 示します ー Slow Shutter ACG ゲインを使用しても明るさが不足 するときに使用します Shutter の蓄積時間を長くし 映像を増 幅します この機能を使用するとフレー ムレートが下がるので 動きの速い被写 体を映す場合はズレが生じます 動作は下記のようになります 0 dB x x MAX 0dB AGC slow shutter AGC x1 x 7 ND Filter NDフィルター ND フィルターの設定をします 設定値 詳細 ND Filter ON ND フィルターを使用します OFF ND フィルターを使用しません ...

Page 18: ...イトバランスを調整します 色温度設定枠あり ATW 自動的にホワイトバランスを調整します 色温度設定枠なし One Push ATW に設定したときに ワンプッシュモードになります 9 Block Size 検知ブロックサイズ 動体検知用ブロックサイズを設定します MEMO Block Size 設定後 カメラを再起動すると設定が有効になります 設定値 詳細 1 1 画面全体を 0 1 の格子分割します 1 1 画面半分を 0 1 の格子分割します メモ 格子分割開始位置は垂直方向 0 水平方向 からです ブロック以外のエリアは動き検知はしません ...

Page 19: ...カメラと映像の設定をする 18 0 Mirror ミラーモード 画像を水平方向に反転させて表示します 設定値 詳細 ON ON にすると 画像を水平方向に反転させて表示します OFF 画像を通常通り表示します a BLC Area 逆行補正 全画面を以下のように 分割表示し AE 検波エリアを ON OFF します ...

Page 20: ...特機事業本部 新商品推進部 埼玉県さいたま市見沼区蓮沼 1 番地 Tel 0 1 Fax 0 E mail tokki tamron co jp ...

Page 21: ...camera contact your supplier to service l About the Owner s Manuals The owner s manuals are organized into two books this manual and the Owner s Manual Installation This manual explains how to set up the equipment and configure the image settings For information on installing the equipment see Owner s Manual Installation Adobe Reader from Adobe Systems is required for reading the PDF file Owner s ...

Page 22: ...up File 11 Configuring the Camera and Image Settings 1 1 Mode Setting Output Screen Selection 1 2 Manual PTZ Control Manual Pan Tilt and Zoom Adjustment 1 3 Preset Sequence Program Preset Sequence 1 4 Motion Detection Tour Program 15 5 Picture Adjust 16 6 AGC Automatic Gain Control 16 7 ND Filter 16 8 White Balance 1 9 Block Size Detection Block Size 1 0 Mirror Mode 18 a BLC Area Back Light Compen...

Page 23: ...er and dust re sistance always reattach the rubber cap when the camera after use and check that it is flat on the main unit without any of it sticking out Operational Environment Please check if your computer meets the requirements below Item Operational Environment Operating System Windows XP Professional Version 2002 SP2 SP3 Windows Vista RAM 256MB or more Hard Disk Space 1GB or more Motion Dete...

Page 24: ...the following files from the CD ROM to any folder on your computer 130NT P CM Parameter Setting Ver1 0 exe camera controller software CP210x_VCP_Win_XP_S2K3_Vista_7 exe USB RS232C conversion software 3 Double click the file CP210x_VCP_Win_XP_S2K3_Vista_7 exe 4 Select Install a new instance of this application and click Next ...

Page 25: ...Before Setting Up 5 Click Next 6 Select I accept the terms of the license agreement and click Next ...

Page 26: ...Before Setting Up 7 Click Next 8 Click Install The installation begins ...

Page 27: ...Before Setting Up 9 Check that Launch the CP210x VCP Driver Installer is checked and click Finish The driver installation window appears 10 Click Install The install complete window appears ...

Page 28: ...M from the CD ROM drive Uninstalling On Windows XP Click on this software from Start Control Panel Add or Remove Programs to remove the program On Windows Vista Click on this software from Start Control Panel Uninstall a Program to re move the program ...

Page 29: ...the camera Initial settings will be shown on the first run Saves the current settings to the camera s EEPROM The main configuration window appears Checking the COM Port to Use 1 Right click on My Computer and select Properties 2 In the System Properties window select Hardware Device Manager 3 In the Device Manager window verify that Silicon Labs CP 11x USB to UART Bridge COMxx is displayed under P...

Page 30: ... 3 From the menu select Action A Reload R The initial settings of the camera are loaded and reflected in the main configu ration window To configure the settings proceed to Configuring the Camera and Image Set tings on page 12 ...

Page 31: ...he top right of the main configuration window If the message Save to EEPROM appears this means that the settings have not been written yet Click Yes When the write process is complete Successfully Loaded is displayed on the dialog box Click OK to close the dialog box The 130NT P CM Parameter Setting Ver1 0 exe closes and finishes the con figuration Creating a Backup File 1 From the menu select Fil...

Page 32: ...Configuring the Camera and Image Settings 12 Configuring the Camera and Image Settings 1 2 3 4 5 6 8 9 0 a 7 Camera related settings pages 13 15 Image related settings pages 16 18 ...

Page 33: ...compensating the horizontal angle of view by 120 or 180 degrees Motion Detection Tour Enables the motion detecting tour feature In the MD Tour mode when a moving object is detected in the selected area that area is automatically displayed For setting the area see Motion Detection Tour Program page 15 Preset Sequence Turns ON the auto sequence feature For setting the area see Preset Sequence Pro gr...

Page 34: ...etting specify the preset area Setting Details Range of Values No 1 No 12 When Preset Sequence is set to ON in Mode Setting specify the preset area number here Preset areas No 1 9 10 18 1 10 2 11 3 12 4 13 5 14 6 15 7 16 8 17 9 18 0 No distortion compensation 19 Compensated image 180 22 Compensated image 120 Note When 10 18 is specified the image is magnified by digital zoom causing the image qual...

Page 35: ... 12 1 2 3 4 1 1 4 Area Number Set the maximum number of tour user area 2 4 Dwell Time Time required when switching areas The smaller the numeric value the faster the speed x1 x10 Dwell Time After Detection When a moving object is detected in an area the view switches to display the image in that area for the duration specified here 1s 10s Detection Sensi tivity high 1 low 10 Set the sensitivity of...

Page 36: ... Set the exposure value 9 9 Gain AGC 24 dB Amplifies the maximum gain up to 24 dB and displays it AGC 30 dB Amplifies the maximum gain up to 30 dB and displays it Slow Shutter Use this if AGC gain does not provide suf ficient brightness Prolongs the response time of the shutter and amplifies the image Since this feature de creases the frame rate the image will be out of sync when capturing a fast ...

Page 37: ...One Push mode when set to ATW 9 Block Size Detection Block Size Sets the block size for motion detection Note After setting the Block Size restarting the camera enables the setting Setting Details 1 1 Divides the entire screen into a 20 16 grid 1 1 2 Divides half of the screen into a 20 16 grid Note The start positions for grid splitting are 240 in the vertical direc tion and 256 in the horizontal...

Page 38: ...y flips and displays the image Setting Details ON Turning this ON flips the image horizontally and displays it OFF Displayed the image normally a BLC Area Back Light Compensation Splits the entire screen into 9 areas as shown below and turns AE wave detection area ON OFF ...

Page 39: ...Tamron co Ltd Industrial Optics Business Unit New Product Sales Marketing Dept 1385 Hasunuma Minuma ku Saitama shi Saitama 337 8556 JAPAN Tel 81 48 613 7629 Fax 81 48 683 8594 E mail tokki tamron co jp ...

Reviews: