background image

Quick Start Guide


Sahara NetSlate® a510 Tablet PC
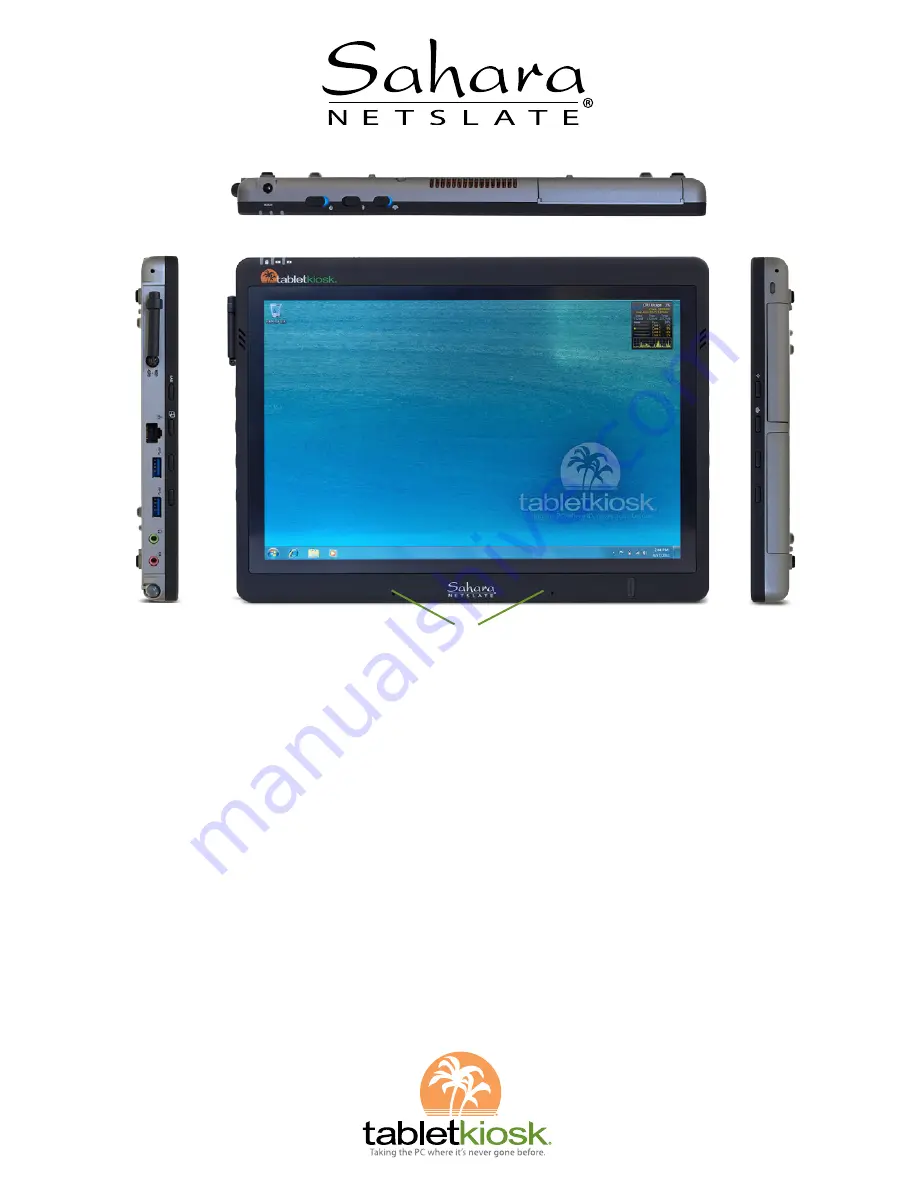
  

Left Side


1.

  Carry Strap Attachment


2.

  3G+GPS Antenna Port 


  (with antenna attached)


3.

  Ethernet Port (RJ45)


4-5.

  USB 3.0 Ports


6. 

  Headphone Jack


7.

   Audio In Jack


8.

  Stylus Pen Garage


9.

  SAS Button


10.


Screen Rotation Lock


11-12.

  Volume or Brightness


  Control Buttons (user


  assignable in BIOS)


Top Side


13.

   DC In (Power In)


14.

   HDD Access LED


15.


Battery Status LEDs


16.

   Power Switch


17.

   Bluetooth Switch


18.

   WiFi Switch


19.


Modular Expansion


  Port with cover


Front


20.

   Audio Speaker


2.

  3G+GPS Antenna 


21.

   Microphone Array


22.

   Fingerprint Reader


Right Side


1.

  Carry Strap Attachment


23.

  Kensington Lock Port


24.

  Battery 1


25.

  Touch Screen ON/OFF 


26. 

Wireless Mode Toggle

 27-28.

  Programmable Buttons


29.

  Battery 2

Left Side

Right Side

Top Side

!

@

#
$
%
^

&
*

CL

@

CL

CQ
CR
CS
CT

BPBQ  BR  BS BT 

BU

CM

CN

BO

(
BL
BM
BN

!

CO

CP

CU

Summary of Contents for Sahara NetSlate a510

Page 1: ...ssignable in BIOS Top Side 13 DC In Power In 14 HDD Access LED 15 Battery Status LEDs 16 Power Switch 17 Bluetooth Switch 18 WiFi Switch 19 Modular Expansion Port with cover Front 20 Audio Speaker 2 3G GPS Antenna 21 Microphone Array 22 Fingerprint Reader Right Side 1 Carry Strap Attachment 23 Kensington Lock Port 24 Battery 1 25 Touch Screen ON OFF 26 Wireless Mode Toggle 27 28 Programmable Butto...

Page 2: ...fortlessly as possible These steps might change slightly over time with newer revisions of the installed operating system or when your tablet is purchased from a systems integrator or solutions provider Step 1 Insert the Battery Pack s Turn the tablet over so the back of the system is facing toward you CAUTION When turning over the Sahara NetSlate be careful not to place it on a surface that could...

Page 3: ... would like to use any external peripherals with the tablet i e USB mouse USB keyboard etc or are planning to connect to the Internet and or a corporate LAN using a wired Ethernet connection RJ45 connect them now Step 4 Power on the Sahara NetSlate Locate the three power switches on the top of the tablet The switch is the computer s main power toggle Slide and hold it until it emits a blue glow ab...

Page 4: ...his will not affect the behavior of the pointer Like a touch screen when you want to select or interact with an object simply tap on it Keep the stylus tip on the screen while moving it around in order to perform a drag operation TIP When trying to select or activate something on the screen with the stylus pen pay attention to the position of the pointer icon on the screen instead of the tip of th...

Page 5: ... choose to cancel and then rerun the calibration routine NOTE If you find that after you calibrate for the first time the screen accuracy is no better or perhaps worse choose to calibrate again After the first calibration for each screen the routine steps down to only using 4 target points for calibration Sometimes the 4 point calibration can produce better feeling calibration data for some users ...

Page 6: ...a log box requesting a network key or password The key password your network administrator should be able to supply this to you must be entered correctly or you will not be able to successfully connect to the network If you entered the network key correctly you should now be connected to the wireless network If it appears you are connected to the network but have limited or no actual connectivity ...

Page 7: ...slot and WWAN data module are inside The SIM card holder is located toward the top right of the compartment just above the WWAN module 4 Unlock the cover by placing your fingernail or another small flat object into the wide oval shaped opening near the top of the SIM holder and slide it toward the left side of the compartment until you feel it click Carefully lift the cover open toward you It shou...

Page 8: ...vice doesn t seem to connect properly or doesn t function after starting up the computer again sometime in the future open up the Bluetooth Settings application located in START All Programs Bluetooth tap on the device you are having problems with to highlight it and then tap on the X Delete button to remove it Then tap on the New Connection button to re setup the device again Using the TabletKios...

Page 9: ...e Tablet Button panel located in the System Tray to reprogram those three buttons to activate a different pre programmed task or to launch a Custom application of your choice Double tap on the icon to launch the Tablet Button applet HotKey 1 is the top button on the right side of the tablet It is pre programmed to turn the touch screen on and off The other buttons can each be programmed to open th...

Page 10: ...ff hibernate to prevent data loss To resume your work either swap in charged batteries or plug in the AC adapter and turn the system back on Restoring Your System Using the System Recovery Partition There may be times where you ll encounter errors that may prevent you from booting into Windows normally Your Sahara NetSlate has a hidden partition on the data storage drive that contains the files yo...

Page 11: ...e LCD screen Additionally you shouldn t ever spray anything directly on the Tablet PC while it is powered on and running A can of compressed air can be used to remove dust and other particulate matter from crevices vents and I O ports Compressed air is also good for cleaning dust from the non slip surface of the Sahara NetSlate s top case Cleaning the LCD screen Gently wipe the surface using a cle...

Page 12: ...c d b a TabletKiosk All Rights Reserved Sahara NetSlate and TabletKiosk are registered trademarks of Sand Dune Ventures Inc in the United States and other countries Windows the Windows logo and Windows 7 are registered trademarks or trademarks of Microsoft Corporation in the United States and other countries rev 5 11 12 ...

Reviews: