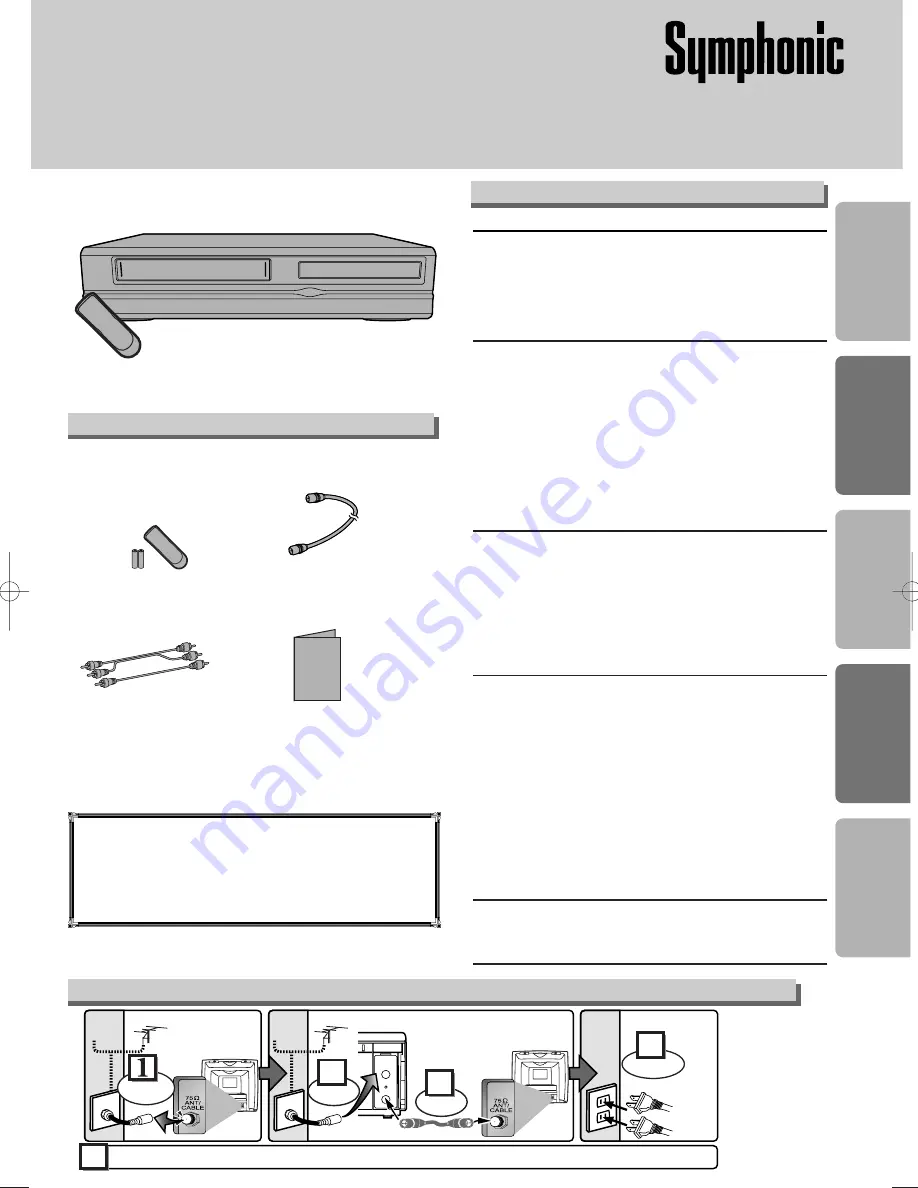
background image

• Remote control

(NB100UD or NB 150UD) 
with two AA batteries

• RF cable

(WPZ0901TM002)

• Audio/Video cables 

(WPZ0102TM015 or

WPZ0102LTE01)

• Owner’s Manual

(0VMN04128)

Owner’s Manual

Please read before using this equipment.

DVD/CD Player with Video Cassette Recorder

CSDV840E

Precautions

D

VD Functions

Setup

VCR Functions

Inf

ormation

Supplied Accessory

Owner's Manual

ANT-OUT

ANT-IN

RF Cable 

(supplied)

(Back of 
DVD/VCR)

(Back of TV)

(Back of TV)

AC 
outlets

Plug in

4

5

From 
TV

From 
DVD/VCR

Please refer to "Connections" on page 5.

or

Cable

Signal

or

Cable

Signal

Disconnect

Antenna

2

Connect

3

Connect

Antenna

Basic TV  Connection

If you need additional operating assistance after
reading this owner’s manual or to order replace-

ment accessories, please call  

TOLL FREE : 1-800-242-7158

or visit our web site at http://www.funai-corp.com

Precautions

Laser Safety. . . . . . . . . . . . . . . . . . . . . . . . . . . . . . . . . . . . . . . . 2

■ 

Important Safeguards . . . . . . . . . . . . . . . . . . . . . . . . . . . . . . . . 3

Installation Location . . . . . . . . . . . . . . . . . . . . . . . . . . . . . . . . . . 4
Avoid the Hazards of Electrical Shock and Fire . . . . . . . . . . . . . . 4
Moisture Condensation Warning . . . . . . . . . . . . . . . . . . . . . . . . . 4
About Copyright . . . . . . . . . . . . . . . . . . . . . . . . . . . . . . . . . . . . . 4
Symbol Used in This Manual . . . . . . . . . . . . . . . . . . . . . . . . . . . 4
Maintenance . . . . . . . . . . . . . . . . . . . . . . . . . . . . . . . . . . . . . . . 4

Setup

■ 

About the Video Cassettes and Discs . . . . . . . . . . . . . . . . . . . 5

Playable Video Cassettes . . . . . . . . . . . . . . . . . . . . . . . . . . . . . . 5
Playable Discs . . . . . . . . . . . . . . . . . . . . . . . . . . . . . . . . . . . . . . 5
Unplayable Discs . . . . . . . . . . . . . . . . . . . . . . . . . . . . . . . . . . . . 5

■ 

Connections . . . . . . . . . . . . . . . . . . . . . . . . . . . . . . . . . . . . . . . 5

RF Output Channel . . . . . . . . . . . . . . . . . . . . . . . . . . . . . . . . . . 5
Hint for Cable Box or Satellite Box . . . . . . . . . . . . . . . . . . . . . . . 6
Connection to an Audio System . . . . . . . . . . . . . . . . . . . . . . . . . 6
Connection to a TV . . . . . . . . . . . . . . . . . . . . . . . . . . . . . . . . . . 7
Front & Rear Terminals. . . . . . . . . . . . . . . . . . . . . . . . . . . . . . . . 7

■ 

About the Remote Control and Front Panel. . . . . . . . . . . . . . . 8

■ 

VCR/DVD Switching . . . . . . . . . . . . . . . . . . . . . . . . . . . . . . . . . 9

■ 

Preset for Use . . . . . . . . . . . . . . . . . . . . . . . . . . . . . . . . . . . . . 10

Turn on the unit for the first time . . . . . . . . . . . . . . . . . . . . . . . . 10
Clock Set Up . . . . . . . . . . . . . . . . . . . . . . . . . . . . . . . . . . . . . . 10

VCR Functions

■ 

Playback . . . . . . . . . . . . . . . . . . . . . . . . . . . . . . . . . . . . . . . . . 11

■ 

Recording & OTR (One Touch Recording) . . . . . . . . . . . . . . . 11

■ 

Other Operations . . . . . . . . . . . . . . . . . . . . . . . . . . . . . . . . . . 11

■ 

On-Screen Operations . . . . . . . . . . . . . . . . . . . . . . . . . . . . . . 12

■ 

Recording Features . . . . . . . . . . . . . . . . . . . . . . . . . . . . . . . . 12

Timer Recording. . . . . . . . . . . . . . . . . . . . . . . . . . . . . . . . . . . . 12
Hint for Timer Recording. . . . . . . . . . . . . . . . . . . . . . . . . . . . . . 13
Copying a Video Tape. . . . . . . . . . . . . . . . . . . . . . . . . . . . . . . . 13

■ 

MTS System (Multi-Channel Television Sound) . . . . . . . . . . . 13

■ 

Special Features . . . . . . . . . . . . . . . . . . . . . . . . . . . . . . . . . . . 14

Time Search / Index Search / Auto Repeat . . . . . . . . . . . . . . . . 14

DVD Functions

■ 

Playback . . . . . . . . . . . . . . . . . . . . . . . . . . . . . . . . . . . . . . . . . 15

■ 

MP3 Playback . . . . . . . . . . . . . . . . . . . . . . . . . . . . . . . . . . . . . 16

■ 

The On-Screen Display . . . . . . . . . . . . . . . . . . . . . . . . . . . . . . 16

■ 

Search Function . . . . . . . . . . . . . . . . . . . . . . . . . . . . . . . . . . . 17

Track Search  /  Title/Chapter Search / Time Search . . . . . . . . . 17

■ 

Marker Setup. . . . . . . . . . . . . . . . . . . . . . . . . . . . . . . . . . . . . . 17

■ 

Repeat / Random / Programmed Playback . . . . . . . . . . . . . . 18

Repeat Playback / Repeat A-B Playback / 
Random Playback / Programmed Playback. . . . . . . . . . . . . . . . 18

■ 

Special Settings . . . . . . . . . . . . . . . . . . . . . . . . . . . . . . . . . . . 19

Subtitle Language / Audio Language / Camera Angle / 
Black Level Setting / Stereo Sound mode / Virtual Surround . . . . . . . 19

■ 

DVD Set Up . . . . . . . . . . . . . . . . . . . . . . . . . . . . . . . . . . . . . . . 20

LANGUAGE Setting . . . . . . . . . . . . . . . . . . . . . . . . . . . . . . . . . 20
DISPLAY Setting . . . . . . . . . . . . . . . . . . . . . . . . . . . . . . . . . . . 21
AUDIO Setting . . . . . . . . . . . . . . . . . . . . . . . . . . . . . . . . . . . . . 21
PARENTAL Setting . . . . . . . . . . . . . . . . . . . . . . . . . . . . . . . . . . 22
To return the All Selections of SET UP (except for PARENTAL) to the Default Setting 22

Information

■ 

Troubleshooting Guide . . . . . . . . . . . . . . . . . . . . . . . . . . . . . . 23

■ 

Specifications . . . . . . . . . . . . . . . . . . . . . . . . . . . . . . . . . . . . . 24

■ 

Language List . . . . . . . . . . . . . . . . . . . . . . . . . . . . . . . . . . . . . 24

■ 

Limited Warranty . . . . . . . . . . . . . . . . . . . . . . . . . . . . . . . . . . . 24

Quick Use Guide  . . . . . . . . . . . . . . . . . . . . . . . . . . . . . . . . . . .25

Table of Contents

H9611CD(EN).qx33  04.6.29  5:42 PM  Page 1

Содержание CSDV840E

Страница 1: ...scs 5 Unplayable Discs 5 Connections 5 RF Output Channel 5 Hint for Cable Box or Satellite Box 6 Connection to an Audio System 6 Connection to a TV 7 Front Rear Terminals 7 About the Remote Control and Front Panel 8 VCR DVD Switching 9 Preset for Use 10 Turn on the unit for the first time 10 Clock Set Up 10 VCR Functions Playback 11 Recording OTR One Touch Recording 11 Other Operations 11 On Scree...

Страница 2: ...quipment does cause harmful interference to radio or television reception which can be determined by turning the equipment off and on the user is encouraged to try to correct the interference by one or more of the following measures 1 Reorient or relocate the receiving antenna 2 Increase the separation between the equipment and receiver 3 Connect the equipment into an outlet on a circuit different...

Страница 3: ...na Grounding If an outside antenna or cable system is connected to the video product be sure the antenna or cable system is grounded so as to provide some protection against voltage surges and built up static charges Article 810 of the National Electrical Code ANSI NFPA No 70 provides information with regard to proper grounding of the mast and supporting structure grounding of the lead in wire to ...

Страница 4: ...ug and please call our help line mentioned on the front page to locate an Authorized Service Center CLEANING THE CABINET Use a soft cloth slightly moistened with a mild deter gent solution Do not use a solution containing alco hol spirits ammonia or abrasive CLEANING DISCS When a disc becomes dirty clean it with a cleaning cloth Wipe the disc from the center out Do not wipe in a circular motion Do...

Страница 5: ...rmal CD layer can be delivered The sound recorded on the high density Super Audio CD layer cannot be delivered Any other discs without compatibility indications If channel 3 is already occupied for broadcasting 1 Set your TV to channel 4 2 Insert a pre recorded tape into this unit 3 Press the OUTPUT button on the DVD VCR so that the VCR OUTPUT light is lit If noise appears on the TV screen press t...

Страница 6: ... to 2 above Then play back a tape Refer to Playback on page 11 To view one channel while recording another 1 While you are recording on the DVD VCR press the VCR TV but ton 2 At the cable box or satellite box select the channel you want to view ANT OUT ANT IN RF Cable supplied Back of DVD VCR IN OUT E Back of TV Cable Signal Connection A Cable box or Satellite box ANT OUT ANT IN RF Cable supplied ...

Страница 7: ...r etc here S VIDEO OUT jack Connect an optional S Video cable here through the S video in jack of a televi sion DVD only COMPONENT VIDEO OUT jacks Connect optional component video cables here through the component video in jacks of a television DVD only Front Rear Terminals DIGITAL AUDIO OUT COAXIAL ANT OUT ANT IN AUDIO OUT DVD VCR DVD VCR S VIDEO OUT COMPONENT VIDEO OUT AUDIO IN VIDEO IN AUDIO OU...

Страница 8: ...ame at a time To advance playback one frame at a time To pause disc playback To pause disc playback To pause tape playback or recording To stop playback To stop playback To stop playback or recording To skip chapters To skip tracks To return to the top file of the highest hierarchy in the program and MP3 menu MP3 To change channels To adjust the tracking manually during playback To begin disc play...

Страница 9: ...CR button Press the VCR button on the remote control Verify that the VCR OUTPUT light is lit VCR MODE Note Pressing only the OUTPUT button on the front panel DOES NOT switch the mode of the remote control You MUST select the correct mode on the remote control Press the DVD button on the remote control Verify that the DVD OUTPUT light is lit DVD MODE OPEN CLOSE STOP EJECT PLAY REC OTR TIMERREC F FW...

Страница 10: ... memo rized in this unit by using the CHANNEL buttons If AUTO SET UP appears on the TV screen again check the cable connections Then press the B button once again Y Yes es Press the MENU button to exit Refer to Hint for Cable Box or Satellite Box section on page 6 Do you connect the cable from the cable box or the satellite box to the DVD VCR s ANT IN jack YES NO Turn on the unit for the first tim...

Страница 11: ...While you are recording on the DVD VCR press the VCR TV button 2 At the cable box or satellite box select the channel you want to view If you have connect ed the DVD VCR to a cable box or satel lite box refer to Hint for Cable Box or Satellite Box section on page 6 STOP EJECT A You can select a fixed recording time by press ing the REC OTR button repeatedly To cue or review picture during playback...

Страница 12: ...EC SPEED AM B PM Select AM or PM 7 7 Repeat the procedure in steps 5 and 6 to set the end time Select the desired channel Timer Recording If you have connected the DVD VCR to a cable box or satellite box as the Connection A on page 6 select the VCR to channel 3 or 4 the RF output channel of the VCR Then select the desired channel at the cable box or satellite box Leave the cable box or satellite b...

Страница 13: ...ity shielded cables with RCA type connectors Standard audio cables are not recommended You can use a video disc player satellite receiver or other audio video component with A V outputs L1 or L2 is found before the lowest memorized channel Example CH02 L2 input jacks are on the front of this DVD VCR Copying a Video Tape 13 If there is a power failure or the DVD VCR has been unplugged for more than...

Страница 14: ... SELECT Hint Hint To cancel Auto Repeat follow steps 1 2 above Then press the B button so that OFF appears beside AUTO REPEAT Press the CLEAR C RESET button to exit If menu remains on the TV screen at step 3 press the CLEAR C RESET button to exit You can repeat playback of a whole tape automatically Insert a tape into this unit VCR VCR VCR Pro 1 Pro 2 Pro 3 Pro 4 Pro 5 02 01 01 02 03 Beginning of ...

Страница 15: ...on Resume message will appear on the TV screen Press the PLAY button play back will resume from the point at which playback was stopped To cancel resume press the STOP button one more time during the Stop mode For MP3 playback will resume from the beginning of the track at which playback was stopped Paused and Step by Step Playback Press the PAUSE button during playback T To contin o continue pla ...

Страница 16: ...ALL Current track number Total tracks Elapsed time of the current chapter Remaining time of the current chapter Elapsed time of the current title Remaining time of the current title Layer numbers appears only when playing a two layered Disc L0 Layer 0 is playing L1 Layer 1 is playing DVD MP3 MP3 TRACK 01 1 36 0 01 15 T The name of the file currently in play will be displayed Current Repeat setting...

Страница 17: ...or single digit tracks 1 9 press a single number eg track 3 press 3 To play track 26 press 10 2 6 of the Number buttons Using the SEARCH Using the SEARCH MODE MODE b button utton 1 1 Track Search Using the n Using the number b umber buttons uttons DVD MP3 MP3 CD CD 1 1 2 2 Within 30 seconds 29 29 29 Title Chapter Search Using the SEARCH Using the SEARCH MODE MODE b button utton DVD DVD V DVD V 1 1...

Страница 18: ... Your programs are still stored until either the disc tray is open or power is turned off To repeat the current track in the pro gram press the REPEAT button repeatedly until TRACK appears during playback To repeat the entire program press the REPEAT button repeatedly until ALL appears during playback You may determine the order in which tracks will play DVD MP3 MP3 CD CD 1 1 REPEAT PLAY TRACK ALL...

Страница 19: ...e during CD playback DVD CD CD 1 1 STEREO AUDIO PLAY Each time you press the AUDIO button Stereo Sound mode Camera Angle This unit allows you to select a subtitle language if available during DVD play back DVD DVD V DVD V 1 1 1 ENG 6 SUBTITLE T SET PLAY ENG FRE OFF English subtitles French subtitles no subtitles Each time you press the SUBTITLE T SET button subtitle languages change For example Su...

Страница 20: ...isplay QUICK ENTER ENTER SETUP SETUP PARENTAL PASSWORD Please enter a 4 digit password SETUP AUDIO DRC DOWN SAMPLING DOLBY DIGITAL ON ON ON SETUP DISPLAY TV ASPECT STILL MODE ANGLE ICON AUTO POWER OFF 4 3 LETTER BOX AUTO ON ON SETUP LANGUAGE AUDIO SUBTITLE DISC MENU PLAYER MENU ORIGINAL OFF ENGLISH ENGLISH 2 2 Select the desired item 1 1 SETUP QUICK CUSTOM INITIALIZE SETUP STOP SETUP QUICK PLAYER ...

Страница 21: ...R OFF ON TV ASPECT 4 3 LETTER BOX STILL MODE AUTO ANGLE ICON ON AUTO POWER OFF ON 4 3 LETTER BOX AUTO ON OFF TV ASPECT 4 3 LETTER BOX STILL MODE AUTO ANGLE ICON ON AUTO POWER OFF ON 4 3 LETTER BOX AUTO OFF ON Select the desired setting or ENTER ENTER STILL MODE Default AUTO See Hint to the right TV ASPECT 4 3 LETTER BOX STILL MODE AUTO ANGLE ICON ON AUTO POWER OFF ON STILL MODE AUTO FIELD FRAME Se...

Страница 22: ...ral children can be played back Levels 7 to 2 Only DVD softwares intended for general use and chil dren can be played back Level 1 Only DVD softwares intended for children can be played back with those intended for adult and general use pro hibited 4 4 or Select PARENTAL LEVEL Enter your desired four digit password except for 4737 D PARENTAL menu 1 2 3 4 5 6 7 8 9 0 CHANGE PARENTAL LEVEL ALL 7 7 S...

Страница 23: ...py guard protection making a copy of a video tape Cannot remove the tape Check if this unit is in the VCR mode If not press the VCR button on the remote control to switch the mode No picture Connect the video cables firmly Insert a correct video disc that plays on this unit Press the DVD button on the remote control Check if the DVD OUTPUT light is lit Then try other DVD features Disc cannot be pl...

Страница 24: ...sh FUNAI CORP will repair this product free of charge in the CANADA in the event of defect in materials or workmanship as follows DURATION PARTS FUNAI CORP will provide parts to replace defective parts without charge for one 1 year from the date of original retail purchase Two 2 years for Picture Tube Certain parts are excluded from this warranty LABOR FUNAI CORP will provide the labor without cha...

Страница 25: ...e OUTPUT button on the front panel DOES NOT switch the mode of the remote control You MUST select the correct mode on the remote control Press the DVD button on the remote control Verify that the DVD OUTPUT light is lit DVD MODE 2 2 LANGUAGE SELECT B ENGLISH ON FRANCAIS ESPAÑOL 1 1 Turn on the TV and set it to channel 3 If channel 3 is already occupied for broadcasting see RF Output Channel sectio...

Страница 26: ...s To search track To search time CD To rapidly return to a location of disc Search the markers CD To select the recording speed To select channel The 10 button has no effect in VCR mode To clear the markers To clear the markers CD To remove status No in program input To clear the numbers entered incorrectly To clear the numbers entered incorrectly To exit the VCR Menu To reset the tape counter To ...

Страница 27: ...îne de sortie RF 5 Conseils pour les connexions avec boîte de raccordement câble ou satellite 6 Raccordement à un système audio 6 Raccordement à un téléviseur 7 Bornes avant arrière 7 À propos de la télécommande et du panneau avant 8 Commutation Magnétoscope Lecteur DVD 9 Préréglages 10 Première mise sous tension de l appareil 10 Réglage de l horloge 10 Fonctions de magnétoscope Lecture normale 11...

Страница 28: ...ons radio Il n est cependant pas garanti que des interférences ne seront pas pro duites dans une installation particulière Si cet appareil cause des interférences préjudiciables à la réception de la radio ou de la télévision ce qui peut être déterminé en le mettant hors puis à nouveau sous tension il est recommandé à l utilisateur de corriger ces interférences en appliquant une ou plusieurs des me...

Страница 29: ...x endroits où les câbles sortent des appareils 13 MISE À LA MASSE D UNE ANTENNE EXTÉRIEURE Si une antenne extérieure ou un réseau de câblodistribu tion est raccordé à cet appareil veiller à ce que l antenne ou le câble du réseau de câblodistribution soit relié à la terre pour éviter une surtension du raccordement et des surcharges statiques L article 810 du Code national de l électricité CNE ANSI ...

Страница 30: ... mode d emploi pour vous procurer l adresse du cen tre de réparation autorisé le plus proche NETTOYAGE DU COFFRET Utiliser un chiffon doux imbibé d une solution déter gente douce Ne pas utiliser de solution contenant de l alcool de l ammoniac ou des abrasifs NETTOYAGE DES DISQUES Quand un disque est sale le nettoyer avec un chif fon de nettoyage Essuyer le disque du centre vers sa périphérie Ne ja...

Страница 31: ...ues et des cassettes vidéo Disques lisibles Disques ne pouvant pas être lus Seule la piste de son sera lue sur les disques suivants l image ne sera pas affichée CDV CD G NE JAMAIS lire les disques suivants Des dysfonctionnements graves pourront en effet être provoqués dans ce cas DVD RAM DVD avec un code régional différent de 1 ou ALL CD I DTS CD Photo CD DVD ROM pour ordinateurs personnels CD vid...

Страница 32: ... voir Pour lire une cassette Reprendre les étapes 1 et 2 ci dessus Lire ensuite une cassette Consulter le paragraphe Lecture normale à la page 11 Pour regarder une chaîne tout en enregistrant une autre 1 Pendant l enregistrement sur le Lecteur DVD Magnétoscope appuyez sur la touche VCR TV afin de 2 Choisir la chaîne que vous désirez voir sur la boîte de raccordement câble ou satellite ANT OUT ANT ...

Страница 33: ... vidéo etc Jack S VIDEO OUT Brancher ici un câble S Vidéo vers le jack d entrée S Vidéo sur votre téléviseur DVD uniquement Jacks COMPONENT VIDEO OUT Brancher ici les câbles vidéo à composants en option vers les jacks d entrée vidéo à composants de votre téléviseur DVD uniquement Bornes avant arrière DIGITAL AUDIO OUT COAXIAL ANT OUT ANT IN AUDIO OUT DVD VCR DVD VCR S VIDEO OUT COMPONENT VIDEO OUT...

Страница 34: ...lecture d une piste ou d un disque CD Pour répéter la lecture d une piste d un groupe ou d un disque MP3 Pour activer désactiver le niveau des noirs Pour construire une liste de lecture ou lancer une lecture aléatoire Pour afficher le mode de disque actuellement choisi Pour afficher l heure actuelle la durée de la cassette et la chaîne Pour sélectionner directement de chapitre ou de titre Pour sél...

Страница 35: ...la télécommande Vérifier que le témoin VCR OUTPUT est allumé MODE MAGNÉTOSCOPE Remarque Appuyer uniquement sur la touche OUTPUT du panneau frontal NE PERMET PAS de bas culer entre ces deux modes Le mode correct doit AUSSI TOUJOURS ÊTRE sélectionné sur la télécommande Appuyer sur la touche DVD sur la télécommande Vérifier que le témoin DVD OUTPUT est allumé MODE DVD COMMUTATION MAGNÉTOSCOPE LECTEUR...

Страница 36: ...ce à l aide des touches CHANNEL Si le message RÉGLAGE AUTO s affiche à l écran du téléviseur vérifier les branche ments des câbles Appuyez ensuite sur la touche B à nouveau Oui Oui Appuyez sur la touche MENU pour sortir du menu Se reporter au paragraphe Conseils pour les connexions à boîte de rac cordement câble ou satellite page 6 Les raccordements passent ils par la boîte de rac cordement câble ...

Страница 37: ...nt Pour geler l image sur l écran du téléviseur pendant la lecture mode figé Appuyer sur la touche PAUSE STILL À chaque pression sur la touche l image avancera d une trame Si l image commence à vibrer verticalement la stabiliser en appuyant sur les touches CHANNEL Si l image est déformée ou bouge verticalement ajuster le réglage de déformation verticale si votre téléviseur en est équipé Réinitiali...

Страница 38: ...Sélectionner le jour voulu PROGRAMME UNIQUE NO DE PROG 4 DATE 0 5 0 3 LUN DEBUT FIN CHAINE VITESSE 1 1 MENU B PROGRAMMATION REP AUTO HF REGLAGE CHAINES REGLAGE HORLOGE SELECTION LANGUE MENU Sélectionner un numéro de programme libre Sélectionner NORMAL QUOTIDIEN Lun Ven ou HEBDO 5 5 Sélectionner l heure du démar rage de l enregistrement heure Sélectionner les minutes PROGRAMME UNIQUE NO DE PROG 4 D...

Страница 39: ...DVD MAGNÉTOSCOPE ou si elle n a pas de languette de sécurité le témoin TIMER REC clignotera et l enregistrement avec minuterie sera inopérant Insérer une vidéocassette enregistrable Si la bande arrive à sa fin pendant l enregistrement avec minuterie le Lecteur DVD MAGNÉTOSCOPE s ar rête éjecte la vidéocassette et passe automatiquement au mode DVD alors que le témoin TIMER REC clig note Si le lecte...

Страница 40: ...ur la touche B pour faire s afficher HF à côté de REP AUTO Appuyer sur la touche CLEAR C RESET pour le quitter Si le menu reste affiché sur l écran du téléviseur au niveau de l étape 3 appuy er sur la touche CLEAR C RESET pour le quitter Il est possible de configurer une répétition automatique de la cas sette en entier Introduire une cassette dans l ap pareil VCR VCR VCR Pro 1 Pro 2 Pro 3 Pro 4 Pr...

Страница 41: ... sur l écran du téléviseur Appuyer sur la touche PLAY la lecture reprendra au point où elle avait été arrêtée Pour annuler la reprise appuyer sur la touche STOP encore une fois Pour les MP3 la lecture reprendra à partir du début de la piste au cours de laquelle la lecture a été arrêtée Pause et lecture pas à pas Appuyer sur la touche PAUSE pendant la lec ture P Pour quitter la lecture pas à pas ou...

Страница 42: ...tre en cours de lecture Durée écoulée du titre en cours de lecture Durée restante du titre en cours de lecture Numéro de couche s affiche uniquement pour les disques à plusieurs couches L0 La couche 0 est en cours de lecture L1 La couche 1 est en cours de lecture DVD MP3 MP3 PISTE 01 1 36 0 01 15 T Le nom du fichier en cours de lecture sera affiché État de la répétition ne s affiche que si cette f...

Страница 43: ...i dessus s affiche Pour les numéros de pistes à un seul chiffre appuyer sur un seul numéro par exemple le 3 pour la piste n 3 Pour lire la piste n 26 par exemple appuyer sur 10 2 et 6 À l aide de la touc À l aide de la touche SEARCH MODE he SEARCH MODE 1 1 Recherche par piste À l aide des touc À l aide des touches n hes numériques umériques DVD MP3 MP3 CD CD 1 1 2 2 Dans les 30 secondes 29 29 29 R...

Страница 44: ...ateau de disque ou la mise hors tension de l appareil Pour répéter une piste pendant une lecture aléatoire appuyer à plusieurs reprises sur la touche REPEAT jusqu à ce que PISTE s affiche Pour répéter l ensemble de la sélection aléatoire appuyer à plusieurs reprises sur la touche REPEAT jusqu à ce que TOUT s affiche Il est possible de programmer une liste de lecture des pistes DVD MP3 MP3 CD CD 1 ...

Страница 45: ...ction ner le mode stéréo pour lire un CD DVD CD CD 1 1 STÉRÉO AUDIO PLAY À chaque pression sur la touche AUDIO Mode de son stéréo Angle de la caméra Cet appareil vous permet de sélection ner la langue des sous titres utilisés pendant la lecture d un DVD si toute fois cette fonction est disponible DVD DVD V DVD V 1 1 1 ENG 6 SUBTITLE T SET PLAY ENG FRE HF sous titres en anglais sous titres en angla...

Страница 46: ...ermet de configurer la langue d affichage à l écran RAPIDE ENTER ENTER SETUP 2 2 Sélectionner l élément désiré SETUP STOP Men Menu CONF u CONF RAP RAP ou Se reporter aux paragraphes MENU DU LECTEUR ASPECT TV ou DOLBY DIGI TAL pages 20 à 21 Il est possible de modifier la configuration du Lecteur de DVD MENU DE CONFIGURATION Il est possible de sélectionner le MENU DU LECTEUR ASPECT TV ou DOLBY DIGIT...

Страница 47: ...BOX AUTO EF HF ASPECT TV 4 3 LETTER BOX ARRÊT SUR IMAGE AUTO ICÔNE DE L ANGLE EF ARRÊT AUTO EF 4 3 LETTER BOX AUTO HF EF ASPECT TV 4 3 LETTER BOX ARRÊT SUR IMAGE AUTO ICÔNE DE L ANGLE EF ARRÊT AUTO EF Sélectionner la valeur voulue ou ENTER ENTER ARRÊT SUR IMAGE Par défaut AUTO Voir le conseil ci contre ARRÊT SUR IMAGE AUTO TRAME IMAGE ASPECT TV 4 3 LETTER BOX ARRÊT SUR IMAGE AUTO ICÔNE DE L ANGLE ...

Страница 48: ... Seule la lecture des supports DVD pour enfants peut être effectuée ceux conçus pour les adultes et pour une utilisation générale sont interdits ou Sélectionner NIVEAU PARENTAL Saisir un mot de passe à qua tre chiffres que vous avez choisi mis à part le 4737 D Menu PARENT 1 2 3 4 5 6 7 8 9 0 NIVEAU PARENTAL TOUT CHANGEMENT 7 7 SETUP 6 6 ENTER ENTER ou Sélectionner les niveaux désirés NIVEAU PARENT...

Страница 49: ...sser en mode VCR Vérifier si le témoin VCR OUTPUT vert est allumé Puis régler à la position TÉLÉVISEUR TV en appuyant sur la touche VCR TV Lavidéooulacouleurapparaît ou disparaît Une cassette sous copyright ne peut pas être copiée C est la protection contre la copie qui opère graduellementpendant la copie d une cassettevidéo Retrait de la cassette impossible Vérifier si le Lecteur de DVD MAGNÉTOSC...

Страница 50: ...çon comme suit DURÉE PIÉCES FUNAI CORP fournira les pièces pour remplacer les pièces défectueuses à titre gratuit pendant un 1 an à partir de la date d achat au détail d origine Deux 2 ans pour le tube image Certaines pièces sont exclues de cette garantie MAIN D ŒUVRE FUNAI CORP fournira la main d œuvre à titre gratuit pendant une période de quatre vingt dix 90 jours à partir de la date d achat au...

Страница 51: ...ppuyer sur la touche OUT PUT du panneau avant de l unité NE SUFFIT PAS à faire basculer le mode de la télécommande Il FAUT OBLIGA TOIREMENT sélectionner le bon mode sur la télécommande Appuyer sur la touche DVD sur la télé commande Vérifier que le témoin DVD OUTPUT est allumé MODE DVD 2 2 LANGUAGE SELECT ENGLISH B FRANCAIS ON ESPAÑOL 1 1 Allumer le téléviseur puis choisir la chaîne n 3 Si la chaîn...

Страница 52: ...is du disque Pour rechercher un marqueur précis CD Pour allumer ou éteindre l appareil Pour démarrer l enregistrement Pour passer au menu de recherche par index ou horaire Pour sélectionner le mode de sortie DVD Pour activer la télécommande en mode DVD Pour sélectionner le mode de sortie DVD Pour activer la télécommande en mode DVD Pour répéter la lecture d un chapitre ou d un titre Pour répéter l...

Отзывы: