Symmons DURO ACTIVESENSE S6360B, Installation And Maintenance Manual
The Symmons DURO ACTIVESENSE S6360B is a state-of-the-art showerhead designed for a premium shower experience. To ensure proper installation and maintenance, we offer an easy-to-use Installation And Maintenance Manual. Download this manual for free from our website and discover everything you need to know about maximizing the performance of your showerhead.
Share
Download


Reviews:
No comments
Related manuals for DURO ACTIVESENSE S6360B

BS-NA3801
Brand: Nadoli Pages: 8
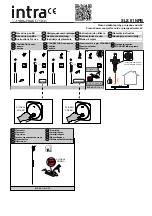
Piezo SLS 01NPB
Brand: Intra Pages: 6

ChekPoint EC-3103
Brand: T&S Pages: 35

Locarno 04853 0 Series
Brand: Hans Grohe Pages: 24

noken Giro 100090133
Brand: Porcelanosa Pages: 6

Raindance C Series
Brand: Hans Grohe Pages: 40

PuraVida 27414 1 Series
Brand: Hans Grohe Pages: 24

Mirror Demister
Brand: Tranquility Bathroomware Pages: 2

K-98740
Brand: Kohler Pages: 44

AXOR Citterio 39834 0 Series
Brand: Hans Grohe Pages: 16

Axor Citterio 39414 1 Series
Brand: Hans Grohe Pages: 36

SEA008
Brand: Cassellie Pages: 2

BST571
Brand: Fontana Showers Pages: 10

DK
Brand: Svedbergs Pages: 4

44 CR 5271
Brand: Fiore Pages: 7

Amico
Brand: vismaravetro Pages: 8

original6
Brand: KUDOS Pages: 5

ULTIMATE 1 Series
Brand: KUDOS Pages: 6


