

To begin using your Symantec Security Platform (SSP) appliance, complete the
following steps in order. For additional instructions, including safety information,
see the SSP-S410 and ISG guides
,
available at:
1 Unpack the Appliance
Verify the contents of the shipping package for your appliance: (2) C13-to-C14
AC power cords; (1) RJ45-to-DB9 null modem serial cable; slide-rail kit;
Quick
Start Guide
(this document); Software License Agreement; and Hardware
Warranty Information.
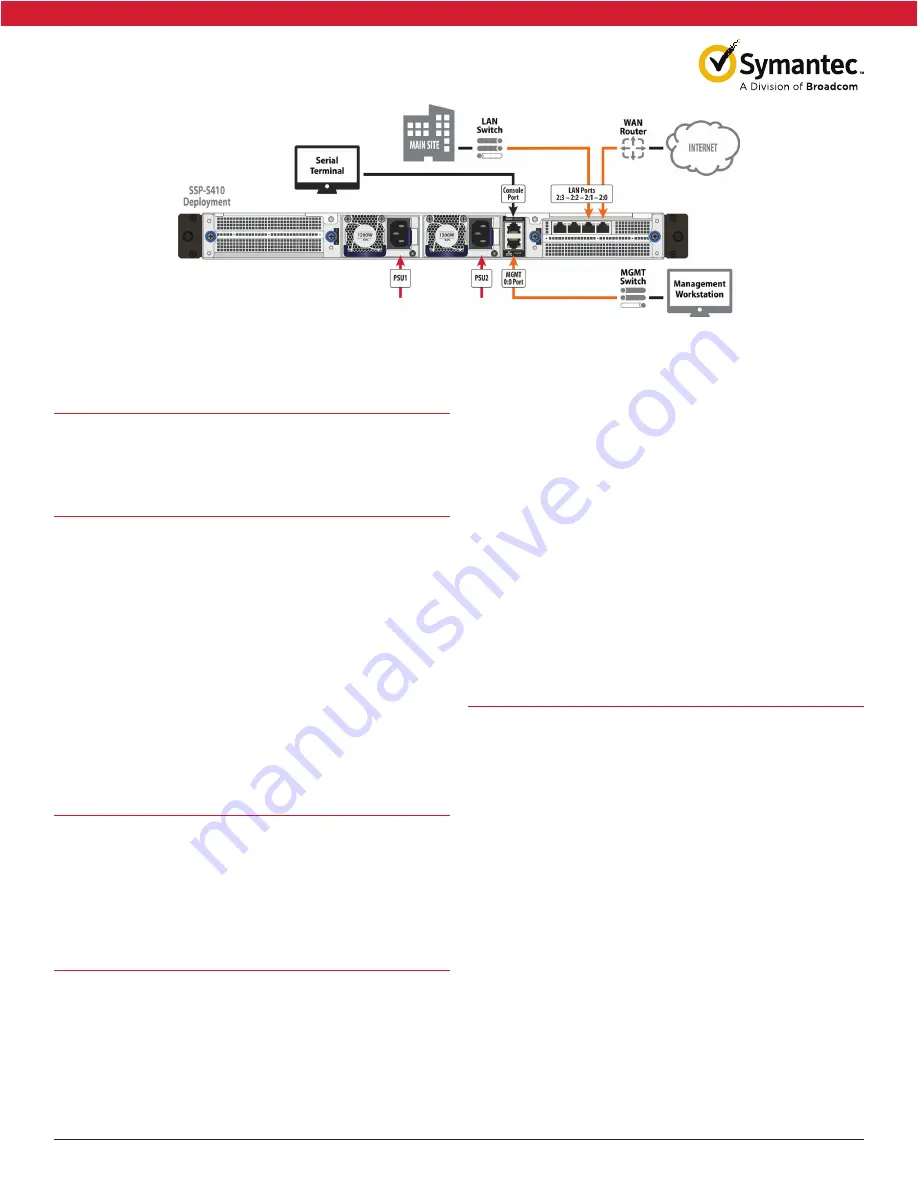
2 Connect Cables
Note:
If you would rather mount the appliance before configuring it, skip to
Step 7—Mount the Appliance
and then come back and proceed from this step.
a.
Connect Ethernet cables from the appliance to the following devices.
•
Appliance
LAN
(2:0) port to WAN router (Internet)
•
Appliance
LAN
(2:1) port to LAN switch (main site)
•
Appliance
MGMT
(0:0) port to management switch (workstation)
b.
Connect the RJ45 end of the included null modem serial cable to the appli-
ance’s
Console
port. Connect the other DB9 end of the cable to a serial ter-
minal or workstation with terminal emulation software (a DB9-to-RJ45 rollover
adapter may be necessary).
c.
Connect the included power cords to the appliance’s
PSU1
and
PSU2
inlets
and connect the other ends to a valid power source.
Note:
Ethernet cables are not included with the appliance. Use only straight-
through Ethernet cables, category 5E or better for 1000Base-T operation,
category 6A for 10GBase-T operation.
3 Power on the Appliance and Verify LEDs
a.
If the appliance does not automatically power on after connecting to a power
source, press the soft power switch on the front panel.
b.
As the appliance boots, verify the following:
•
The
Power LED
turns amber.
•
Near the end of the boot cycle, the
Power LED
alternates between amber
and green, indicating an unconfigured state.
•
After initialization (see
Step 4
), the
Power LED
will turn green.
4 Initialize the SSP Host Appliance
a.
Confirm the appliance’s
Console
port is connected to a serial terminal or
workstation with terminal emulation software.
b.
Open a terminal emulation program, such as HyperTerminal
®
, PuTTY, or Tera
Term and configure it to use the following settings:
• Baud rate:
9600 bps
• Data bits:
8
• Flow control:
none
• Parity:
none
• Stop bits:
1
c.
When prompted, press
Enter
three times.
d.
To initialize the host appliance, perform the following steps.
•
On the
Menu
screen, press
2
to open the Setup Console.
•
Enter the
IP address
,
IP subnet mask
,
IP gateway
, and
DNS server
for
the appliance’s network ports.
•
Specify the
console password
and
enable password
. Press any key to
activate and return to the serial console.
e.
To access privileged commands on the host appliance, enter:
localhost#
enable
Enable Password: <host-enable-password>
f.
To install a license on the host appliance, perform the following steps.
•
On the
Menu
screen, press
1
to open CLI.
•
For node-locked licenses, enter:
licensing load id
<serial-number>
•
For ISG application licenses, enter:
licensing load id
<isg-license>
Note:
You can locate your serial number or ISG license in the e
Fulfillment
Letter
you received from Broadcom at the time of purchase.
g.
To install application images on the host appliance, perform the following steps.
localhost#
config
localhost(config)#
images
localhost(config-images)#
load
<url>
Note:
Application images have a .bcsi extension and are available for down-
load from:
support.broadcom.com/security
5 Add ISG Applications
a.
Confirm the appliance’s
Console
port is still connected to the serial terminal
and that the terminal software is configured as in
Step 4
.
b.
On the
Menu
screen, press
1
to open CLI.
c.
To access privileged commands on the host appliance, enter:
localhost#
enable
Enable Password: <host-enable-password>
d.
To add an ISG application, enter:
localhost#
config
localhost(config)#
applications
localhost(config-applications)#
create
<app-type>
image-id
<app-image>
model
<app-model>
license-id
<id> <app-name>
Note:
To add a ProxySG application, enter
sg
as the app-type. To add a
CAS application, enter
cas
as the app-type. See your e
Fulfillment
Letter
to verify the number and type of ISG applications and models that can be
installed on your host appliance.
e.
To start an ISG application, enter:
localhost(config-applications)#
start
<app-name>
localhost(config-applications)#
attach-console
<app-name>
f.
When prompted, press
Enter
three times.
g.
Use the Configuration Wizard to initialize the ISG application.
•
Press
a
to proceed with Manual Setup.
•
Enter the
IP address
,
IP subnet mask
,
IP gateway
, and
DNS server
for
the appliance’s network ports.
•
Specify the
console password
and
enable password
.
Broadcom, the pulse logo, Connecting everything, Avago Technologies, Avago, the A logo, Symantec, the Symantec logo, the Checkmark logo, Blue Coat, and the Blue Coat logo are among the trademarks of Broadcom and/or its affiliates
in the United States, certain other countries, and/or the EU. Copyright © 2020 Broadcom. All Rights Reserved. The term “Broadcom” refers to Broadcom Inc. and/or its subsidiaries. For more information, please visit
Symantec Security Platform
SSP-S410 Quick Start Guide


