background image

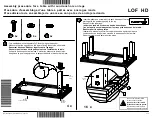
ASSEMBLY INSTRUCTIONS 

ITEM# L-GZ798PST-E 

IMPORTANT

Production Number: xxxx

xx

xxxx

Thank you very much for choosing Sunjoy Group. 
Please take time to read these instructions thoroughly and follow each step carefully for safe and easy 
operation. Keep this manual for future reference. 
We  would like to hear from  you with any comments  or suggestions.  You can call us  toll-free 
at 

1-866-578-6569 

anytime

 24 hours / 7 days a week

For further assistance , please write to us at


[email protected]

Summary of Contents for L-GZ798PST-E

Page 1: ... read these instructions thoroughly and follow each step carefully for safe and easy operation Keep this manual for future reference We would like to hear from you with any comments or suggestions You can call us toll free at 1 866 578 6569 anytime 24 hours 7 days a week For further assistance please write to us at customer care sunjoygroup com ...

Page 2: ...g or damage to the item which could also result in injury Center hook s maximum weight capacity is 26 lbs WARNING Keep all flame and heat sources away from the tent fabric This tent is made with fabric that meets CPAI 84 specifications for flame resistance It is not fire proof The fabric will burn if left in continuous contact with any flame source The application of any foreign substance to the t...

Page 3: ...ner Panel Long Cross Beam 1 Long Cross Beam 2 Short Cross Beam 1 Short Cross Beam 2 Oblique Beam Long Middle Beam Short Middle Beam Bottom Long Middle Beam Bottom Short Middle Beam Bottom Oblique Beam 1 Bottom Oblique Beam 2 Big Roof Connector Hook Small Roof Oblique Beam Small Roof Connector Corner Shelf Big Canopy A B C D E F G1 G2 H I J1 J2 K L M N O P 4 2 2 2 2 4 2 2 2 2 2 2 1 1 4 1 4 1 Parts ...

Page 4: ...ross Beam 2 C E intoLong Short Cross Beam 1 B D tighten with Knob S Fig 3 Insert the assembled Cross Beam B C D E into Corner Panel A Hardware Pack 1 Small Canopy Q 1 Mosquito netting R 1 Knob S 12 P00152B06011 P00332B01903 P90804A07001 Part NO QTY CS NO Image Description ...

Page 5: ... Beam G1 and Short Middle Beam G2 into the big Roof Connector K attached the Hook L on the big Roof Connector K Fig 9 Insert the assembled bottom middle beams H I into the Cross Beam E C tighten with Knob S place the Big Canopy P to the roof do not spread it Fig 10 Insert the Small Roof Oblique Beam M into the Small Roof Connector N Fig 11 Attach Small Canopy Q to the small roof along the Small Ro...

Page 6: ...ttom Oblique Beam J1 J2 aligning the corners and stretching it to fit Fig 14 Place Corner Shelves O onto Corner Panels A as desired Fig 15 Hang Mosquito netting R to the Cross Beams B C D E by using Plastic Ring AA Fig 16 Secure the assembled gazebo to lawn with stakes BB through the bottom of corner panels A Part NO QTY CS NO Image Description ...

Page 7: ...aterials and workmanship of your item provided the item is maintained with care and used only for personal residential purposes The item is warranted to be free from defects in material or workmanship for a period of one 1 year We don t reimburse for transportation or delivery costs or compensate the individual or any outside party for assembling or disassembling the product Exclusions Items used ...

Reviews: